Do some googling and you’ll see benchmarks and YouTube videos showing Final Cut Pro X to be not just faster, but many times faster than other NLEs at importing, playback and export. However, you’ll also hear some reports from folks who have had the opposite experience.
If you’ve experienced slowness, or are looking to squeeze more speed from FCP X this article is for you. This article continues the series that began with How to recognize and fix 11 common problems in Final Cut Pro X.
Symptom #1 FCP X is just plain slow, all the time, doing everything.
Diagnosis: Your Mac is ancient
The requirements for Final Cut Pro X are not extreme. In fact, I have a 2007 iMac in my office running FCP X 10.2.3 that edits just fine using proxy over our NFS network. But if I’m expecting it to use a keyer, stabilization, and 5 animated titles without rendering, then I’m delusional.

When Apple was “aiming where the puck is going to be” with FCP X, hardware was as in the picture. GPU and storage performance has skyrocketed in the last few years and FCP X has leveraged it. So for the most part if you expect a fluid editing experience from a “stock” Mac realized before FCP X (2011) you’re likely to be frustrated.
Prescription
A shiny new 5K iMac with SSD or a cylindrical Mac Pro will make FCP X sing. But your older Mac might just benefit from an upgrade.
Upgrading storage & memory
To boost FCP X performance add as much memory (RAM) as your Mac can handle (16GB is good, 32GB is great) and swap out your startup drive with an SSD.
Just last week, I helped a buddy who thought his 2010 iMac was a goner because of its sluggish performance. With a kit and instructional videos from Other World Computing, I helped him upgrade to a 1TB internal SSD. When he opened up FCP X and scrubbed through some projects (spots for a major toy retailer), he was flabbergasted. He texted me later to say “this computer’s a-blazin’!”
Upgrade your GPU
Easily upgrading an internal GPU in recent Macs is unfortunately not possible without significant DIY skills. If you have a Mac Pro tower (pre-2013) you do have several choices (this is a good place to start) and FCP X can even utilize 2 GPUs as this forum thread discusses. For recent Macs with Thunderbolt 2 or 3, you have even more choices. External GPUs (eGPUs) are just coming to market, with the first offerings like these provide an amazing boost to FCP X. The newest macOS release, Sierra, has eGPU capabilities built-in, so be sure to keep your eye on their development. They’re sure to be a game-changer.
Upgrading to a new a Mac
If you decide to buy new, I would recommend buying as much machine as you can possibly afford. Don’t skimp. Get a Mac with fast storage (see Symptom #2 below for more on this), memory (16GB or more) and a dedicated GPU (not integrated). Sure a Mac Mini, MacBook or MacBook Air can run FCP X. But if you are a pro, you need something with more gusto.
Symptom #2 Slow response when trimming & moving clips, delay when starting playback
Diagnosis: Poor storage
I can’t emphasize enough what a big deal storage performance is. You can have the latest CPU and GPU but poor storage will bring FCP X to a standstill. Final Cut Pro X is different when it comes to NLEs as it relies on storage during editing. In fact, every operation you perform is immediately saved to an FCP X Library database. While this means you won’t lose your edits in case of a power outage or a crash, and you can export and make changes to the same timeline concurrently (this feature blows my mind), this also means FCP X Libraries (and caches) shouldn’t be stored on any old drive.

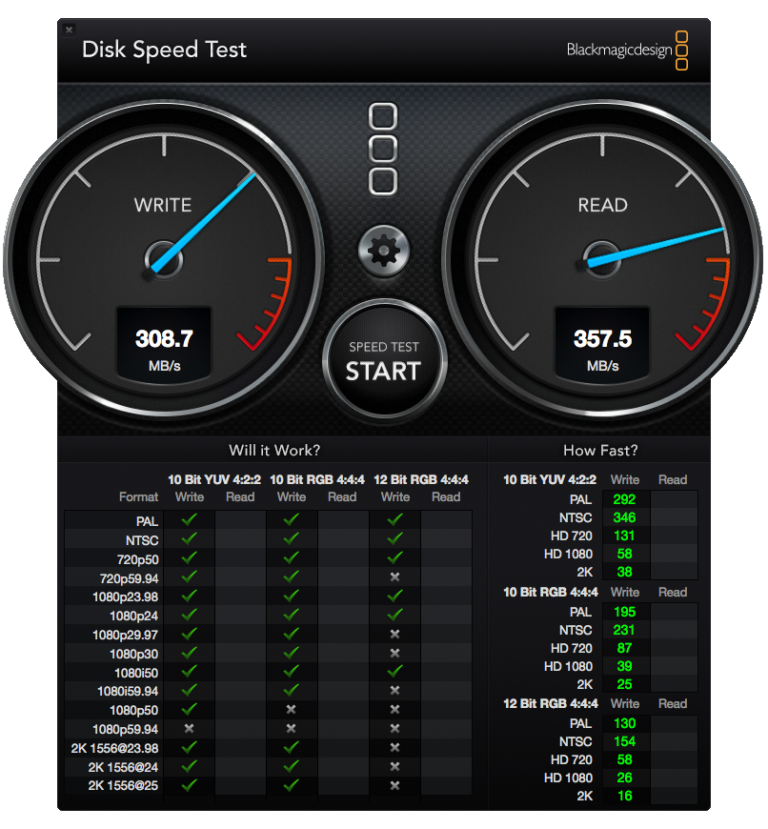
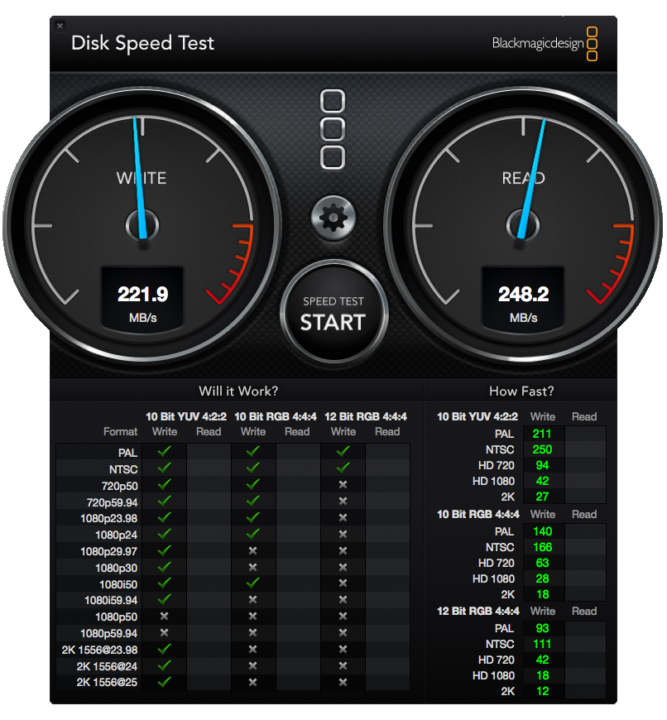
FCP X Libraries perform best when located on storage which can write and read tiny chunks of data (small random reads and writes) very fast—which is what you need when editing. Unfortunately the most popular apps we use for benchmarking our drives measure the opposite. BlackMagic Disk Speed Test and AJA System Test test large chunks of data (large sequential reads and writes)—measuring what is needed when playing back media but not necessarily storing your Library.
When an FCP X Library is accessed on slow performing storage, editing is like trudging through the mud. To show you what a significant effect the wrong storage can have here is a video I made a while back when I realized the old RAID I had for many years was causing my FCP X editing slowdowns.
Prescription
Storing your FCP X Library and Cache on an SSD or other solid-state storage will make FCP X sing. A properly optimized spinning disk RAID 0, or 5 connected via Thunderbolt, NFS or even USB3 will also give great performance. To find out if your storage is causing slowdowns there are several handy tools that can help.
Real world testing for FCP X Library storage
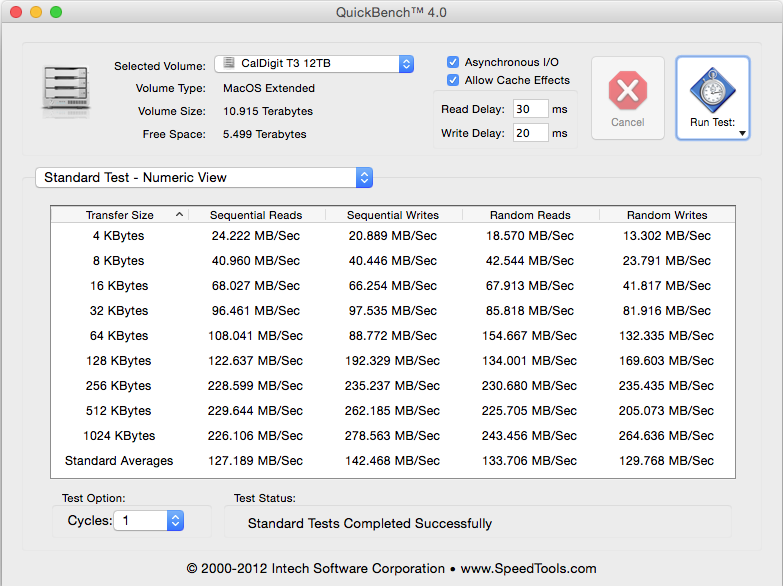
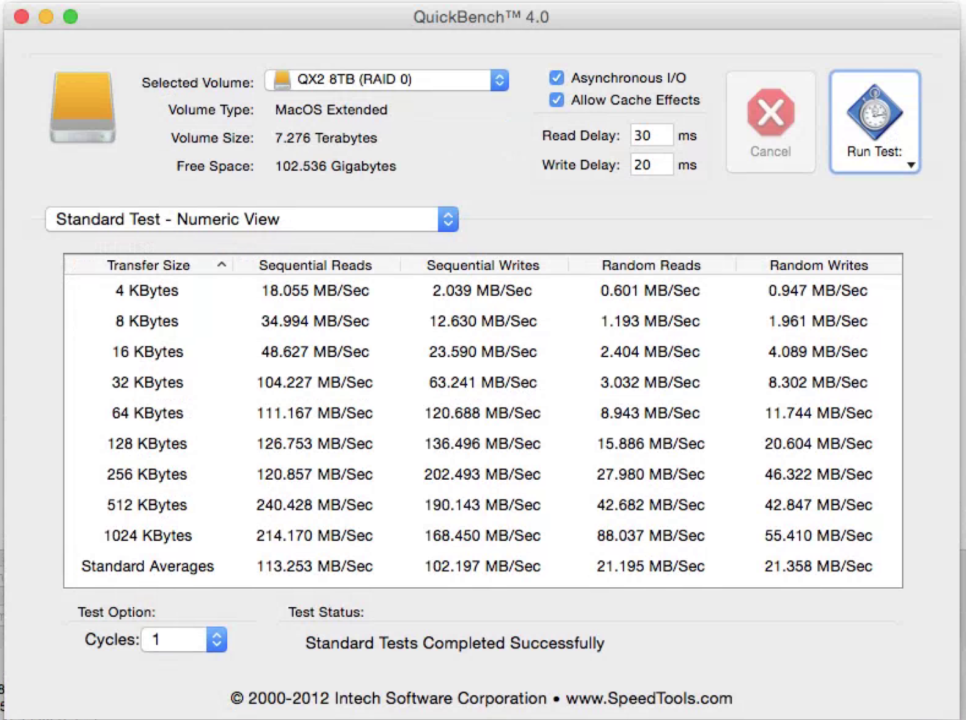
The best way I’ve found to test a drive for FCP X Library storage is Disk Speed Tools QuickBench. When running these benchmarks the small random reads and writes of 4K and 8K should give you a good picture of how an FCP X Library will perform. If your QuickBench results are under 1 MB/Sec, you’ll have a hard time editing with FCP X on that drive. 10MB/sec is good, 20MB/sec or more will make your edits fly.
Not fully supported
QuickBench is a handy tool, but unfortunately, it doesn’t work on all network volumes. An inexpensive app that does work on network volumes is DiskMark on the Mac App Store. However, I have not had time to extensively test it and find that its results don’t exactly match QuickBench. But you might find it useful.
The following is a real-world example of two drives that I own and tested with BlackMagic Disk Speed Tests and QuickBench.
Drive A: Good for playback and your Library
CalDigit T3 connected via Thunderbolt: Looking at the BlackMagic Disk Speed tests results (top) this RAID looks like a great drive for playing back many streams of ProRes, 308MB/sec Write, 357MB/sec Read. The results from QuickBench confirm that it is also excellent for FCP X Library storage: 16MB/sec for 4K random writes and 22MB/sec for 8K.
Drive B: Good for playback, horrible for your Library
OWC QX2 connected by a LaCie Thunderbolt to eSATA adapter: The BlackMagic Disk Speed tests results look acceptable for HD playback, 221MB/sec write and 248MB/sec read. The QuickBench results, however, show a serious problem for FCP X Library storage, less than 1MB/sec for 4K and less than 2MB/sec for 8K. Putting an FCP X Library on this drive will try your patience. (This, in fact, is the drive that showed poor performance in the video I mentioned above.)
Testing before you buy
These are great for testing after the fact. But if you’re looking at a new drive or network storage, ask for a random read/write test from the manufacturer. And verify them yourself if possible. Many companies will even provide QuickBench results.
Symptom #3: Delay when starting playback, dropped frames when playing camera HD or 4K clips
Diagnosis: Footage is overtaxing CPU/GPU
At first, this may appear to be closely related to having an older Mac as in Symptom #1, but it is possible to have a recent Mac that has a hard time playing back your camera footage, especially compressed 4K (and larger) footage using h264, RED Raw, and other formats.
Prescription
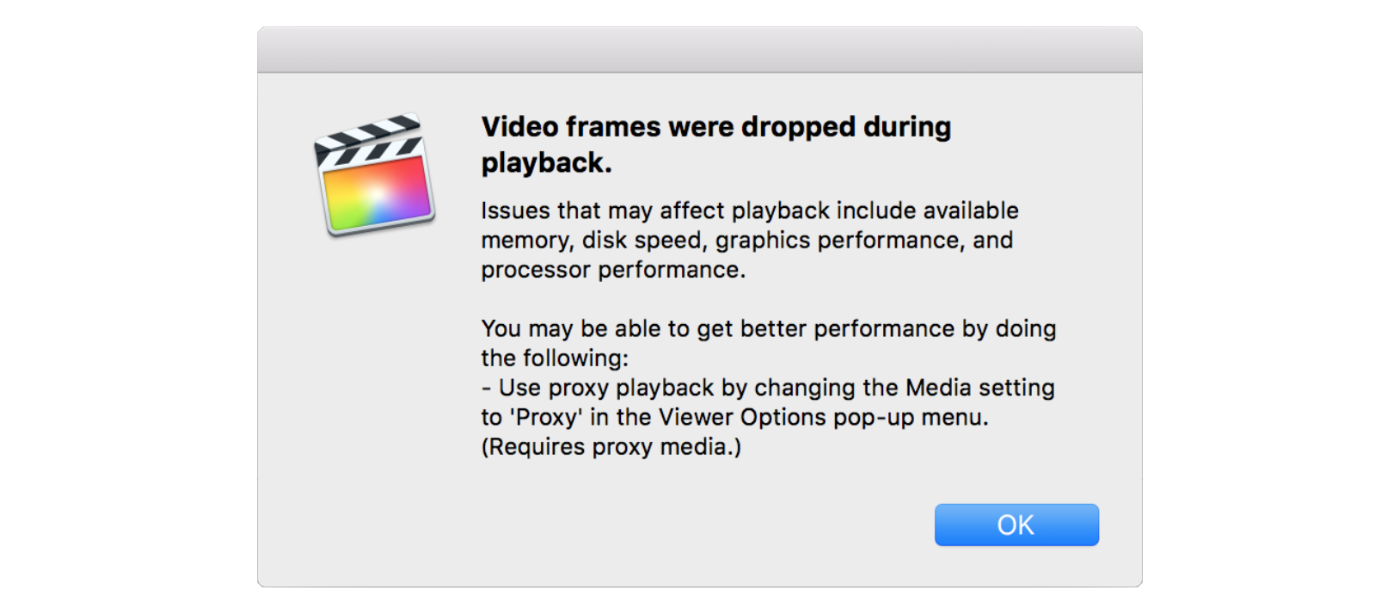
If you encounter this issue and you have drop frame warnings turned on in preferences, Final Cut Pro X itself will often rightfully diagnose the problem and give a solution right in the warning dialog (as you can see above).
Transcode to Optimized or Proxy Media
Using the built-in FCP X feature of transcoding to optimized or proxy can make a significant difference in your playback performance of compressed media and overall snappiness of your edit sessions. My ancient 2007 iMac upgraded with an SSD that I mentioned above can indeed handle light editing in FCP X, but only when transcoding media to proxy. I’m not suggesting you make your livelihood with FCPX relying on a now 9-year-old Mac. But it shows that transcoding to optimized or proxy can make editing on any Mac smoother.
In some workflows, like when editing high res RED Raw, transcoding to optimized or proxy will greatly improve your edit experience.
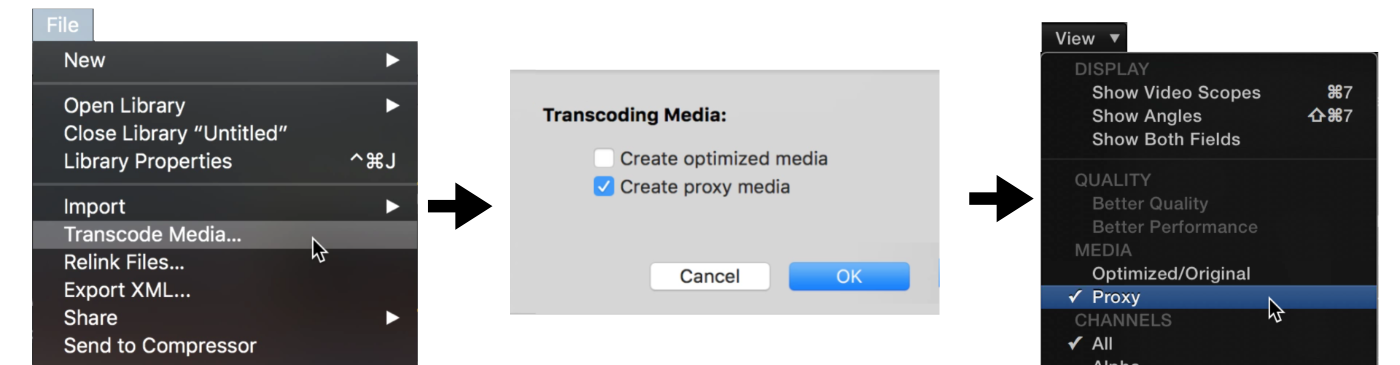
Transcoding in FCP X is simple. You can choose transcode options from the Import Dialog box, or in the Browser select an Event, Project, or individual clips then File > Transcode Media and then choose proxy or optimized. Selecting a single Project and then Transcode is a fantastic way to speed up editing and save storage space by only transcoding media in the Project timeline you are working on.
Symptom #4: Dropped frames during playback of effects & transitions, slow export times, crashing on export
Diagnosis: GPU Overload, Motion Template, FXPlug, or Audio Plugin
I find real-time performance of Final Cut Pro X to be amazing. After a few jobs, I turned off background rendering because it wasn’t needed for my titles, color correct and transitions. On subsequent jobs, I then naturally added more effects, titles, and transitions. Soon I expected everything to play in real time, and when it didn’t I thought something was wrong with the app and my system. After speaking with other editors with similar experiences, I realized an odd paradox—it is easy to overload FCP X precisely because it can do so much in real time that I expect it to handle anything.
Some of the more common overloading occurs when using titles, generators or tools that only a few years ago would have been unthinkable to be in an NLE: The Hollywood quality 3D motion graphic title and templates from MotionVFX.com; the incredible noise removal from NeatVideo; footage salvaging deflickering with Digital Anarchy Flicker Free, just to name a few. These are amazing effects, but even on recent hardware they will process only 4-5 frames a second at best—and therefore this will undoubtedly lead to a 5 to 6 fold increase in export time which is uncharacteristic of FCP X.
Prescription
You have several options for dealing with this overloading without having to spend money on hardware.
Conserving processing power for real-time effects
Transcoding media to optimized or proxy (described in Symptom #3) has the added benefit of freeing up CPU/GPU cycles. Because ProRes files require less computing power to decompress you’ll have more power for real-time effects. Setting your viewer to use Proxy Media will give the most power to effects by processing them at 1/4 resolution. An often-overlooked performance boost is switching the Viewer to Better Performance. This lowers the resolution of playback slightly. It also plays unrendered effects at a lower resolution and quality which allows your editing to go smoothly without rendering.
If your Viewer is using Proxy Media, remember that your exports will use Proxy Media as well. Proxy is fine for drafts, but switch your Viewer to Optimized/Original Media to ensure the highest quality exports.
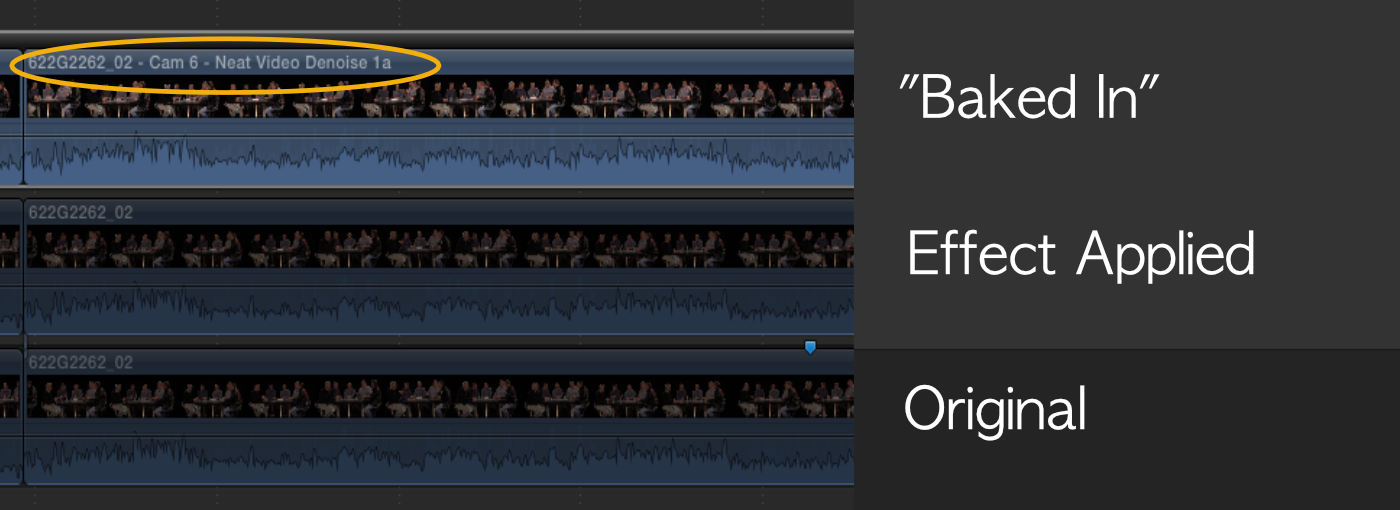
“Baking In” effects
Sometimes rendering your timeline is impracticable or undesirable. So for effects, compositing, or complex Motion Templates that use a lot of crunching power, consider “baking in.” You bake in by applying an effect and then exporting a file to use in your edit. You’ll find this not just useful but often necessary for many of the effects mentioned above. You can use the baked in clips as your new source, or depending on your need, you can use a very clever Compound Clip workflow to allow you to swap out your original and baked in versions of clips.
This Compound Clip effect workflow lets my final output be fast and yet I can still tweak the effects as needed. Let me share a recent experience of this workflow in action. This week I finished up a 30 minute 6 camera roundtable discussion. Unfortunately, one camera was mismatched and super noisy, so I needed to process the entire camera angle with NeatVideo.
I started by creating a Compound Clip of the entire noisy angle in my multicam clip. Inside the Compound Clip, I connected duplicate versions of the original clips (select all and option-drag to connect a copy above), and then applied NeatVideo to each connected clip. I then disabled the original clips and exported master files for each.
The next day…
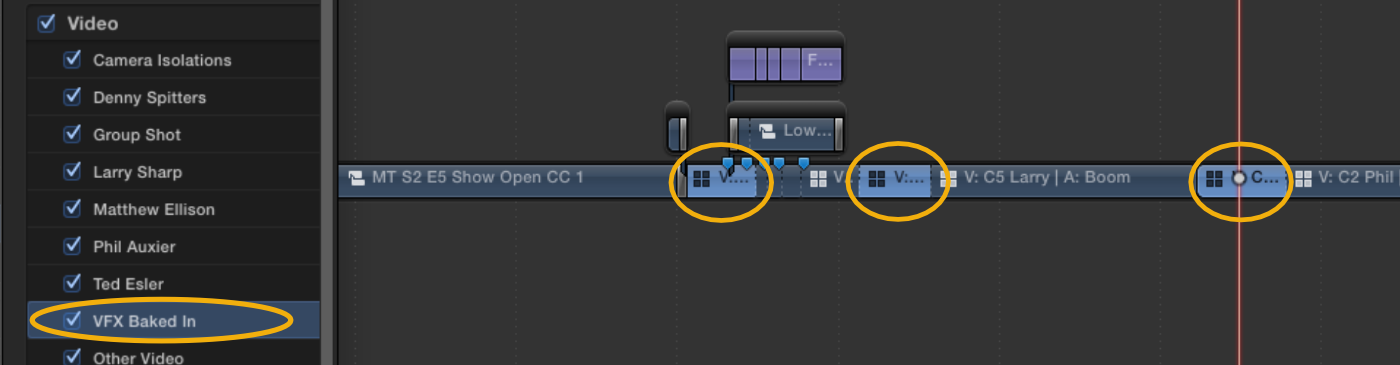
After the 4 hour overnight export I connected the repaired clips on the top of my stack and disabled the other clips (I wasn’t using the camera audio from this angle, but if I did, I might need to detach the original clips audio). I assigned the new clips the video sub-role “VFX Bake In” so I could later highlight them in my Project if needed. I can always go back to the original version by disabling and enabling as needed inside the Compound Clip. It’s also a great opportunity to show the client/director our restoration work, or simply geek out with a fellow editor.
For this project, the fruit of my labor came when I was editing up to the last possible minute before stream time. I could edit knowing that the h264 version of the 30-minute show would only take about 10 minutes to export. And not the 4+ hours it would take if I didn’t bake in the effects.
Isolating heavy-duty effects
You might find that some restoration plugins, like NeatVideo, use some much GPU and CPU processing power that they can cause slowdowns, crashes or odd display anomalies. If you find this to be the case try isolating your effect shots to their own Library and export baked-in versions. I frequently use iZotope RX 5 for audio cleanup but because stacking them in FCP X for real-time performance is not ideal, I limit their plugin use to testing.
I will then note my settings and apply the effects in the RX Audio Editor where I will export new sound files. This workflow breaks your edit groove. But when plugins slow down your edit, it’s better to take care of the issue and get back to work.
Symptom #5: After long edit sessions FCP X slows down.
Diagnosis: Memory usage issue
Sooner or later we were going to encounter a known problem with FCP X and this is one of them. In FCP X 10.2.3 and earlier versions, after editing in for several hours you may find the app slowing down. I’ve ruled out other causes of slowdowns, but I can’t find the smoking gun. In the last update as of this writing 10.2.3, the issue is lessened, but it stubbornly remains.
Prescription
The solution is simple. Quit FCP X and relaunch the App. FCP X will remember right where you left off. On the bright side, this break from editing gives you a chance to get up and stretch. Perhaps it can be touted as a “feature” as Apple is encouraging us to be less sedentary. Yeaaah. That’s it. It’s a feature! Joking aside, Apple is continuing to optimize FCPX and hopefully, the next update will resolve this issue.
I’m hopeful that I have given you knowledge about what to do when FCP X isn’t behaving as expected. Troubleshooting problems is not the most glamorous of tasks. However, when you think about editing much of our work is finding creative solutions to seemingly insurmountable problems.