Multicam in Final Cut Pro X is an amazing feature. Its simplicity allows any editor to sync and setup a multiple camera job with ease.
Yet it’s powerful enough to manage nearly unlimited video and audio angles. However, if you have used FCP X Multicam to just switch cameras, then you’ve only scratched the surface.
In this first article in the series, Make the Most of FCP X, I’ll show you some uses of Multicam Clips that go beyond the basics that will help make your editing and finishing tasks faster and more efficient.
I’m assuming you know the basics of creating and editing Multicam in Final Cut Pro X. If you’re new to Multicam I would recommend checking out the overview of Multicam in the FCP X user guide, which you can read here.
Click images to enlarge.
1. Unlock batch color correction and audio adjustments.
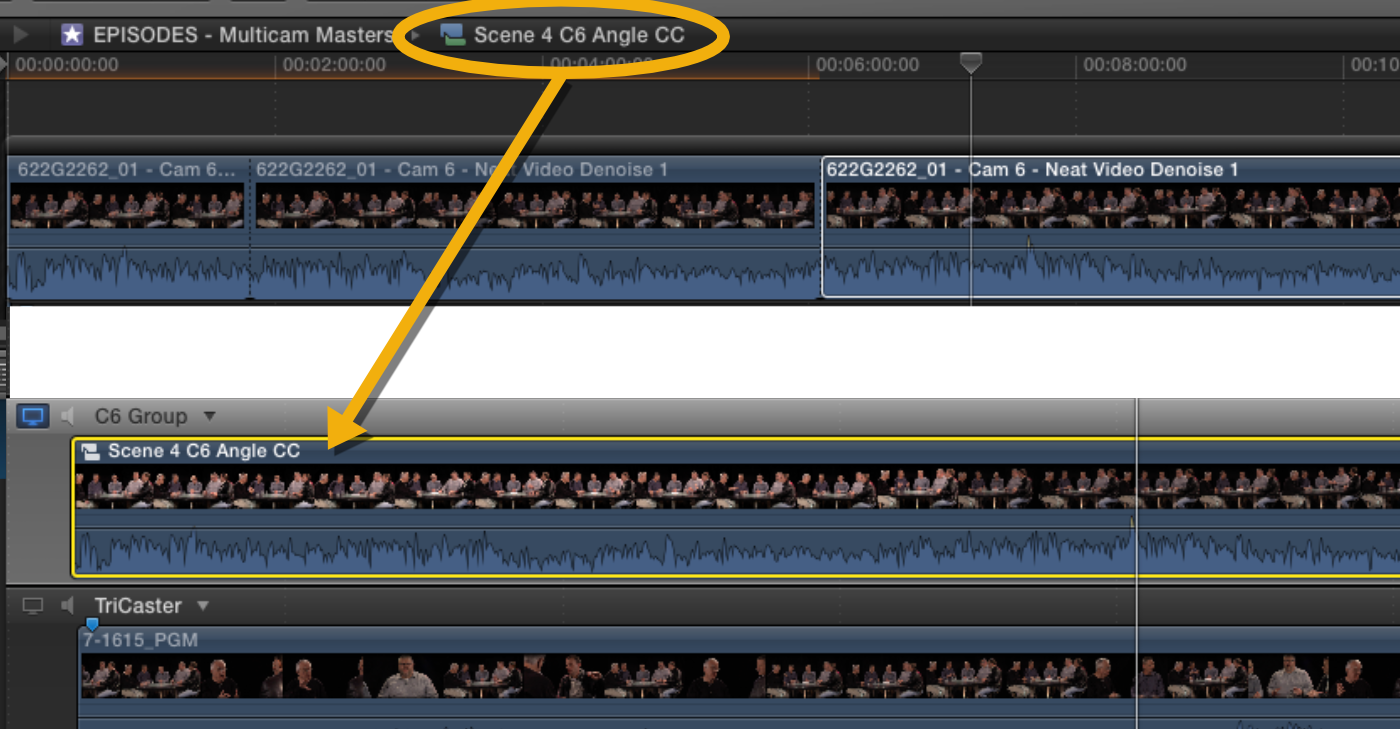
In Final Cut Pro X Multicam Clips and Compound Clips are a special kind of clip. Each time you use a clip or a portion of a clip, it is a “child” which references a “parent” in a Library. Compound Clips give you a reusable container with the capabilities of a Project timeline, while Multicam Clips lets you take your pick of multiple synchronized video and audio sources. Open and make a change to any Compound Clip or Multicam Clip (the parent) and that change will be reflected every time the clip is used (the child).
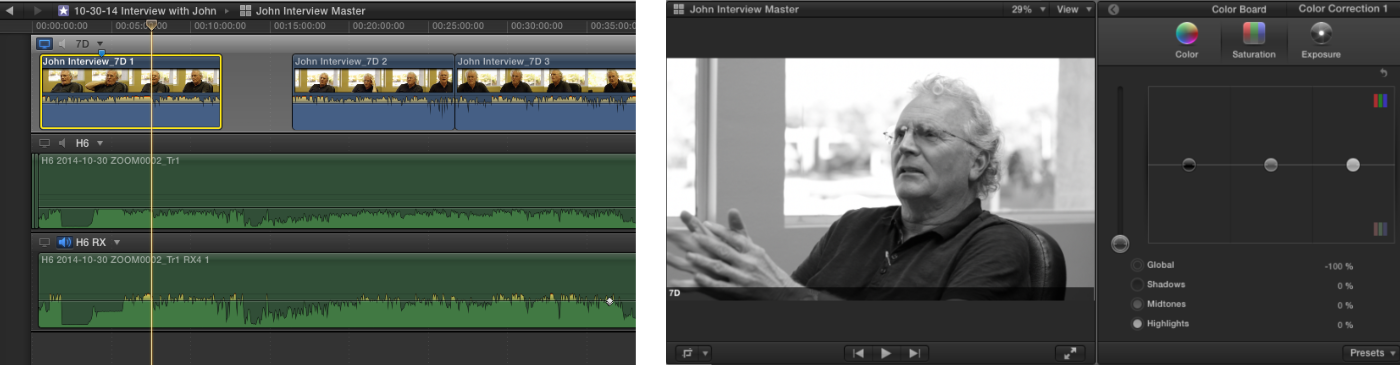
Armed with this knowledge you can probably already imagine some uses for parent-child relationships in Multicam Clips. One of the best uses is applying color correction, or audio sweetening the cameras in your multicam inside the angle editor, rather than in the timeline. Adjust the color once, and you’ll see it reflected every time you use that angle in your edit. Once you get your head around this concept and how to take advantage of it, it will save you an amazing amount of time in your edits.
Note: The Parent-Child relationships of Multicam and Compound Clips are why FCP X has the option to Duplicate Project as Snapshot. Duplicating as a Snapshot freezes all reference clips in the project, duplicates them in the timeline, and then shows the duplicated versions in the browser whenever you modify a parent clip, or reveal them in the browser with Shift-F.
2. Make single camera interviews more efficient
Multicam is a must when pulling together multiple cameras in an edit, but it is also the best choice for interviews with just one camera. Because color correction and audio effects will flow to every instance of your Multicam Clip, that means the 100 edits you made to shape that interview will all have your changes. For a single camera interview with separate audio, using Multicam is a better choice than Synchronized Clips because of the parent child relationships. Here are just a few other ways multicam can make your single camera interviews more efficient.
- Remove a dipping boom pole with a tool like Coremelt SliceX, and that fix will appear in every instance. (see tip 4 below)
- Apply stabilization or other effects once which will ripple through your edits (see tip 4 below)
- Easily swap out a sweetened version of your audio on the same angle or additional angle
- Add an additional close up angle to cover edits without b-roll. (see tip 5 below)
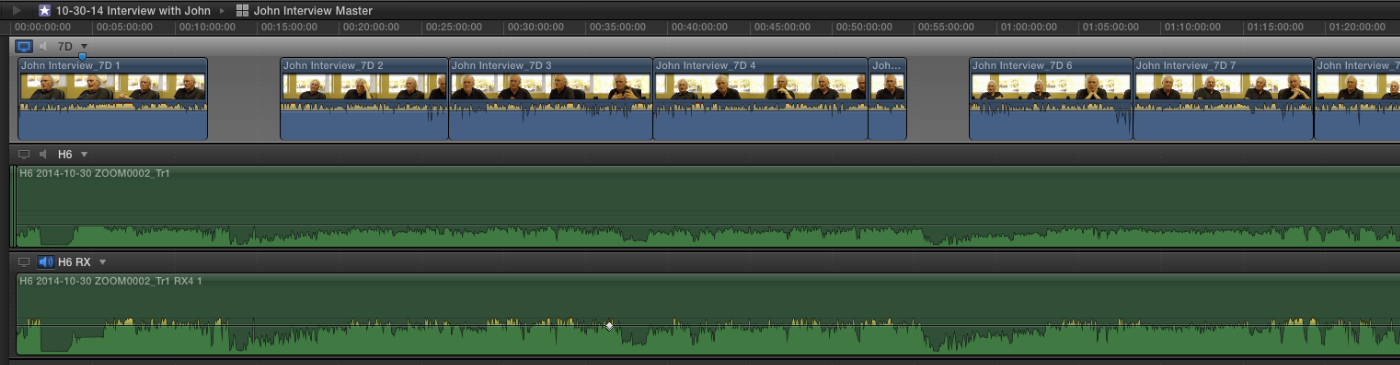
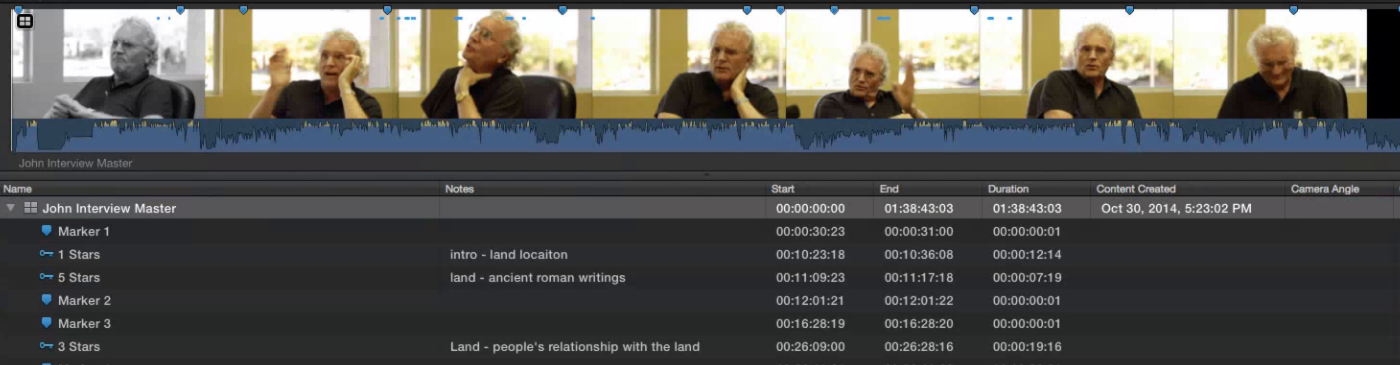
- Join an interview that spans multiple clips into one container to add markers, keywords and favorites.
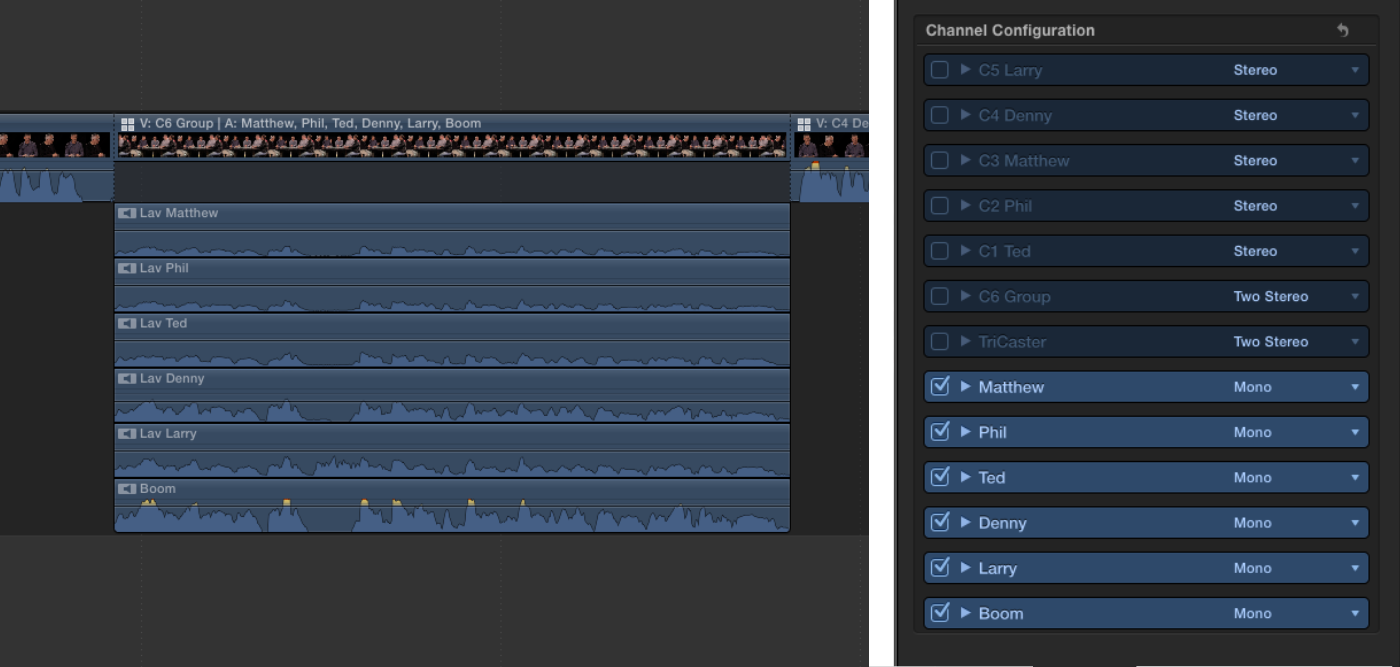
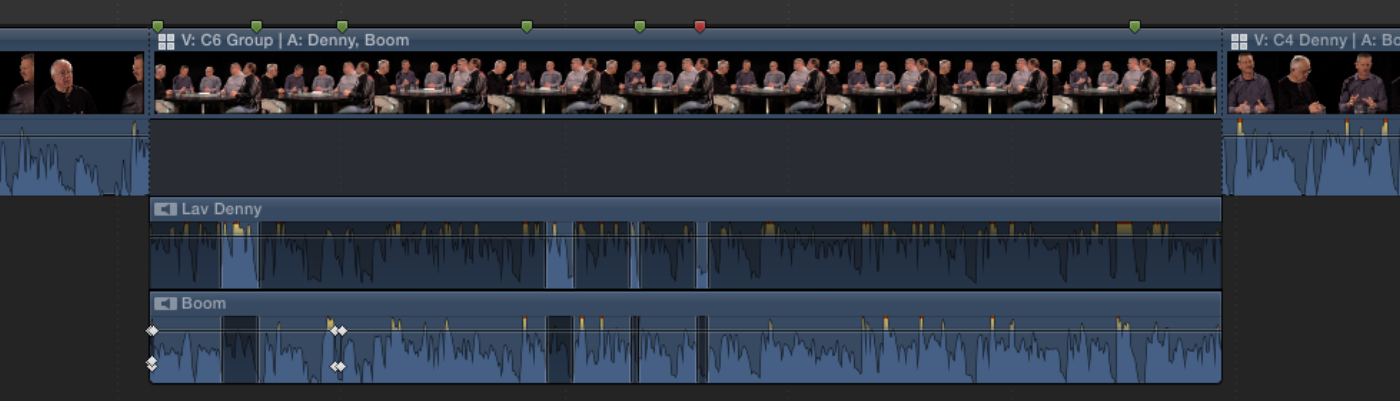
3. Get better control of multi channel audio
If you have one camera angle, but multiple audio files, Multicam Clips are a better choice than Synchronized or Compound Clips. Synchronized Clips work best with one video source and one audio source. While Compound Clips allow you to connect any amount of audio, you can only enable or disable storyline or connected audio in the inspector and your timeline. Multicam Clips, on the other hand, let you enable/disable any number of audio angles in your timeline.
In my workflow nearly all the audio I capture will have at least a lav mic and shotgun mic on a boom, so I use multicam clips on nearly every job. I configure our Zoom H6 to record mono files for each mic and add the device and mic name for each clip in the Camera and Angle fields before creating Multicam Clips. Once my Multicam Clips are created, I’ll make a first-pass on audio and perform global adjustments for each mic angle.
Then during my edit, because the mics are on different angles, I can enable just the mic that sounds best, or enable both mics and disable and enable portions if the talent inadvertently taps his lav mic, or taps the table.
4. Save time when you nest keying, compositing and effects
Nearly any clip type in FCP X can be a source for an angle in Multicam Clip. Stills, Compound Clips and even other Multicam Clips if first placed in a Compound Clip. This makes the angle editor an incredibly powerful tool for effects in a variety of situations:
Fixing a problematic camera and jib
One of the 6 cameras on a recent show was on a jib that was improperly balanced—which is a nice way of saying it fit right into the 60’s TV Batman fight scenes shot at crazy angles. To make matters worse, the skewed jib revealed a light under a table on the set. In addition, the jib operator was inconsistent in his movement: sometimes fast, sometimes slow and sometimes jerky. The good news: shots like this are all fixable inside the Multicam Angle Editor.
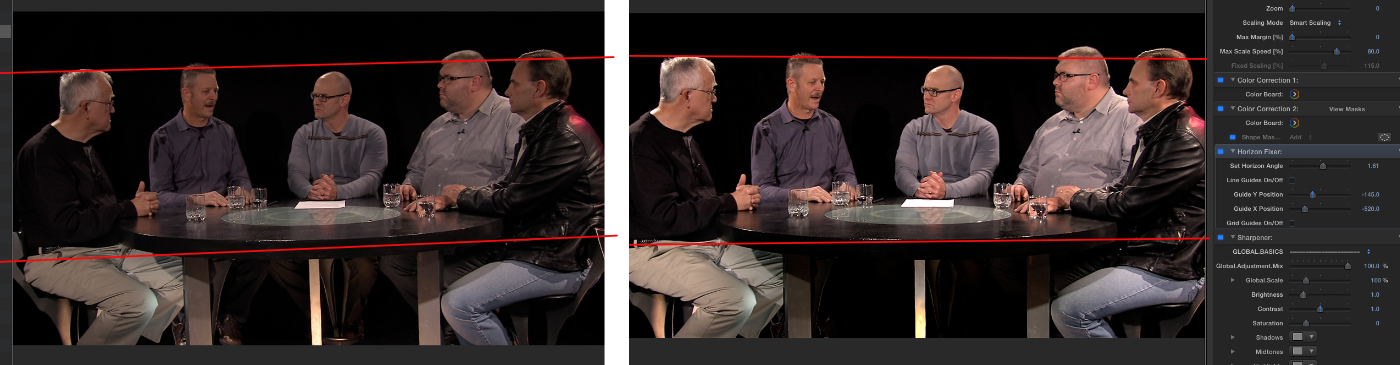
First I used Cineflare Horizon Fixer to deal with the tilt of the camera. Next, I stabilized the shot with CoreMelt Lock and Load to smooth out the movement, and added a mask together with the color board to lower the brightness on that light under the table. While FCP X built in stabilization was perfectly acceptable, Lock and Load analyzed in 1/10th of the time, which is a significant on a 30-minute show. Finally, I added a bit of sharpening with Sharpener from My FCPEffects . Since all of these fixes were performed in the angle editor, when I got to actually performing the edit and switch for the 6-camera show, I could concentrate on the timing and not having to apply fixes in my timeline.
Faster green screen and virtual sets
Compound Clips inside the Angle Editor open up incredible possibilities. Performing a green screen composite inside the Multicam Clip can be a great timeline saver when creating a virtual set. In a simple 2-camera interview segment shot on green screen, I was able to make a simple virtual set utilizing Compound Clips inside the Angle Editor. I apply just one keyer setting per angle on my background which was itself a compound clip so it could be quickly changed. These precomposited angles made the multicam switch and edit a breeze.

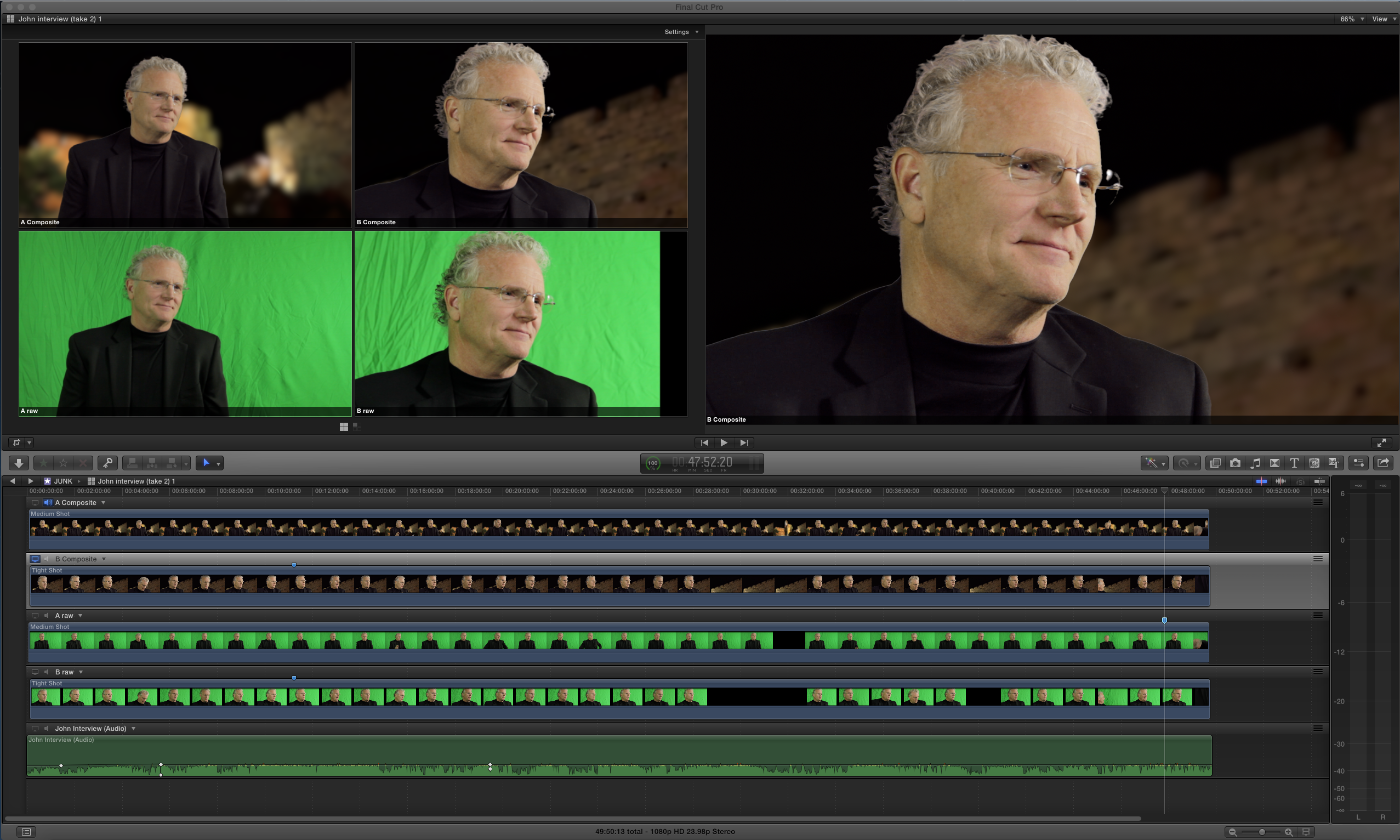
Compositing inside a Multicam Clip does have one consequence. Your timelines will look super clean, efficient and uncomplicated and they will be much too uninteresting to post on #timelinetuesday on Twitter. 😉
5. Re-frame ultra-high-res to compose new camera angles
Simplified punch in
If you’re shooting 4K, and your delivery is 1080p, you can create “fake angles” for a close up. I find it best to first create a Compound Clip of the angle I want to duplicate. After placing another instance of the Compound Clip in my second angle, I’ll apply my transformation and effects to the Compound Clip (not in the Compound Clip). Then if I can perform any adjustments inside the “real” angle’s Compound Clip, and it will ripple to the “fake” ones.
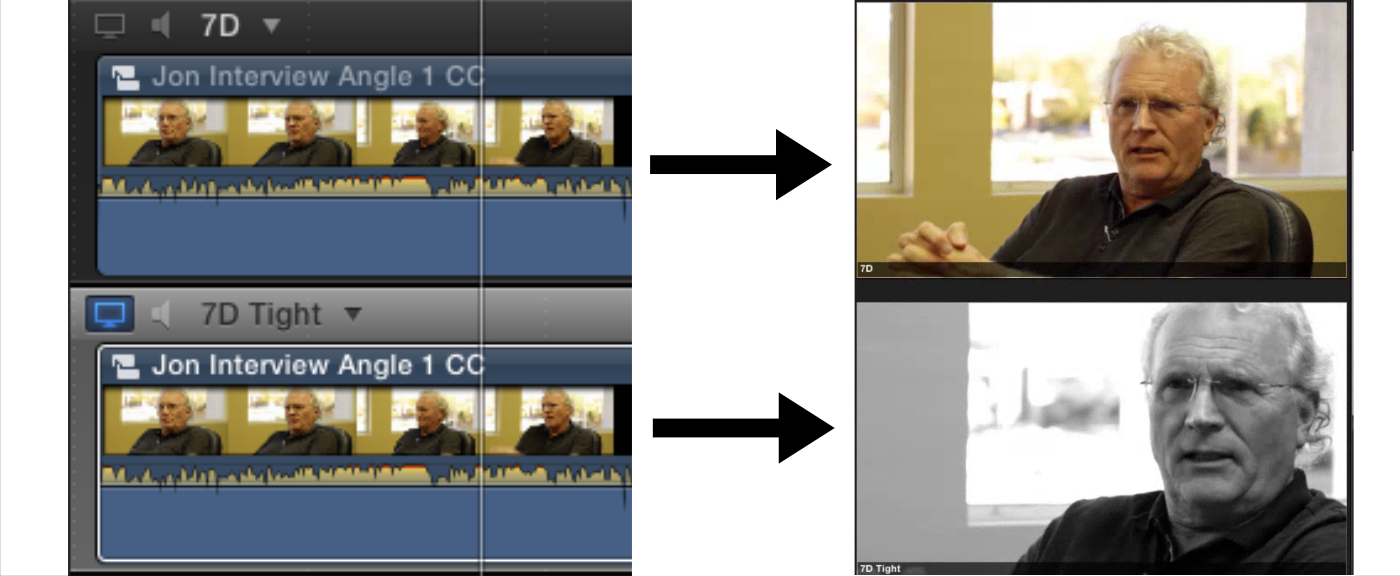
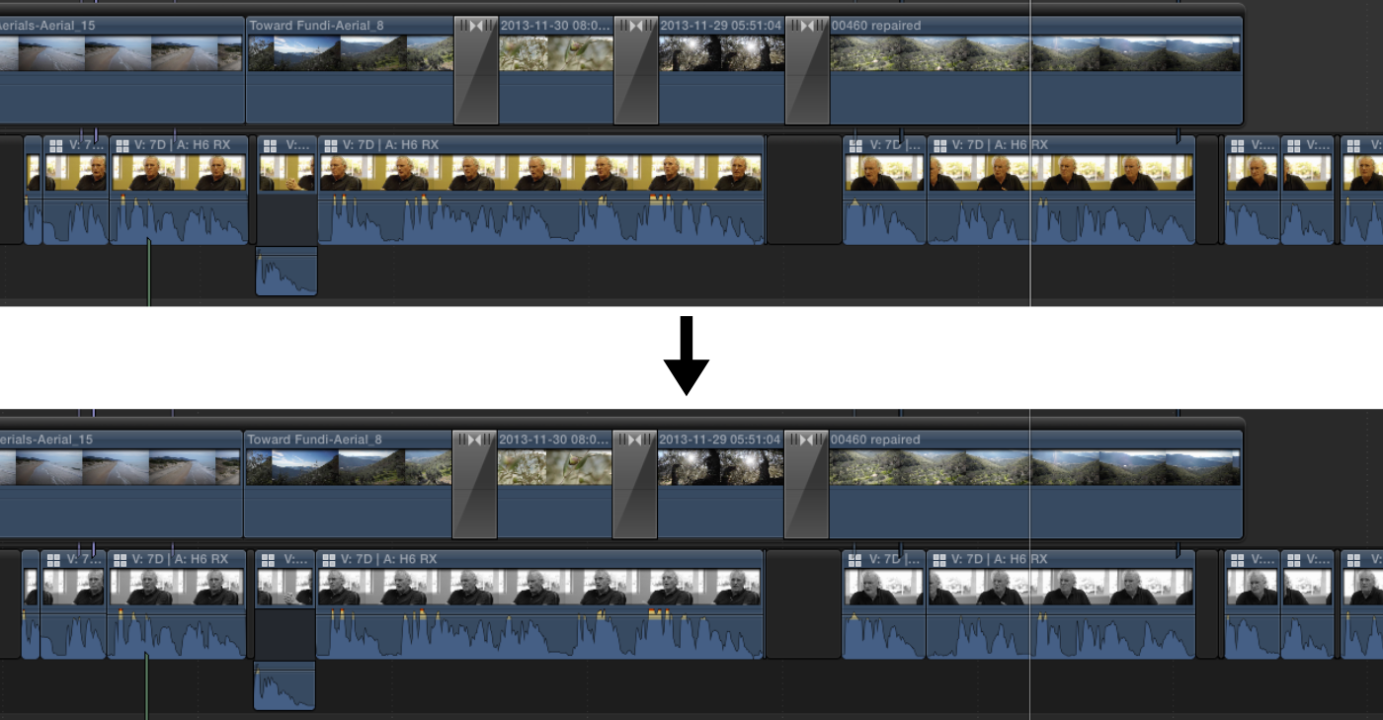
You could even add other effects to hide from your viewers the fact that you’re showing a tighter version of single shot. Making the tighter angle black and white or adding a grain effect works well. I’ve even added organic camera movement to the angle by using CineFlare Handheld’s Drift and Handheld. Done subtly it looks amazingly impressive.
Even when my footage is shot 1080, I can create an alternative angle by keeping my enlargement less than 140% and applying just enough sharpening. I find creating a bit of definition in the shadows and match the grain/noise of the original clip does the trick. The built-in sharpening filter in FCP X has only a single adjustment, so I prefer the sharpening tool Sharpener from My FCPEffects. It has individual amount and threshold controls for sharpening the highlight, midtone and shadows.
Combining angles for a 2-up or 3-up shot
You don’t have to limit yourself to just one camera per angle. You can easily create a 3 guest interview where you occasionally cut to a 2-up or 3-up shot (what you often see on cable news shows). To pull this off, create a Compound Clip of each angle, and then add a third angle that contains another Compound Clip with those individual Compound Clips stacked to make a 3-up shot. For more flexibility, could create additional angles for other guest combinations of 2-up shots.
6. Sync clips already in the timeline
If you shoot double system sound, or multiple cameras, your first step is synchronizing your clips in a Multicam Clip. However sometimes you may find yourself needing to sync clips after the fact, and sure enough, the Multicam Angle Editor can help you out.
Syncing clips using audio waveforms from your timeline
 The Multicam Angle Editor can sync clips via audio waveforms already in the timeline.
I couple of years back a production company called asking to clean up a 90 minute TV pilot. I was horrified when I opened the FCP X timeline to find each second source audio clip had been lined up by hand to each RED 4K clip. Ouch. I cannot imagine the time that took. It felt horrible for that editor considering there are built in tools that could have saved loads of time.
If you find yourself needing to sync clips in the timeline, the Multicam Angle Editor can be a lifesaver. The Angle Editor can synchronize clips after your initial sync and you can then paste them in your timeline. Here are the basic steps to synchronize audio to video that contains reference audio:
Steps to follow
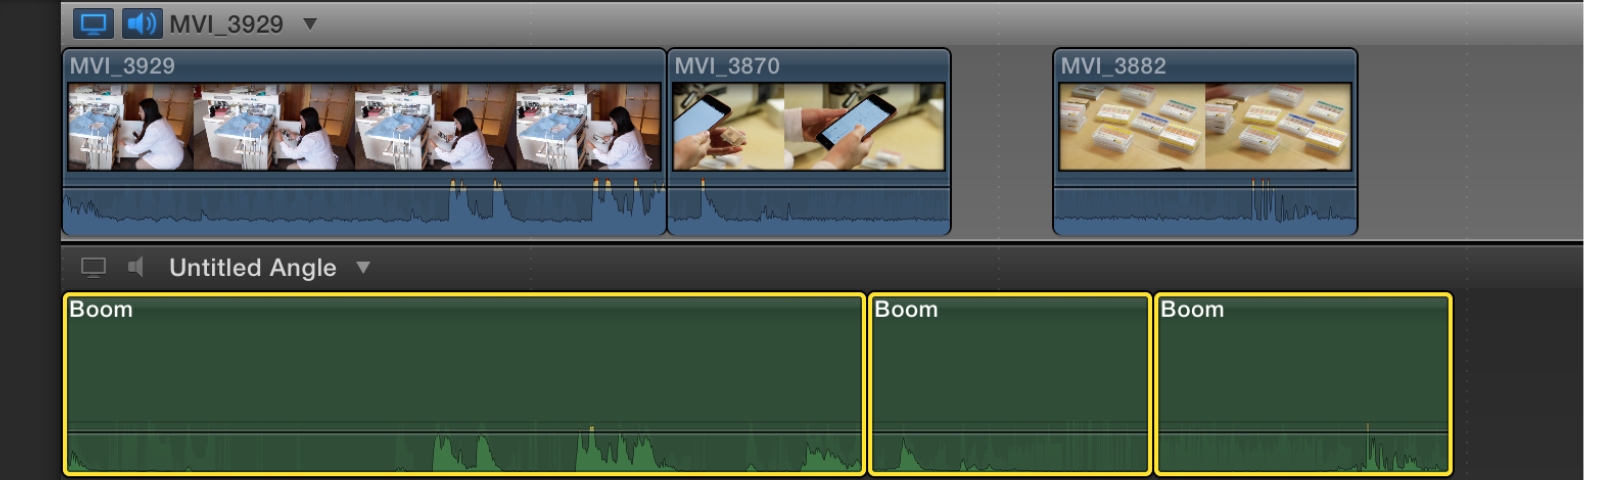
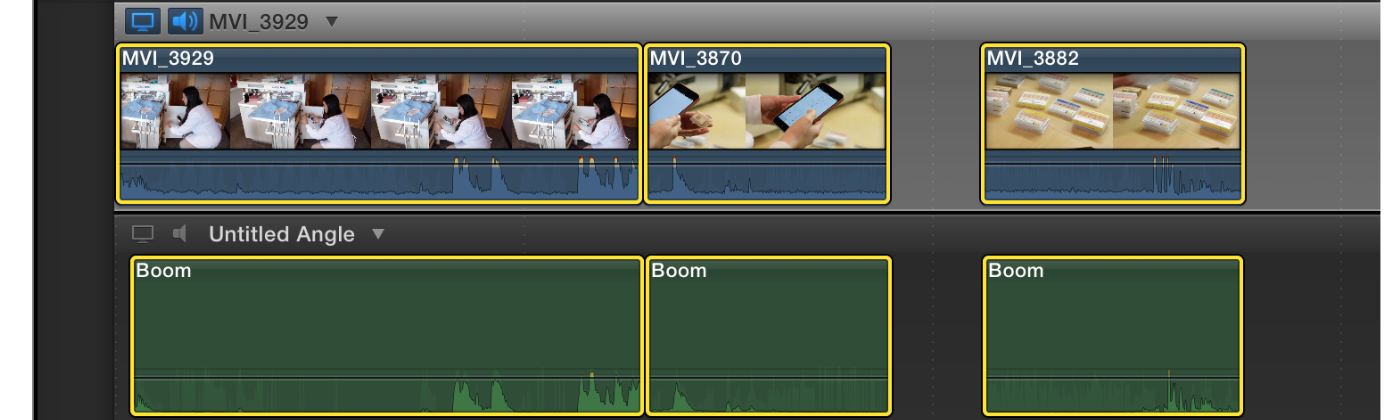
1) You will need to create a temporary Multicam Clip for this, so just grab any clip in your browser, right-click and choose New Multicam Clip. Then you can discard that clip in the first angle and begin to paste your footage into angles. Be sure to grab your video clips as a group so they maintain their relative positions. From the Angle Menu (just to the right of the angle name) choose to add more angles as needed.
2) Set the video angle as the Monitoring Angle by clicking the screen icon to the left of the angle name. This ensures that angles clips remain in place and your audio clips will move to align with them.
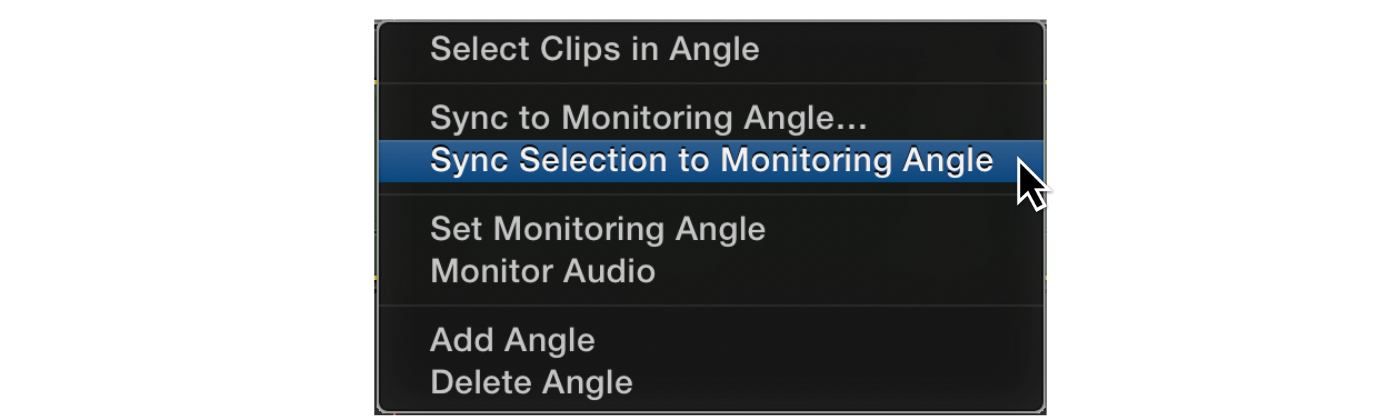
3) On the angle you wish to synchronize, from the angle menu choose “Select Clips in Angle”. Then select “Synchronize to Monitoring Angle.”
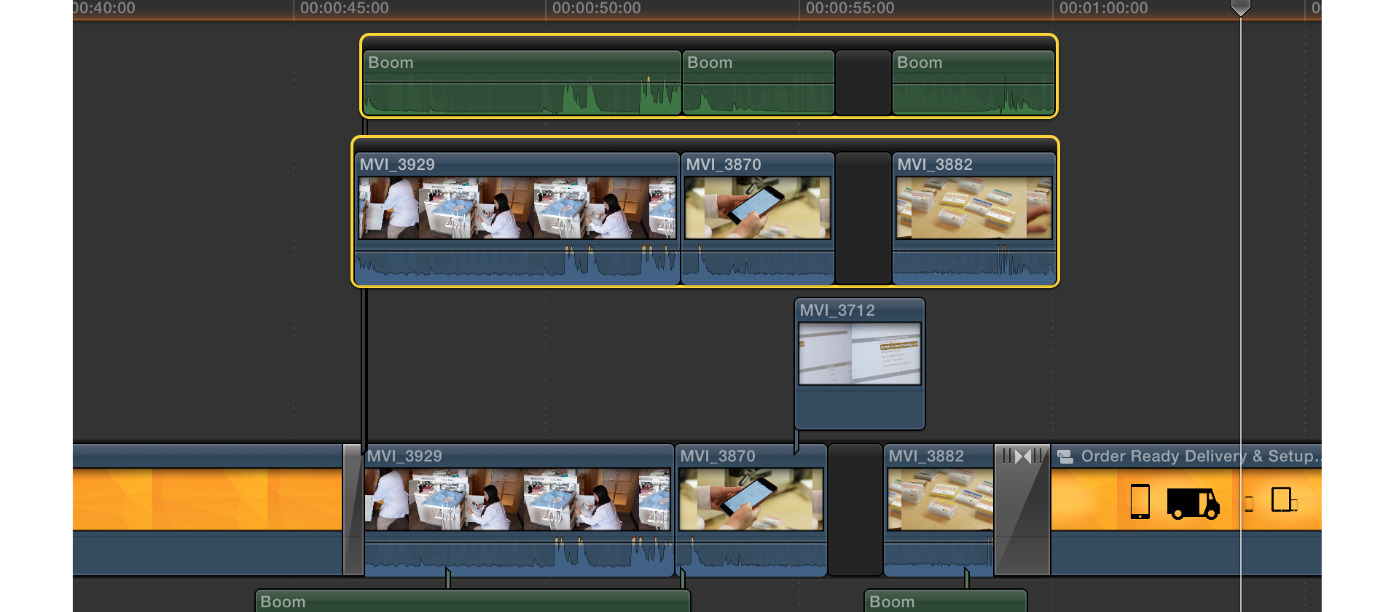
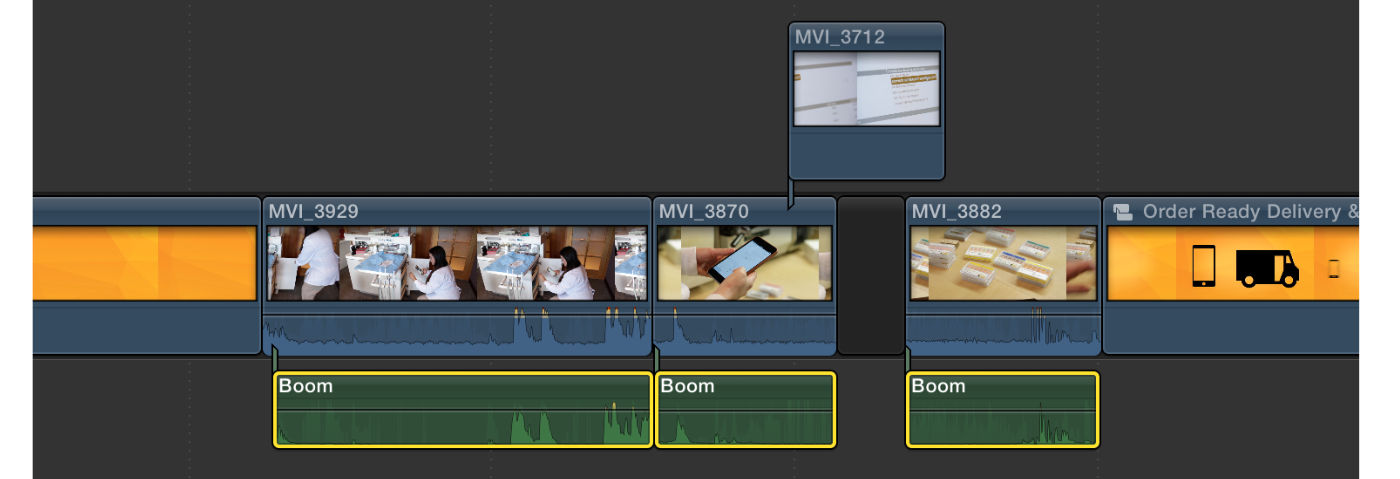
4) When the task is complete (and it can take a few minutes), select all the video and audio clips. Do this by dragging a marquee (a box) around the clips, or select a clip from each angle and press command-A. Then copy and paste these back into your main timeline. Each angle will end up in its own connected storyline. Then group these together in a Compound Clip, or overwrite the video to your storyline leaving the audio as connected clips.
Save the day by syncing clips that failed to sync
Using audio to synchronize clips when creating Multicam Clips works very well—most of the time. Sometimes you’ll be notified of failure, or worse, you’ll find during editing that a clip is out of sync. In these cases, you still have a good chance of syncing without having to do so manually. FCP X has a feature just for this in the Angle Editor to “try harder” when syncing from audio waveforms.
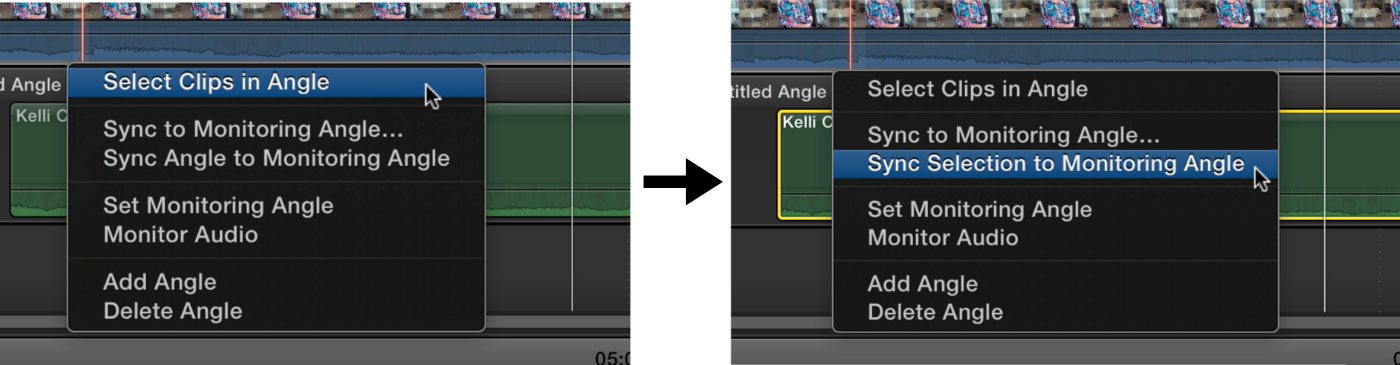
The feature is simple to use and was actually mentioned in the previous section. First Set Monitoring Angle, then in the angle you wish to sync, choose “Select All Clips” from the angle menu. Finally choose “Synchronize to Monitoring Angle”. (By the way, this will provide different results than “Sync Angle to Monitoring Angle”.) FCP X will now attempt to synchronize using audio waveforms based on the monitoring angle. In addition, by choosing this option FCP X will allow clips to reorder as needed to achieve sync.
The results of this method are excellent. In fact I’ve yet to encounter any situation with even borderline decent audio where FCP X failed to sync. I first discovered this technique while needing to reconform a personal project for a friend. I thought it was going to be hopeless because of the horrible audio I had to sync with. I was wrong as FCP X was able to sync it without a problem using this “Try harder” technique. I created a tutorial video showing just what I did which you can watch here.
I sincerely hope these techniques will prove helpful to your workflow. If you have done something out of the ordinary with Multicam Clips in FCP X I would love to hear about it in the comments.