Today, LUTs play a more important role than ever in production and post-production workflows. What makes them so indispensable?
There are a few reasons. First, since virtually all professional and prosumer-level cameras now capture a larger color space than our displays support, we need a consistent, lightweight, and platform-agnostic way of technically transforming the image for viewing — not only in our final grade, but also throughout the production and post-production phases. Equally important is the ability to preview the creative intent of the filmmakers prior to final color.
This not only affects the way shots are lit and composed, but it shapes everyone’s expectations for the grade, ensuring that this process feels like a natural continuation, rather than a sudden alteration, of the film’s aesthetics.
Despite their limitations, LUTs remain the most reliable solution for these needs, and it’s no wonder more filmmakers than ever are interested in creating their own camera or show LUTs. So in this article, I’m going to show you how to tackle this task without ever leaving DaVinci Resolve.
Before we dive in, I’m going to assume in this article that you have some basic familiarity with LUTs and how they work. If you need to brush up, or if you get confused by anything, check out my Essential Guide to LUTs.
Before you start
As you prepare to build your LUT, let’s look at the key questions you need to answer in order to be successful.
Is a LUT the right fit for my needs?
We’ve already discussed the basic utility of a LUT: it allows us to store and share a fixed color transformation for our image. But it’s also important to review what LUTs can’t do so that you don’t waste your time trying to make them! Below is a partial list.
Spatial manipulations
This includes power windows, vignettes, gradients, or any adjustment made based on the spatial attributes of our image.
Textural manipulations
This includes softening, blur, grain, and any other adjustment that modifies the texture of our image.
Multiple color spaces
A LUT can only be set up for one input color space, and one output color space. So if, for example, you’re shooting on two different cameras, you’ll need to build a separate LUT for each of them.
What color space will the LUT expect as its input, and what color space will it output?
This will be dictated by the camera you’re shooting on. For example, if you’re shooting on an Alexa, your LUT should be set up to expect Arri Log C/Wide Color Gamut as its color space. It’s also important to note that many cameras allow you to record or output more than one color space, so you’ll need to decide which you prefer before building your LUT.
For example, if you’re shooting on a Sony FS7, do you prefer S-Log2 or S-Log3? Once you’ve confirmed this choice, you’ll be able to select your LUT’s input space appropriately.
On the output side, since we usually want our LUT to give us an image properly transformed for display, this will almost always be Rec. 709 and Gamma 2.4. But if you’re building a LUT for viewing on a web device, for example, you’d want to set up the LUT to return Rec. 709/Gamma 2.2.
What kind of LUT are you building: technical, creative, or hybrid?
Let’s do a quick review of the differences between technical, creative, and hybrid LUTs, as this will have a significant impact on our approach.
Technical LUT
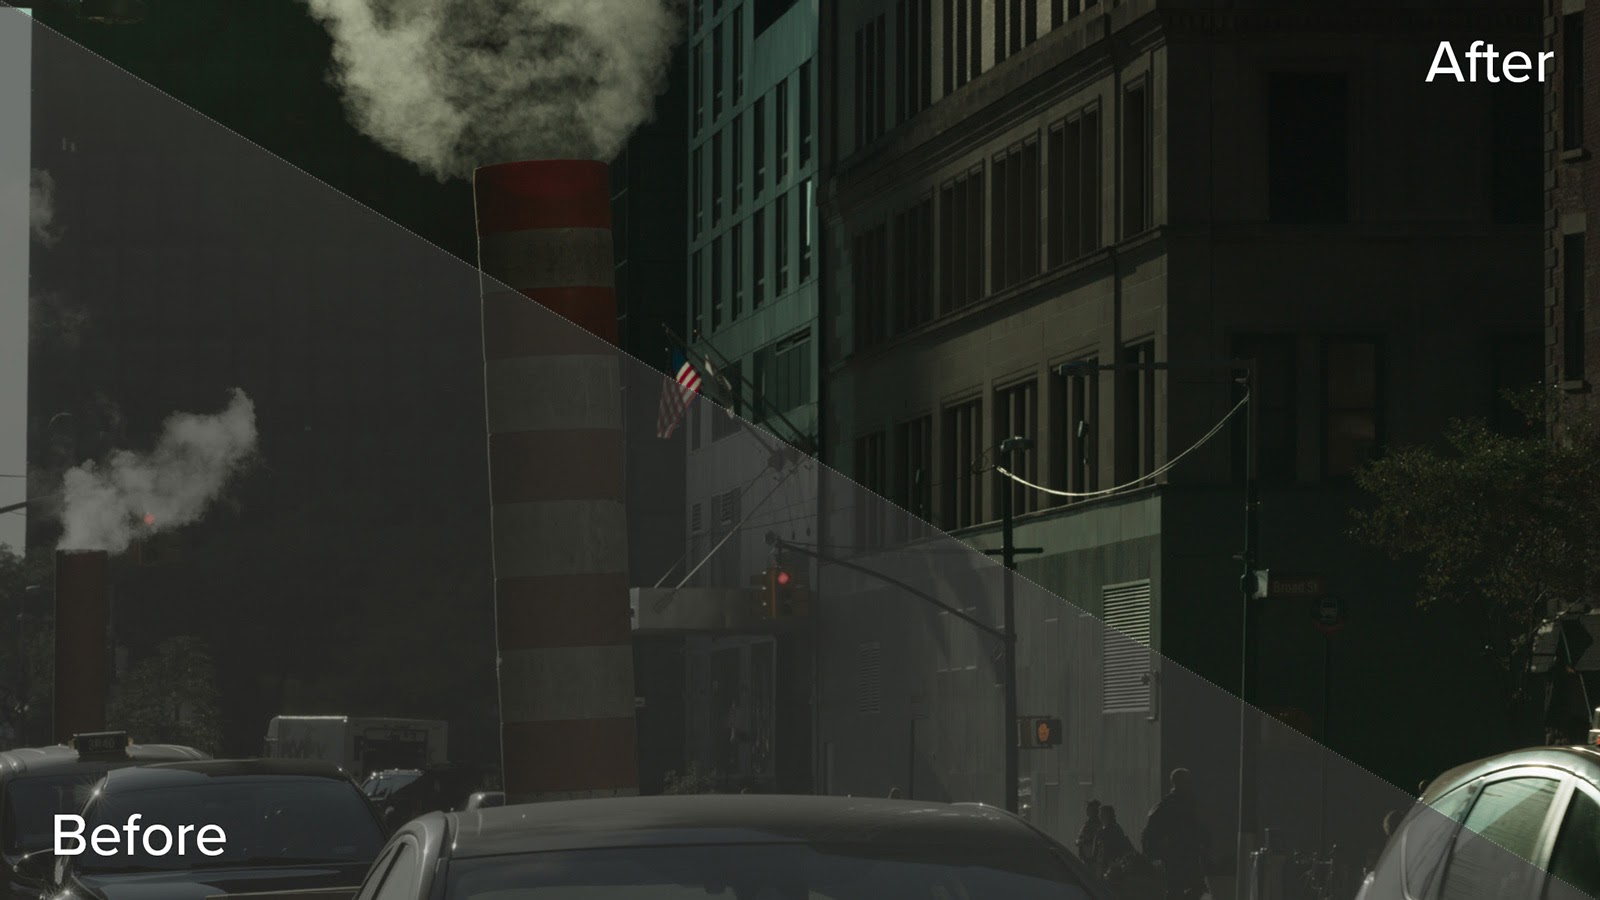
A technical LUT is designed to produce an accurate, non-subjective transformation from one color space to another. It may or may not improve on the subjective aesthetics of an image, but that’s not its purpose — it exists solely as a technical tool.
Building technical LUTs means that we rely on pure image science for our transformation, with no subjective adjustment added.
Creative LUT
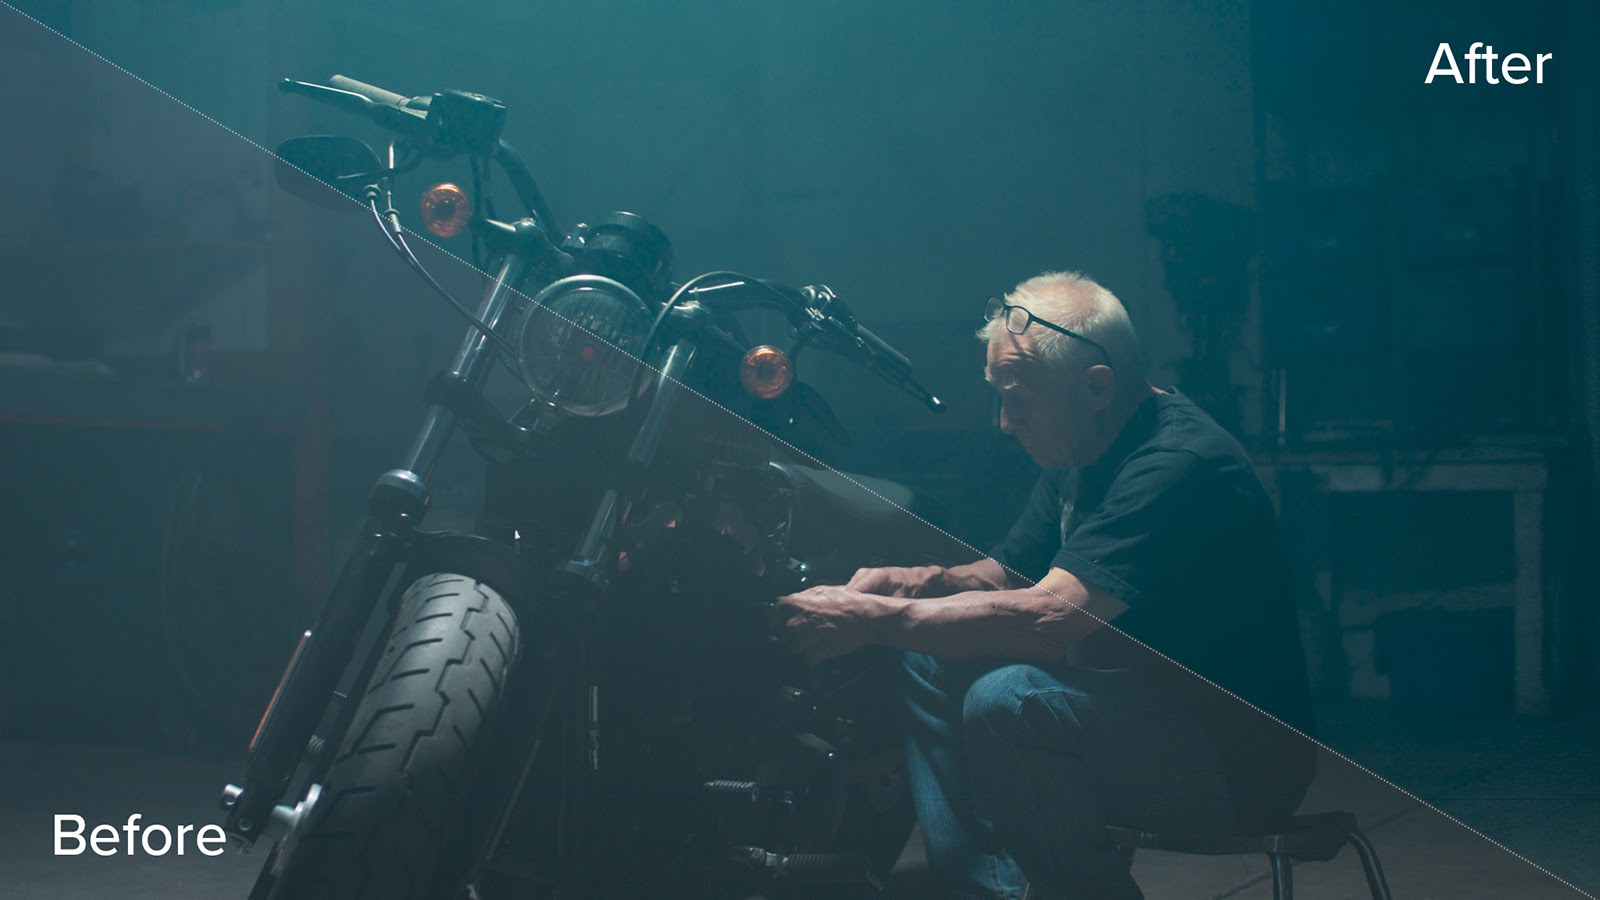
Unlike a technical LUT, a creative or “look” LUT doesn’t care about accuracy — it cares about aesthetics. It’s designed to produce a particular look without making any kind of technical transformation. As a result, creative LUTs will always have matching input and output color spaces.
And since they’re aimed at subjective aesthetics rather than absolute color science, we can employ any number of creative tools to produce our desired effect.
Hybrid LUT
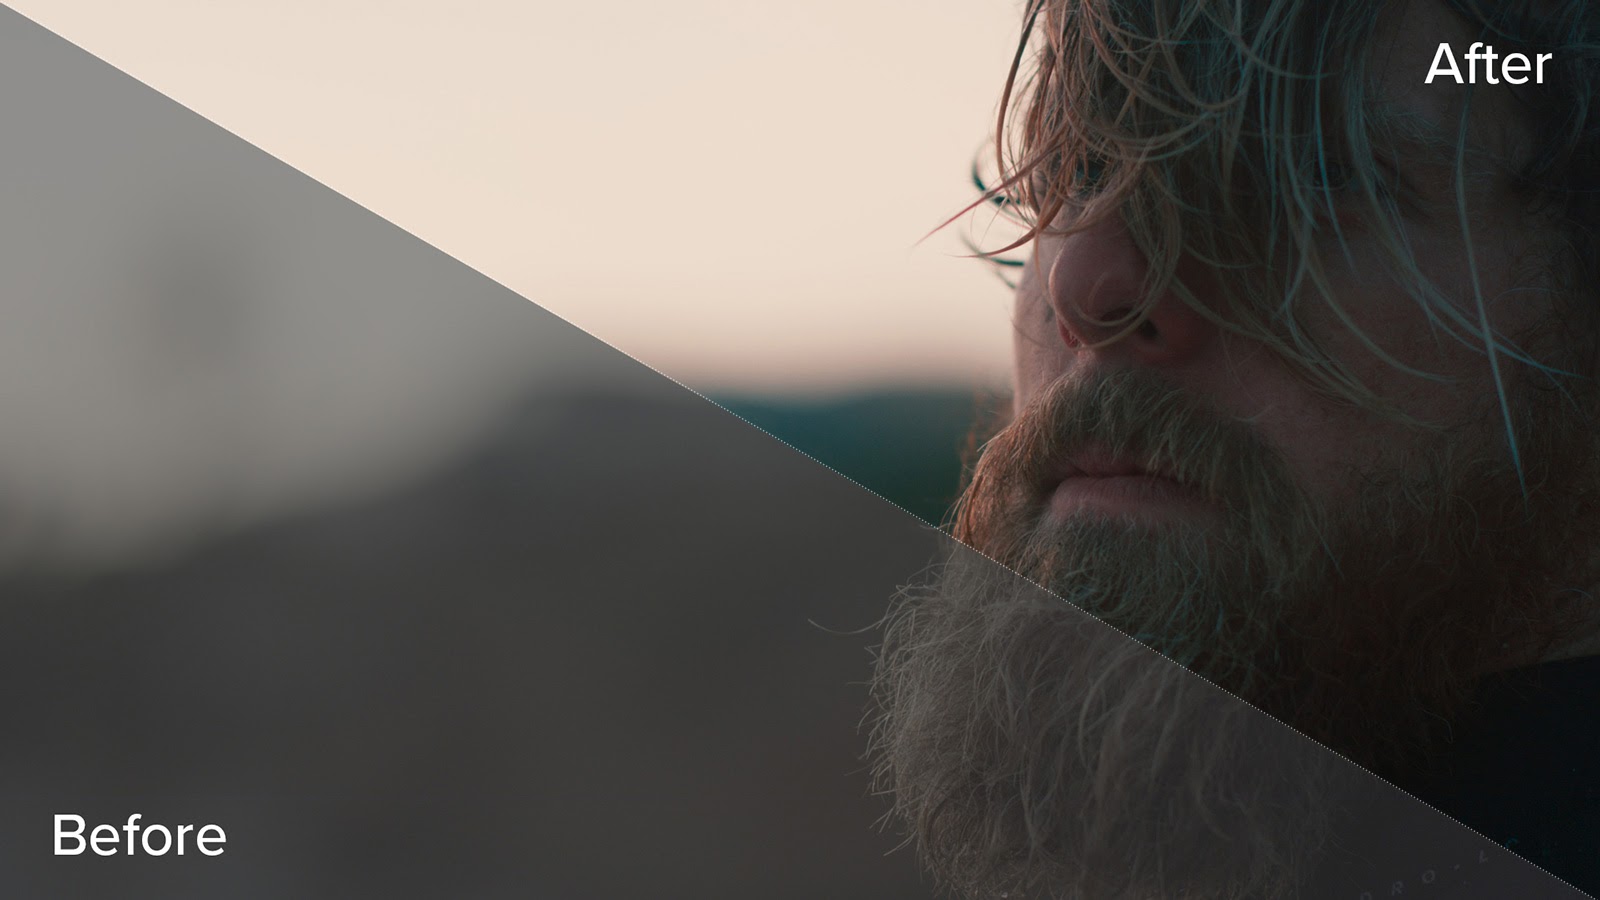
A hybrid LUT, as you might have guessed, is simply a combination of a technical and creative LUT. It imparts both a technical transformation and a creative aesthetic. This tends to be the most common type of LUT, and includes virtually all LUTs provided by camera manufacturers, such as Arri’s LogC to Rec709.
As the name implies, this LUT provides a technical transformation from Arri LogC to Rec709, but along the way it also imparts a look.
Building your LUT
With these key questions answered, you’re ready to begin building your LUT. Let’s walk through the process together using a hypothetical scenario: I’ve decided to build a hybrid LUT for an upcoming film which will shoot on a RED. I’d like my LUT to expect REDWideGamutRGB/Log3G10, and to return Rec 709.
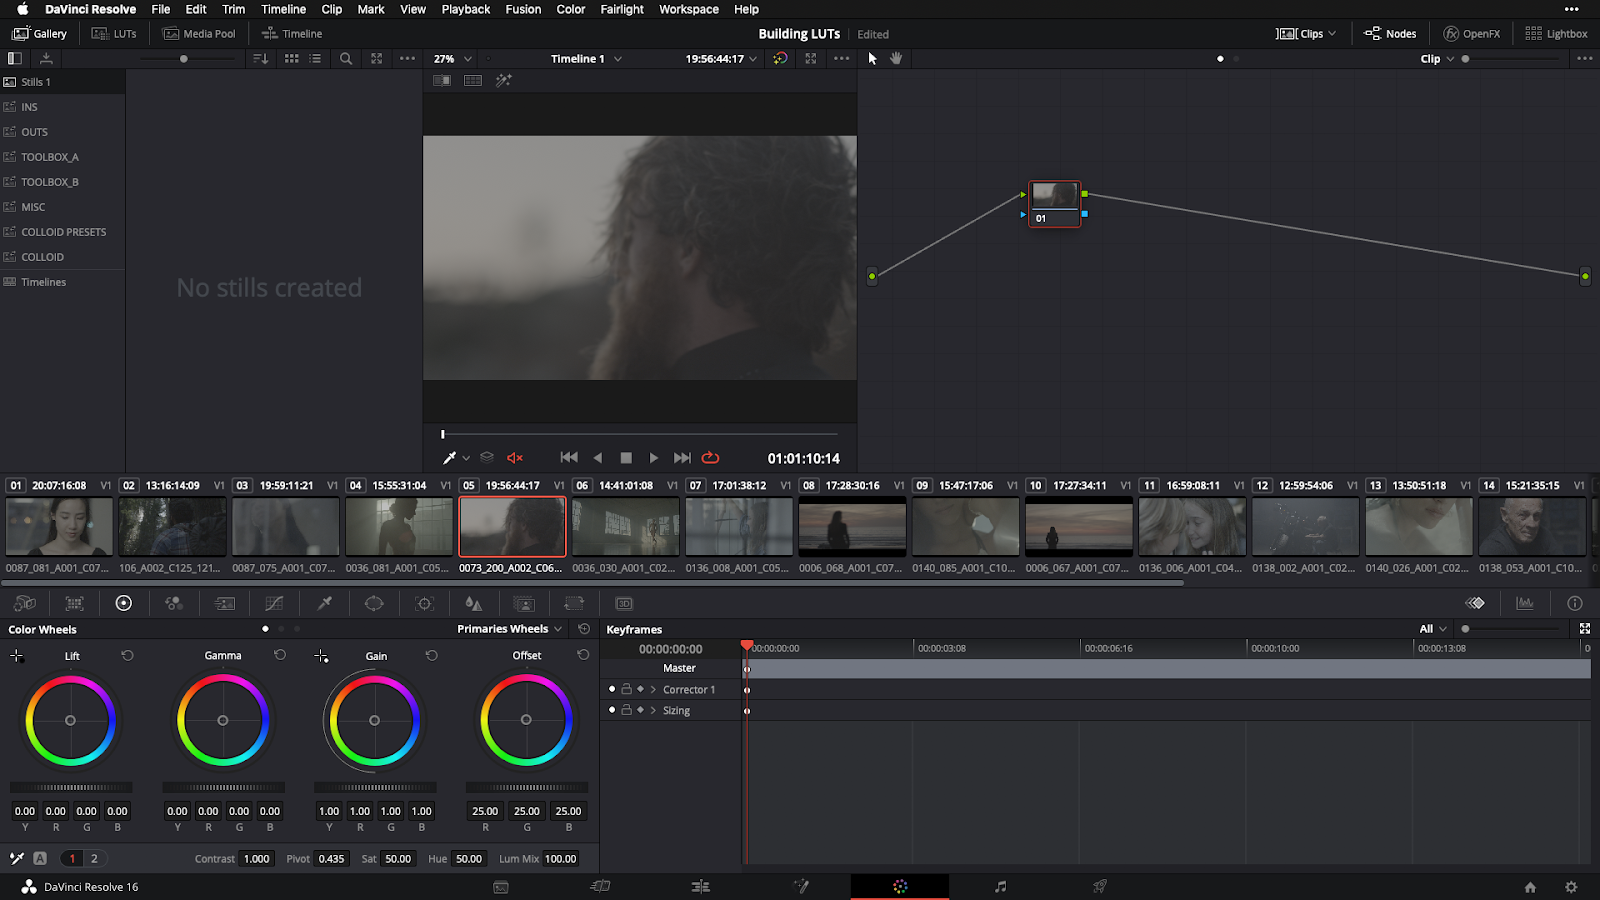
Step 1: Set up a Resolve timeline containing source media matching your LUT’s input color space
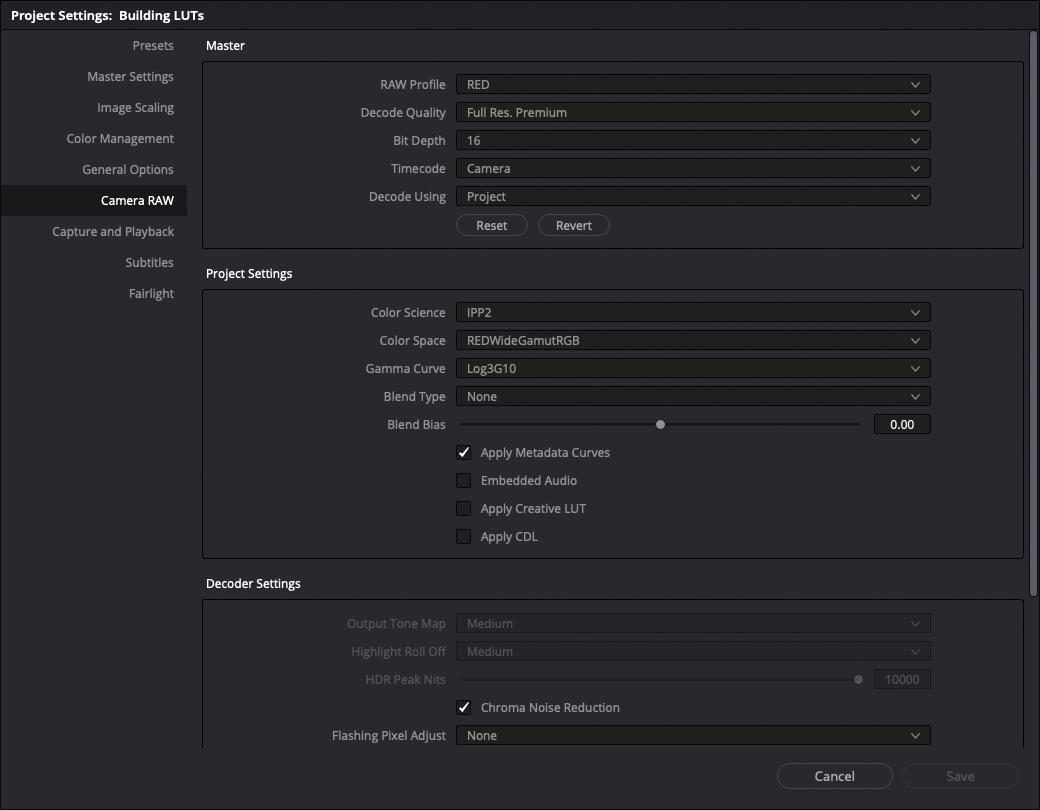
Any media that matches your desired input color space will work, but whenever possible, it’s best to use content that roughly matches the contrast ratio and color palette of what you’ll be shooting. In my case, I know my LUT will need to serve a pretty wide variety of environments and lighting conditions, so I’ve pulled in a mixture of RED footage. I’ve also set up my Camera RAW settings to match my desired input color space (File -> Project Settings -> Camera RAW).
Step 2: Start with any necessary technical transforms
If you’re building a LUT which will include a technical transform (ie a technical or a hybrid LUT), you should always start with the technical transform. In my case, my hybrid LUT will contain a technical transform from REDWideGamutRGB/Log3G10 to Rec 709/Gamma 2.4, so I’m going to use Resolve’s Color Space Transform tool to set this up as the first node in my tree.
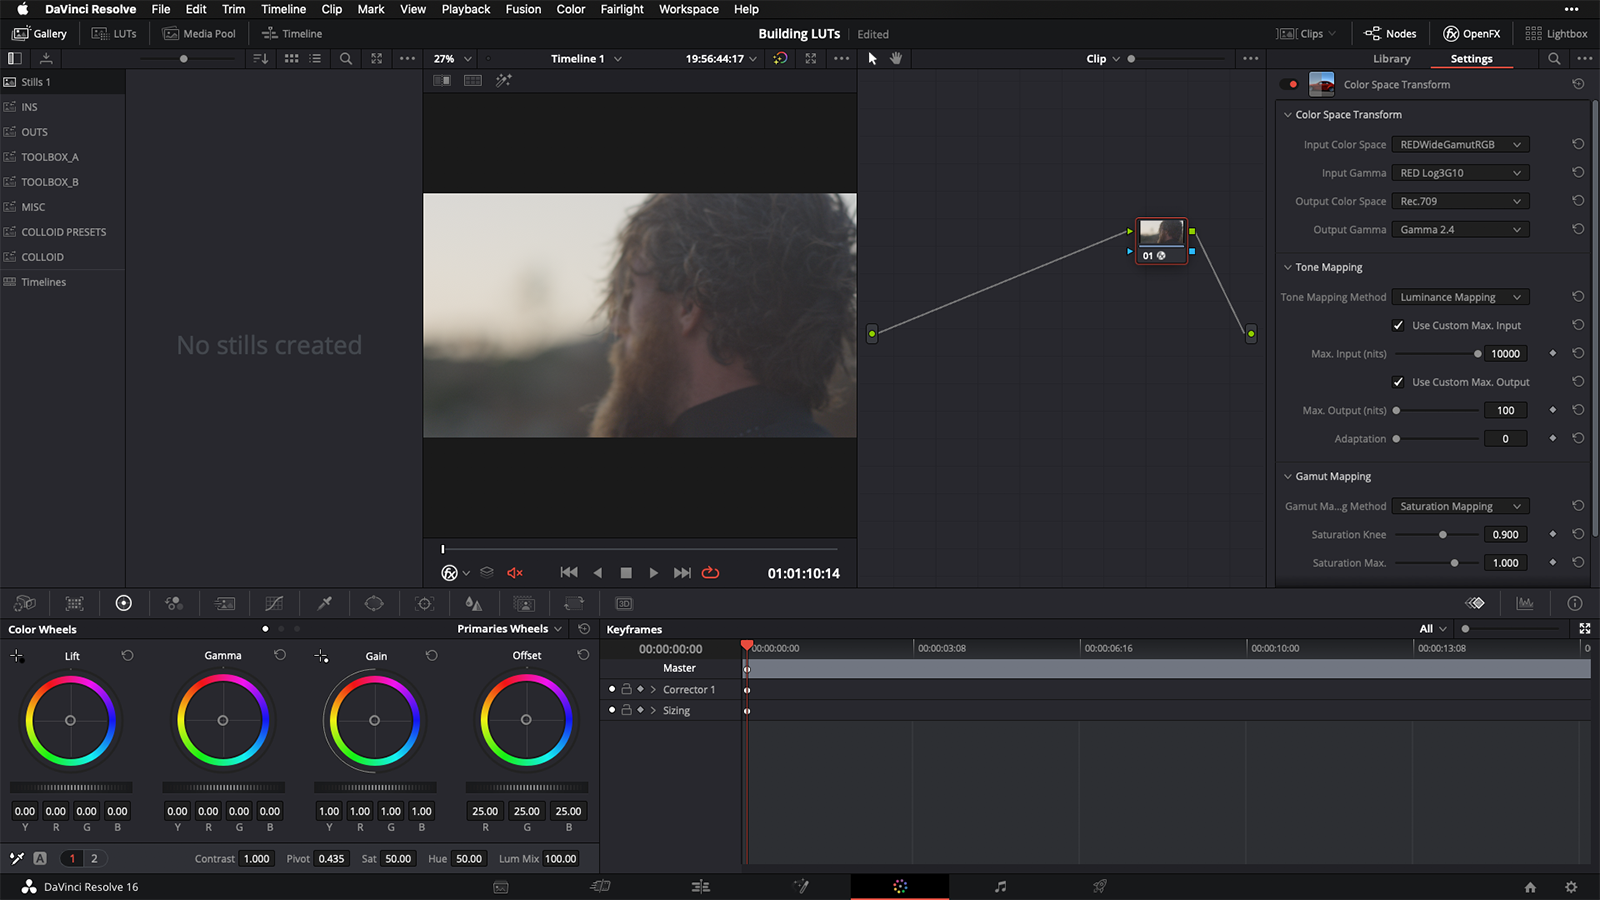
To do this, click the “OpenFX” button at the upper right corner of the Color page, and find “Color Space Transform” under “ResolveFX Color”. Drag this onto an empty node, and set your input color space, input gamma, output color space, and output gamma to match your target input and output.
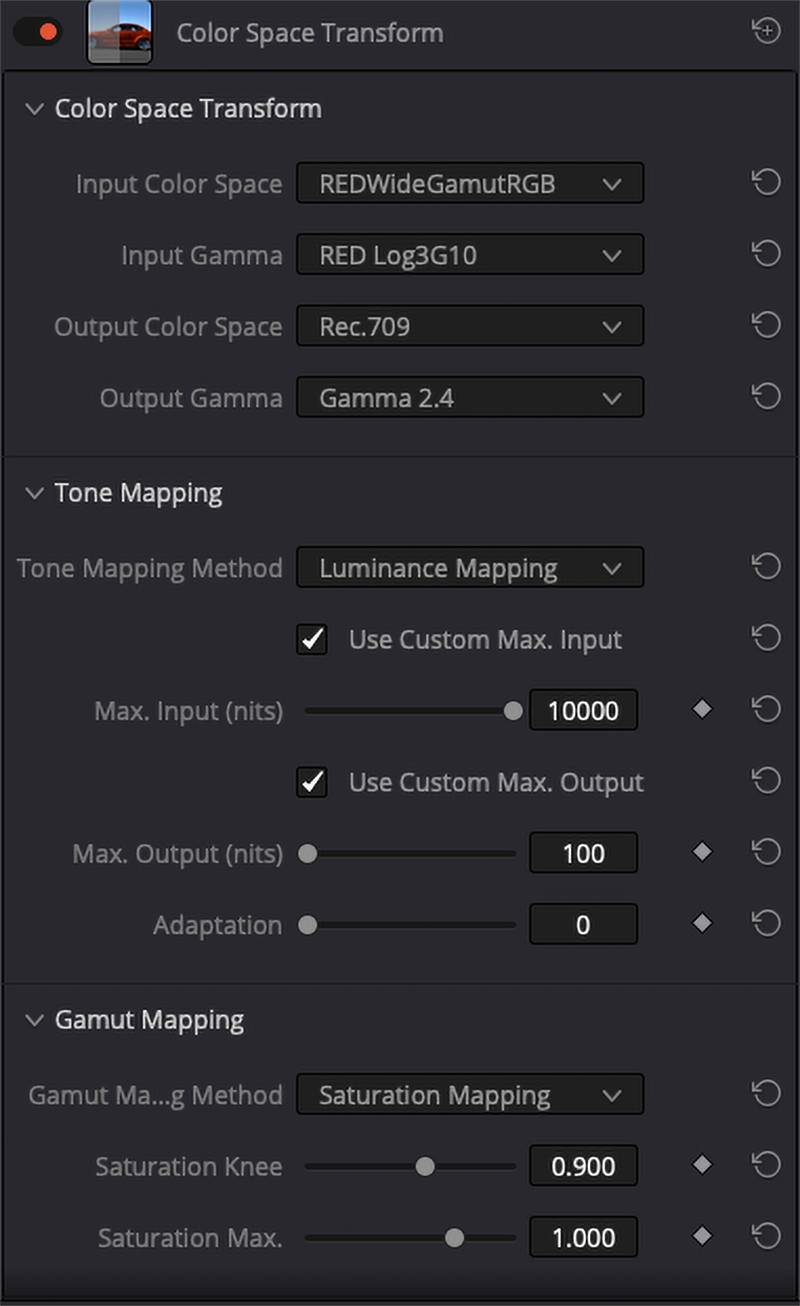
Note: if you’re transforming from log color space (such as Arri LogC) or a larger gamut than your destination (such as Arri Wide Color Gamut), you should also set up your luminance and gamut mapping to deal with out-of-range luminance or color values. You can use the values in the above screenshot as a starting point.
Lastly, you should label this node for organization’s sake — I’ve called mine “->709”.
If I were building a solely technical LUT, I could skip the next step and go directly to step 4. But since I’m not, it’s time to:
Step 3: Get creative!
Now comes the fun part. You’ve set up your working environment, gotten your technical transform out of the way, and you’re free to start experimenting. I’m going to create a simple look using my Custom curves and Primaries to give my LUT a full-contrast, cool, and slightly desaturated vibe. But bear in mind, you can use any tools you like, as long as they’re not spatial or textural in nature — adjustments like grain, blur, power windows, or vignettes won’t translate when you go to export your LUT.
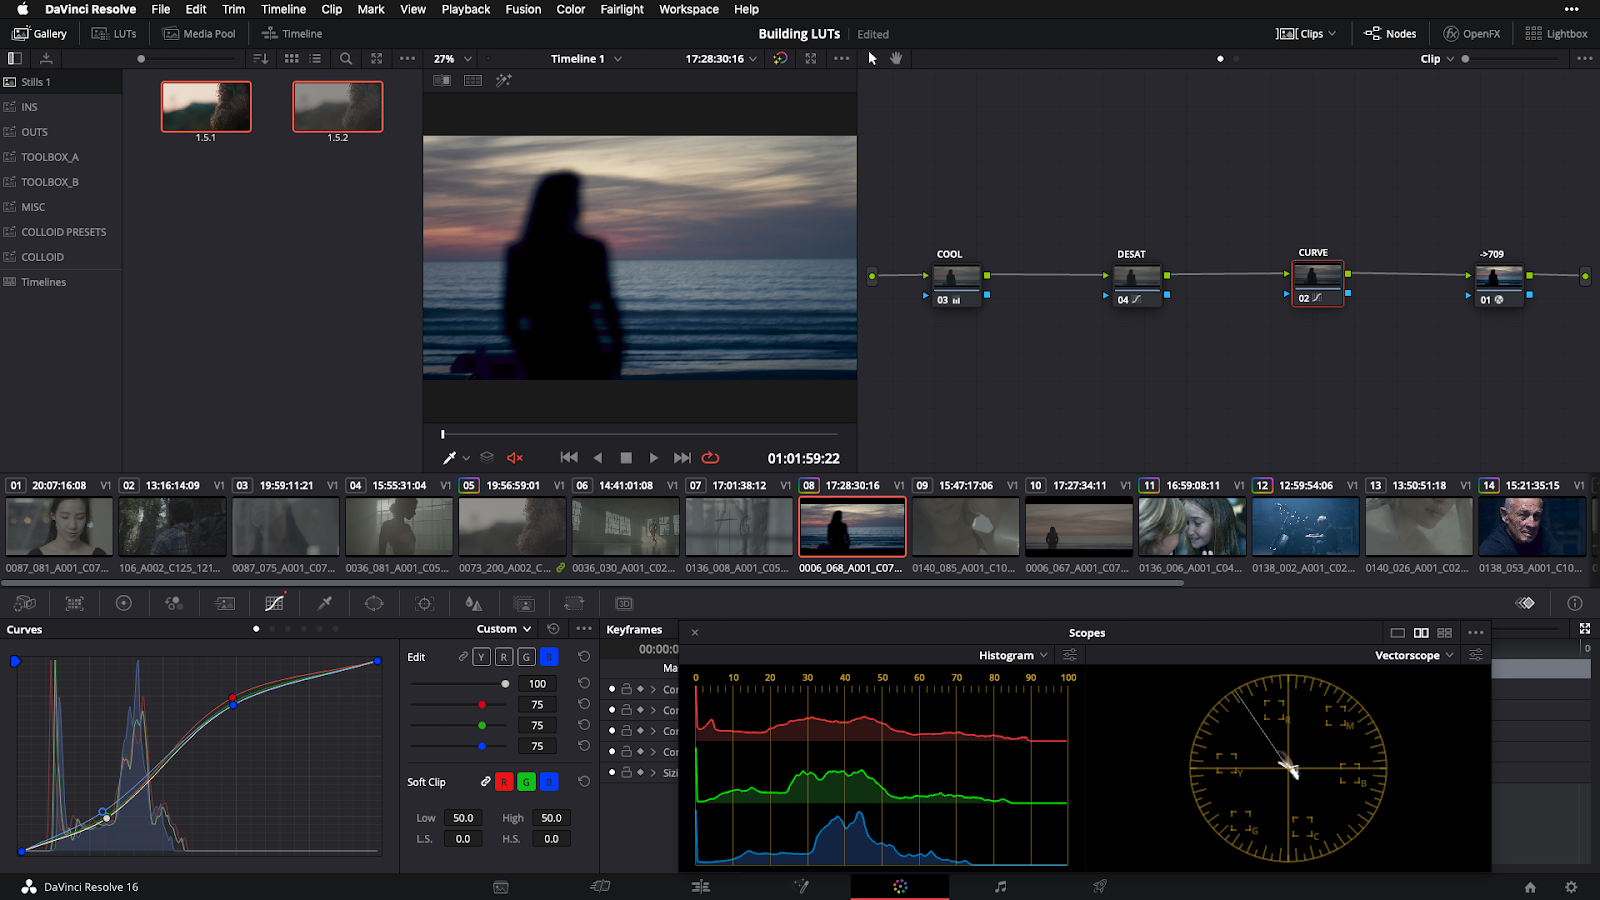
Important note: even though our technical transform is the first adjustment we make in our node graph, it should be the last adjustment made in our image pipeline — meaning everything we do here in step 3 should happen upstream (to the left) of our Color Space Transform node. It’s also important that the node which contains our Color Space Transform is kept free of any other adjustments; these should be made on separate upstream nodes.
And remember, we’re trying to build a LUT that will work for many shots, not just one, so make sure you paste your node tree onto multiple shots, and adjust it based on the way different images react.
Finally, as in the prior step, I’m going to label my nodes as I go along, because I want to be able to easily make sense of my node graph as it grows, and be able to open my project and quickly make refinements at any point.
Step 4: Create your LUT
Once you’ve got a look you’re happy with, it’s time to output your first draft. Save your grade into a dedicated album, and label it “v1”, since we’re going to continue revising as we test the LUT out.
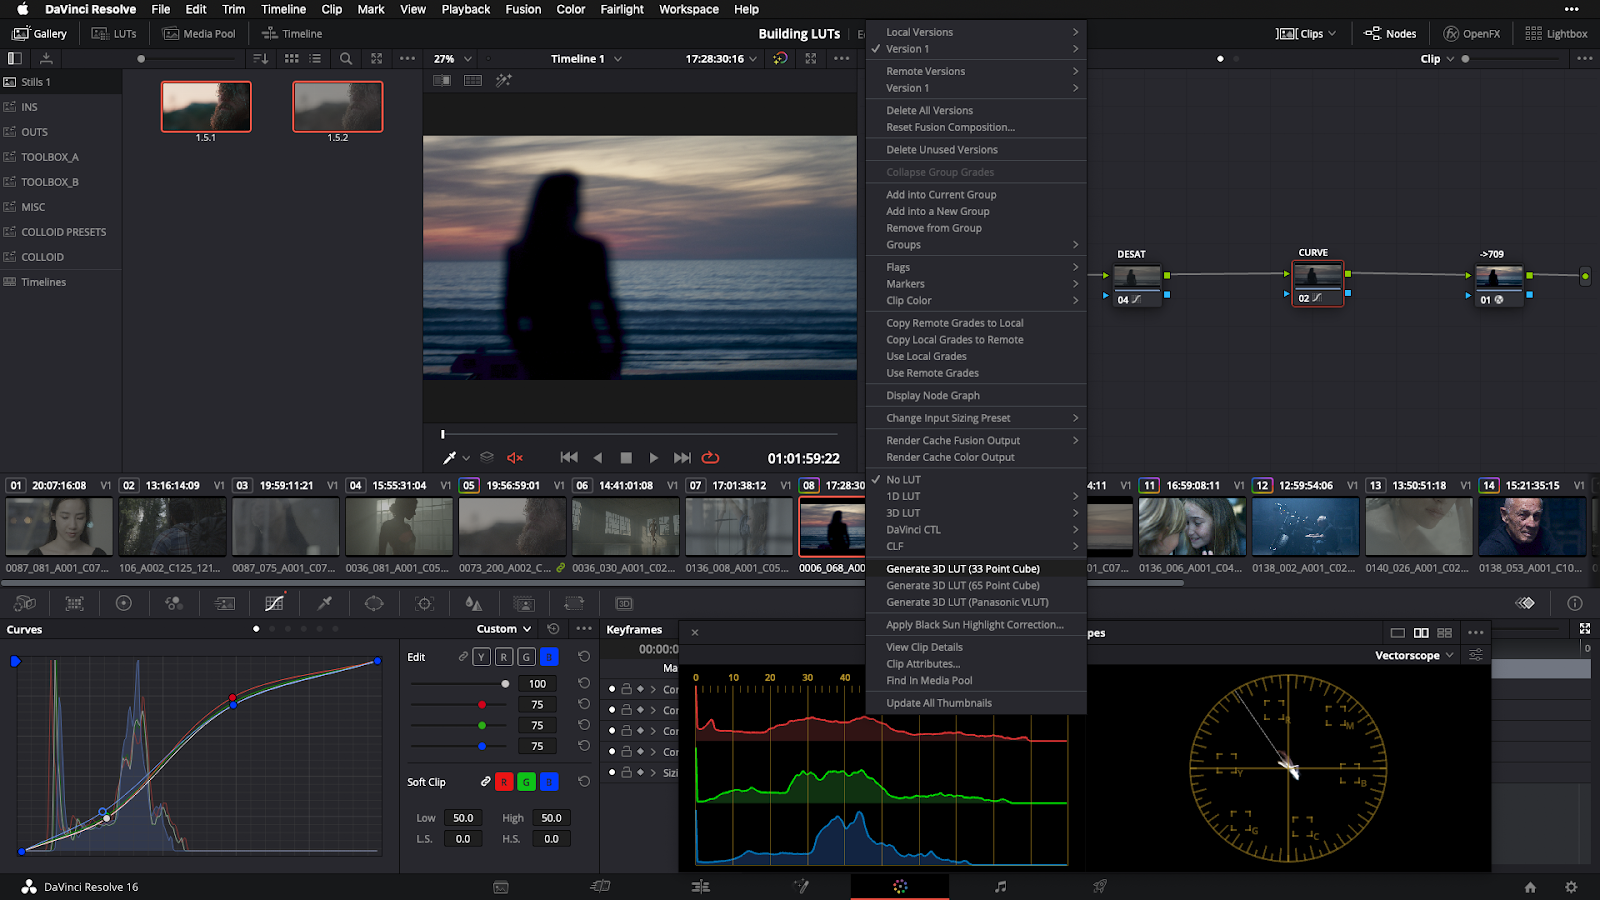
Right-click on the thumbnail for your image and select “Generate 3D LUT (33 Point Cube)”. Select a destination folder and give it a descriptive name, including a “_v1” suffix. You’re free to generate a 65-point LUT, but for the most part, all this does is increase file size and create compatibility issues with cameras that can’t accept larger LUTs.
Congratulations — you’ve now cooked your first LUT! You’ll probably want to rename the file to remove the suffix added by Resolve. If you want to round-trip back it into Resolve, simply copy it into your LUT folder and relaunch the program.
For macOS:
/Library/Application Support/Blackmagic Design/DaVinci Resolve/LUT
For Windows:
\ProgramData\Blackmagic Design\DaVinci Resolve\Support\LUT
And of course, you’re also free to load your LUT onto your camera and start framing images with it. Most cameras will readily accept the .cube format of your exported LUT, but in some cases you may need to convert formats — most notably for the Alexa or any other Arri camera. In this case, you can make the conversion to Arri’s .aml format using the Arri Color Tool, which is available as a free download:
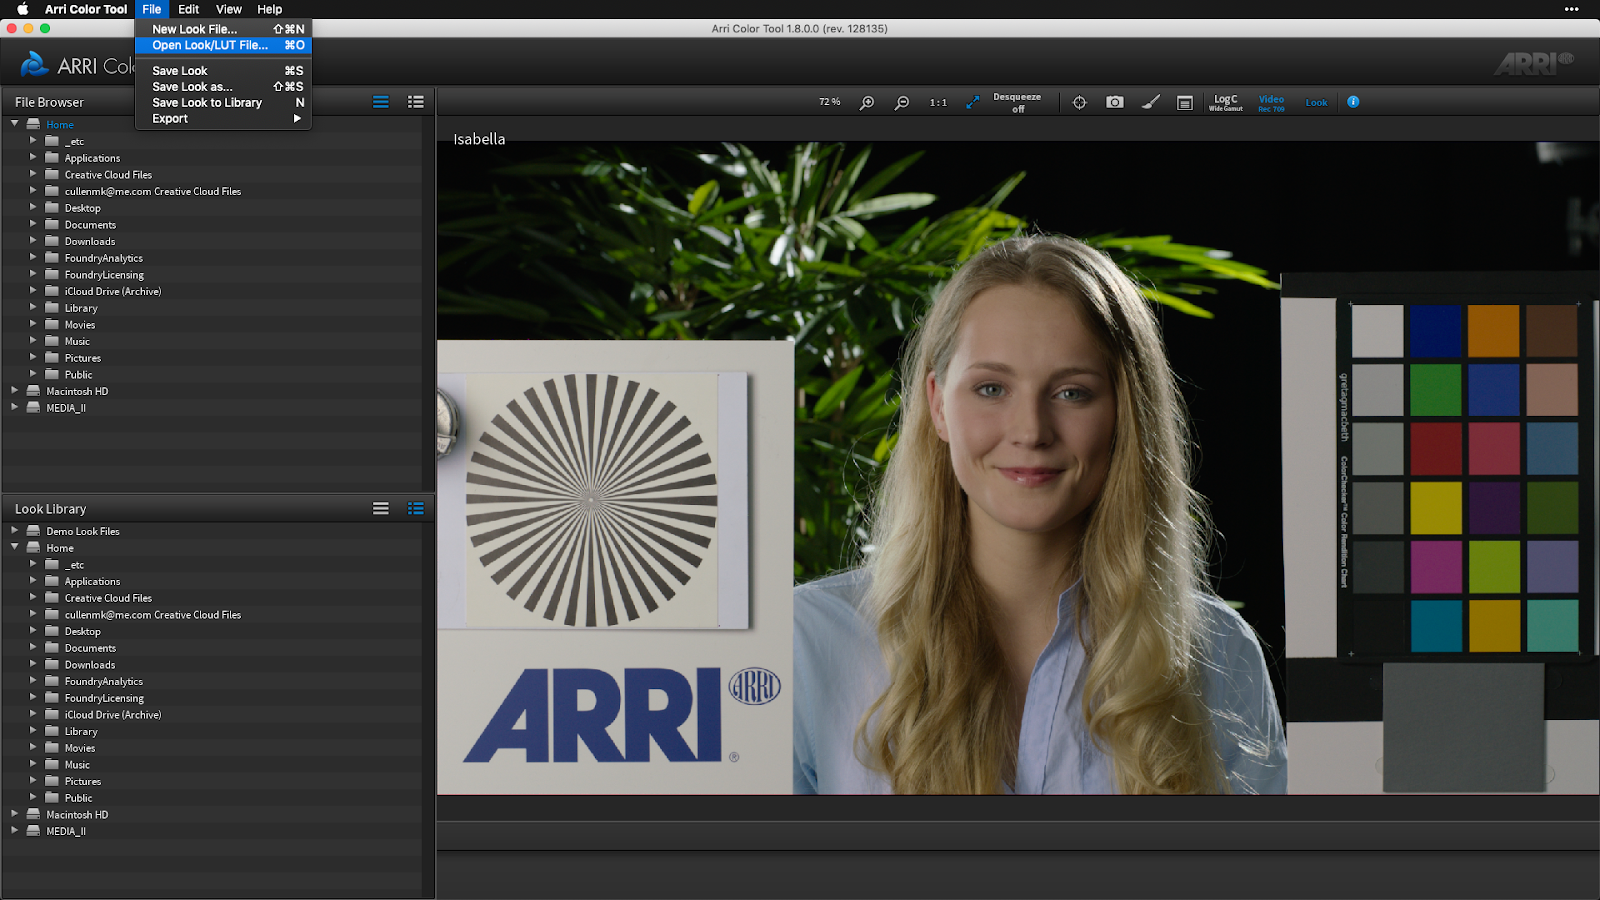
- Open the program, then go to File -> Open Look/LUT File and navigate to your exported .cube file.
- Next, go to File -> Save Look As… and pick a destination directory. An .aml file will be output to this location, which can be loaded onto Arri cameras.
Step 5: Test, adjust, repeat
From here, you simply want to put your LUT through its paces. Test it on a variety of images and in a variety of shooting conditions. Does it get too dark? Too saturated? Too flat? The best way to dial in a robust LUT is to do lots of testing and lots of adjusting.
It’s also helpful to save each version you create as a still image so that you can retrace your steps if you go down the wrong path. The more you test, the more confidence you gain in your LUT, and the more you learn about building them in general.
That’s a wrap
I hope this gives you a great starting point for creating LUTs and using them effectively in your workflows. Whether you’re a director, DP, editor, or colorist, cultivating the ability to create LUT-based transforms and looks and share them with your collaborators is one of the best investments you can make in yourself as a filmmaker.
As a parting note, I highly recommend Lattice for anyone who regularly creates or uses LUTs. It lets you analyze, manipulate, convert, and re-purpose LUTs in a variety of ways, and you’ll find it quickly pays for itself in time saved.
Feel free to post any questions below, and to share links to any work graded with your LUTs. Happy building!


