The Academy Color Encoding System (ACES), is a grand idea.
In theory, an ACES pipeline delivers a high-quality color management system that gives you the best possible color accuracy and image fidelity through the entire post-production process.
But in practice, ACES can be…complicated.
For example, Adobe applications aren’t integrated with ACES right out of the box. And, in my experience, many artists don’t use color-managed video workflows in Premiere Pro or After Effects anyway.
That’s not to say it can’t be done in those programs. They’re just not designed to do it as well as software like DaVinci Resolve, Nuke, and Flame.
Trickling down
ACES has traditionally been confined to the feature world with very “dialed-in” color science.
There are a lot of reasons for this, with heavy CG and VFX being the biggest. The complexity and number of artists involved in these processes require a standardized system like ACES. But smaller facilities and teams in the commercial world have been slower to adopt a color management system.
Like many business practices, it comes down to necessity.
Not every project needs full color management. Sometimes, managing all the transforms of an ACES workflow can be perceived as overcomplicating the job—especially if artists aren’t familiar with the constraints of working in a color management system.
But I’d argue that a little work sooner can avoid a lot of work later. By learning a little bit about color management, smaller teams can really benefit from the flexibility and power that ACES offers. It takes a bit of work to get it working correctly, but once it’s set up, ACES transforms do most of the heavy lifting for you.
Today, it’s possible to adopt these high-end workflows without the need for a big technical pipeline team. The tools are all there and more accessible than ever.
Bridging the gap between color and VFX
All of which brings us to the topic of this article: adopting an ACES pipeline to integrate After Effects and Resolve.
Why would anyone want to do this? Well, there are a few reasons.
In today’s world, motion graphics, color, VFX, and finishing are often happening at the same time. Eventually, each of these pieces will be integrated to create the final output. Graphics need to be adapted for final color or vice versa, and this can lead to a lot of frustration on both sides when you’re working without a unified color pipeline.
Traditionally, graphics and finishing are created in a display-referred space like Rec. 709, and renders are sent back and forth for matching and integration. There’s no reason why this couldn’t still work today, but there are some limitations and bottlenecks in this type of workflow.
Using this method, graphics would need to be integrated after color and conform, which is usually the very last stage of the process. This can delay graphics work up until delivery because color is notorious for context. If a graphics artist has been looking at offline picture references and tweaking color in that context, there’s a chance that extra work will be needed to match graphics once color is approved.
This back and forth process can absorb a lot of time, and it’s inefficiencies like these that a color management system is designed to avoid.
With a unified color pipeline like ACES, the look and feel of a piece can remain somewhat consistent throughout the whole post process. At the end, when the pieces are all integrated, graphics passes can be colored independently within that color management system, giving the colorist full creative control over how everything fits together.
In other words, once the graphics artist renders their comps with alpha channels, they’re done. From that point on, it’s the colorist or finishing artist who carries the ball. And now, since the colorist is looking at the render in the context of the final conform and color (with ACES renders and full control over the look and feel of the graphics), they can make better decisions for clients on the final look of the piece without all the back and forth.
This kind of concurrent workflow is common in the features and episodic worlds, but not so much in the commercial world. So there’s a lot of potential for a wider-scale adoption of ACES or some kind of unified color management here. Most larger facilities employ color scientists or color pipeline specialists to ensure consistency and proper color management throughout post.
While this is great, systems like ACES are designed to be used by artists, not engineers. So with a little education, smaller commercial facilities can use these powerful tools to design and test their own workflows to make full use of that extra range and control that ACES offers.
In After Effects specifically, a potential pitfall is that artists are used to working in the software’s default Rec. 709 color space.
In reality, many tools within applications are designed to work with gamma-encoded images, so choosing an all-ACES pipeline can have unintended effects that require time-sucking workarounds. But there are workarounds to that default display-referred color management in After Effects, which we’ll explore below.
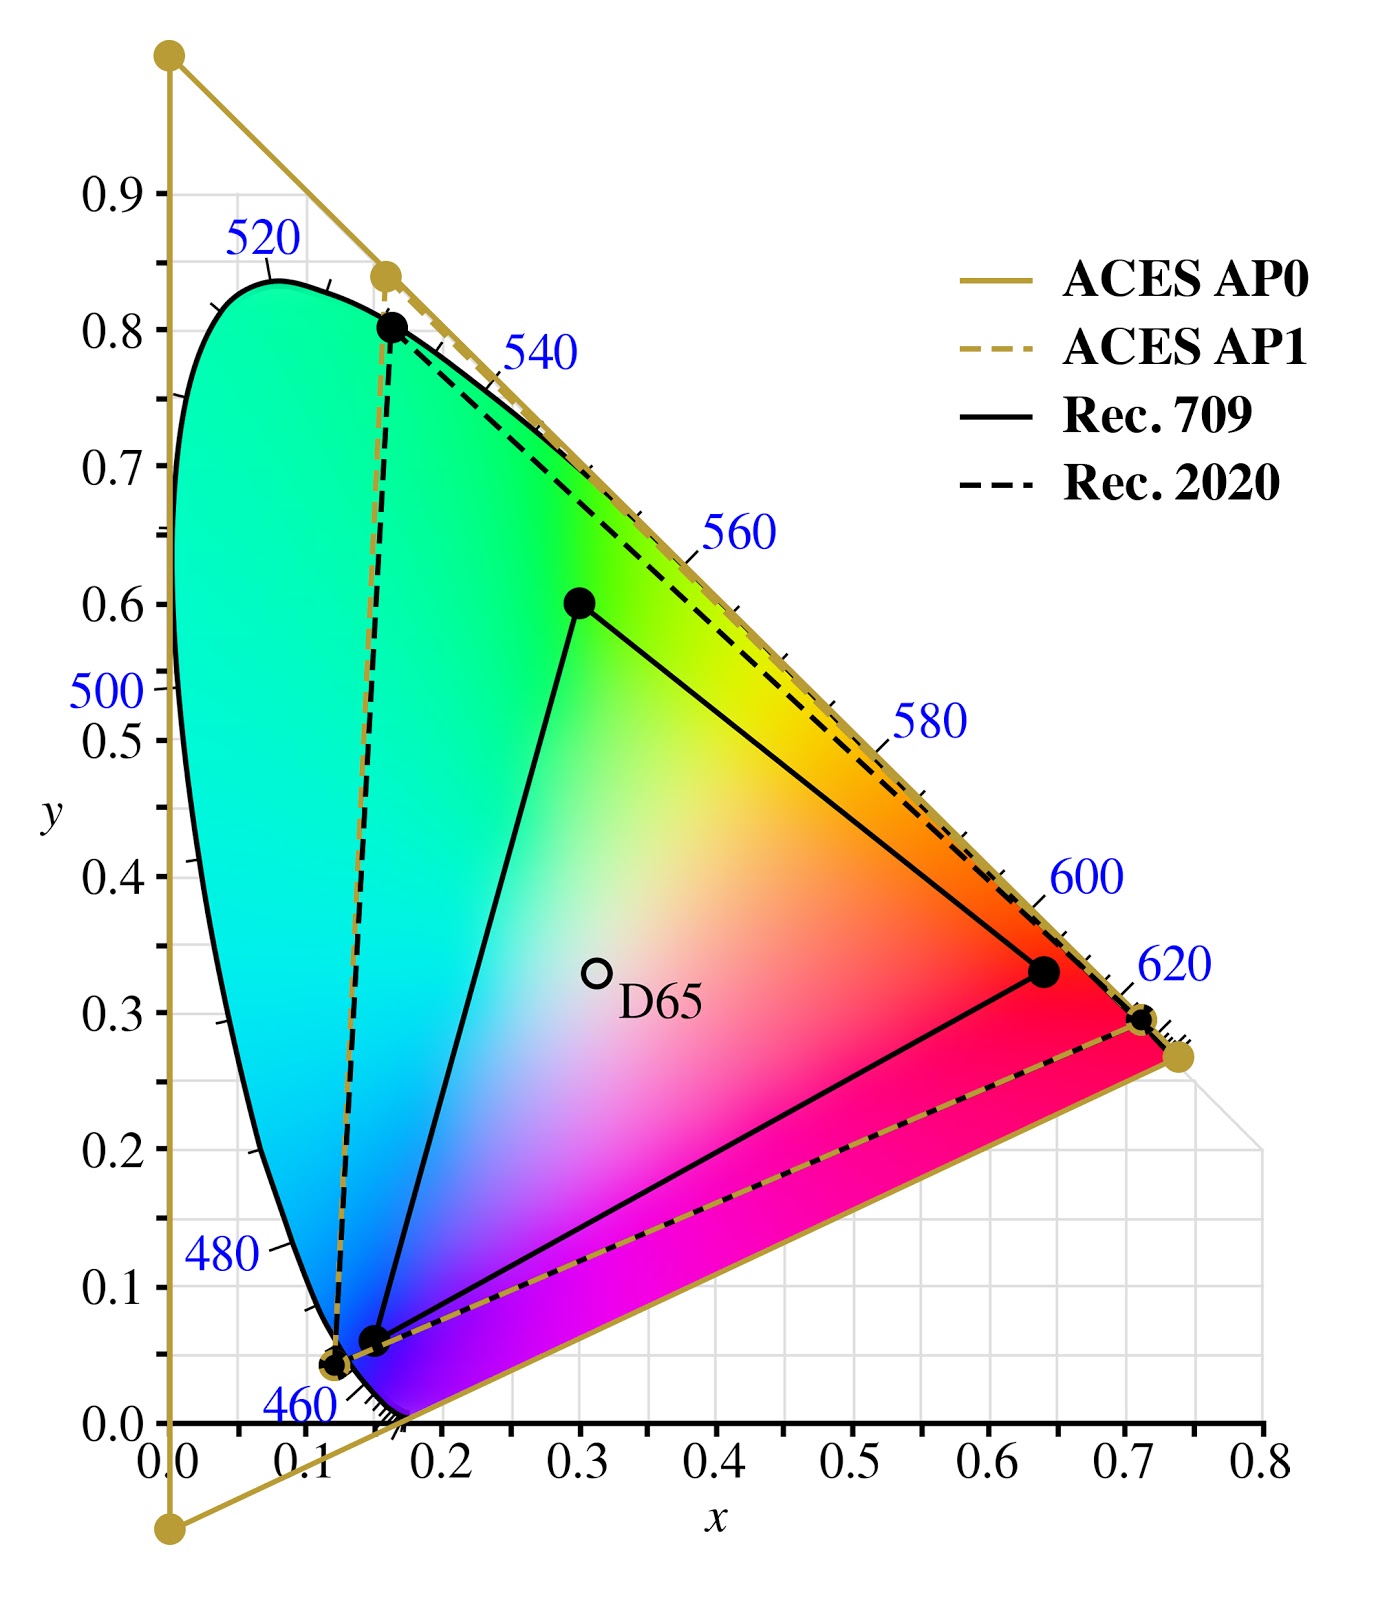
AP0 vs AP1
But before we get to that bit, it’s important to get your head around some of the basics.
ACES is a system of color management, not just a single color space. It’s a framework. This means that there are different interpretations of ACES within applications that you can choose to work in.
The key difference is between AP0 and AP1.
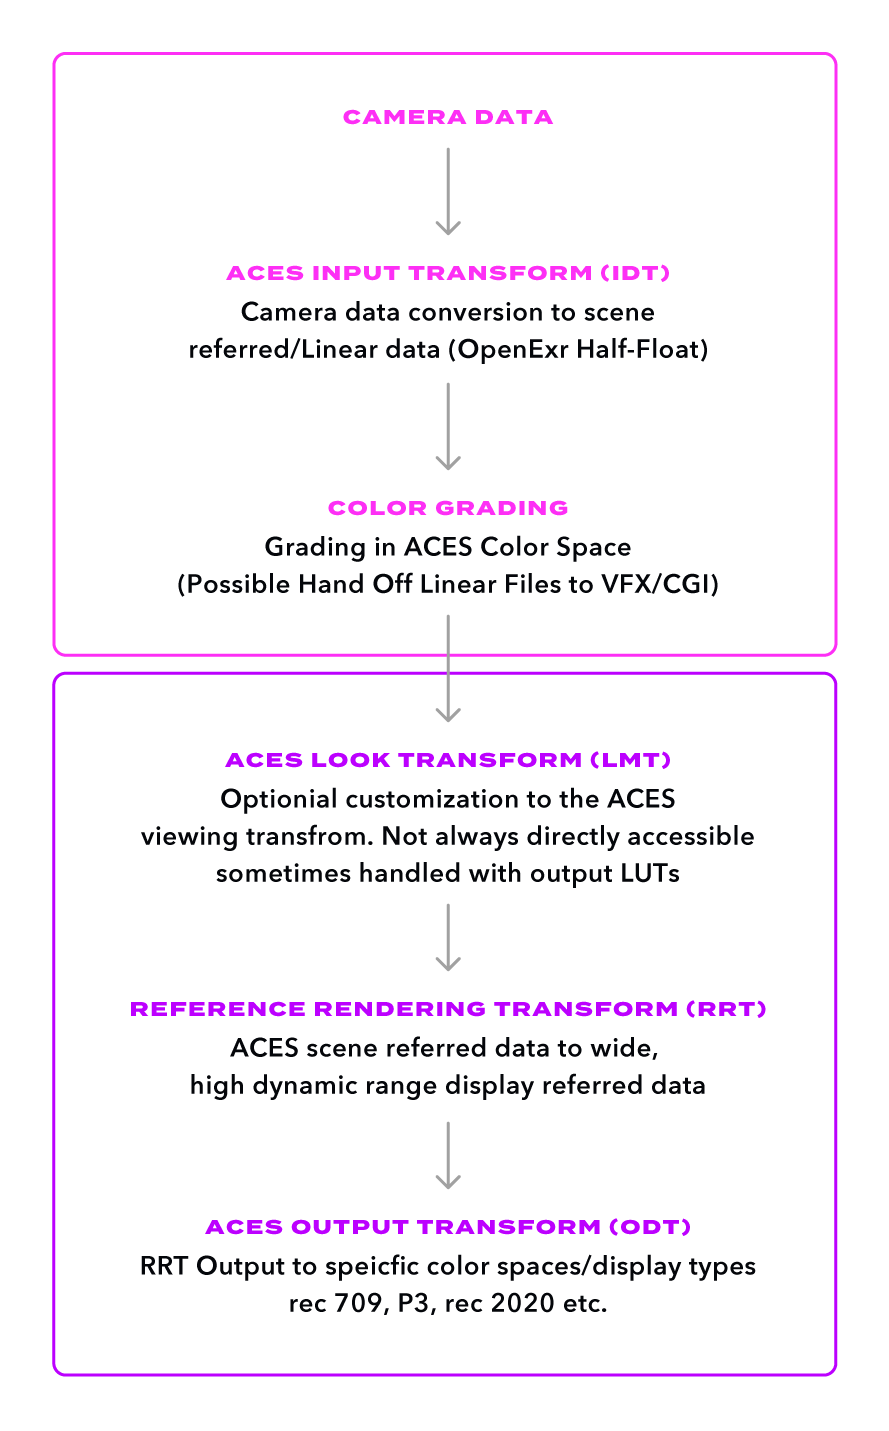
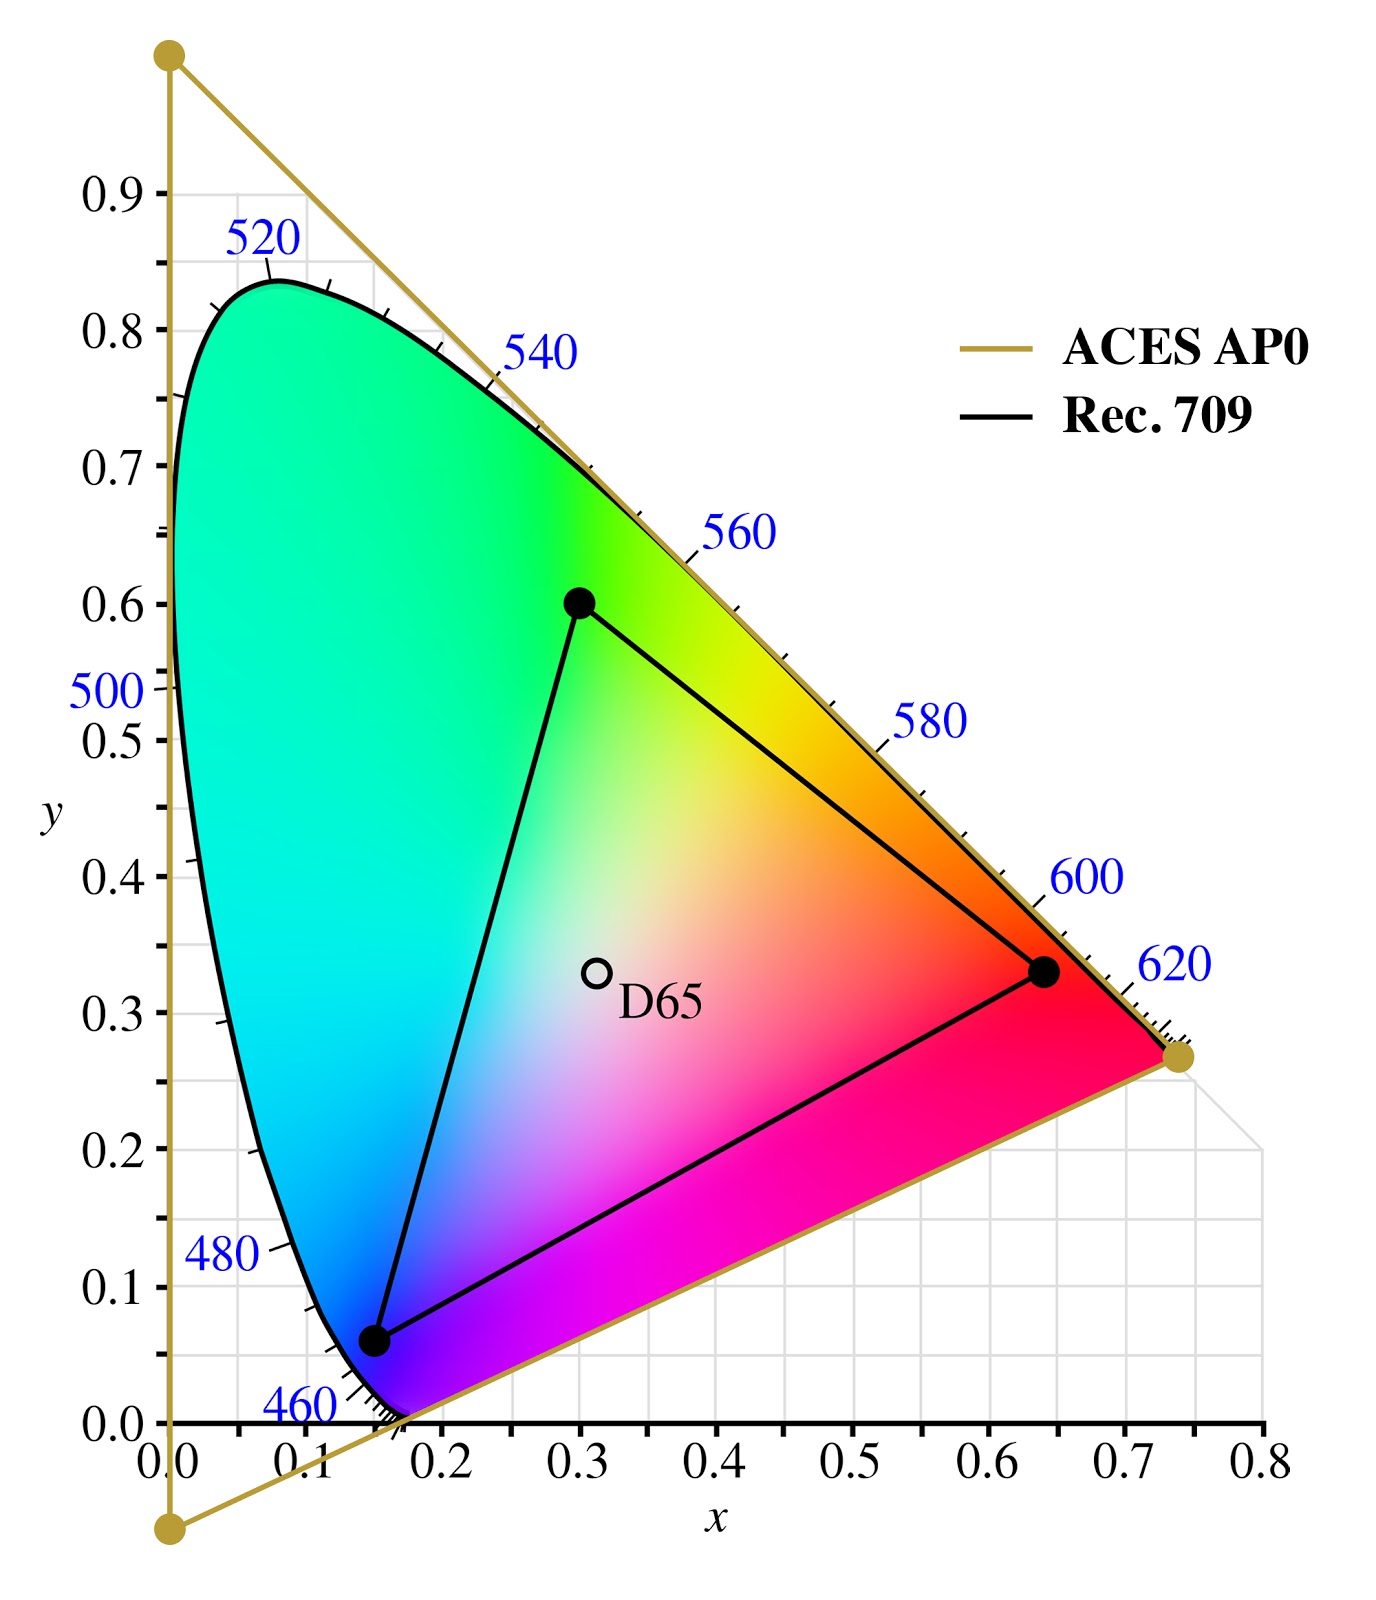
AP0 is the framework used to store and exchange ACES files between applications, and for archiving. Also called ACES 2065-1, AP0 is the widest container for data and is encoded as a 16-bit float linear EXR file, which provides enough space for all that data and quality.
In simple terms, if you can see it, then AP0 can store it.
AP0 encoded files are interpreted in each application depending on how you want to work, i.e., log-encoded for color grading, or linear for CG.
These interpretations are called AP1, which is the working color space and gamma within the software you’re using. So when you’re working in ACES, the key is to use AP0-encoded source files within that AP1 framework.
While it’s possible to work directly with AP0 files, it’s clunky and not how ACES was designed to operate. When you choose an AP1 framework in your application, your software can seamlessly interpret your ACES-encoded source files.
ACEScg vs ACEScc vs ACEScct
The AP1 encoding you choose should match the task you have in mind, and within AP1 you can choose between ACEScg, ACEScc, and ACEScct.
Generally speaking, ACEScg uses linear color and is best for working with CG files in applications like Nuke or Fusion. ACEScc and ACEScct are logarithmic interpretations of ACES and are intended to work like camera sources or film scans for color grading work.
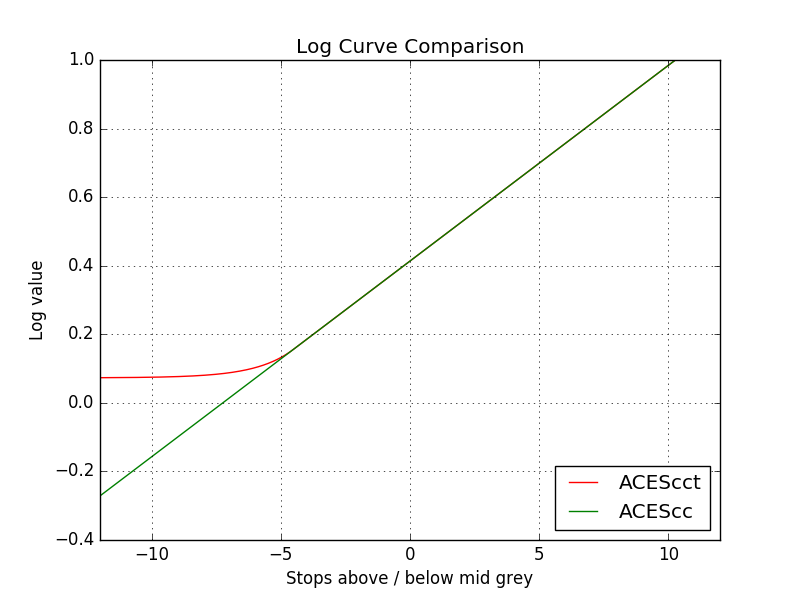
The difference between ACEScc and ACEScct is that in ACEScct, the toe—the shadows at the bottom of the curve—has a softer curve like traditional film scans. With ACEScc, the toe is more linear. Which can take a little getting used to if you’re used to working with camera sources or Cineon film scans.
ACES in After Effects
While it’s difficult to work natively in ACES in After Effects, there are benefits, most notably when working with CG or compositing.
For example, by sending ACES plates to After Effects you can integrate graphics into that framework, render back a composited shot with mattes, and have full creative control over the color and look of the final piece.
Even for simple motion graphics, ACES can help bridge the gap if you’ve tested your own workflow. You can bake-in graphics to ACES plates and have the flexibility to adjust both the plate and graphic element as one unit or independently.
All of these options and technical details can seem intimidating at first. But when we get into working between Resolve and After Effects below, things should become more clear.
Once you get up to speed on how the controls respond differently, ACES can open up new roads and avenues of working. Yes, it can be complicated at first, but most of the transforms and complications are under the hood.
But if it’s been set up properly, and you have a basic understanding of how it works, the rest should be easy.
Setting up Resolve with ACEScct
If you work with primarily Rec. 709-baked sources, you might want to consider if ACES is right for your project.
There are still some benefits to working color managed with gamma encoded sources with limited color gamuts, but sometimes it’s not worth the extra complication.
But for this example I’ll use some RED files to demonstrate. When you’re working with wide gamut, wide dynamic range camera files, an ACES pipeline is ideal as it allows you to maintain their wide range up until delivery.
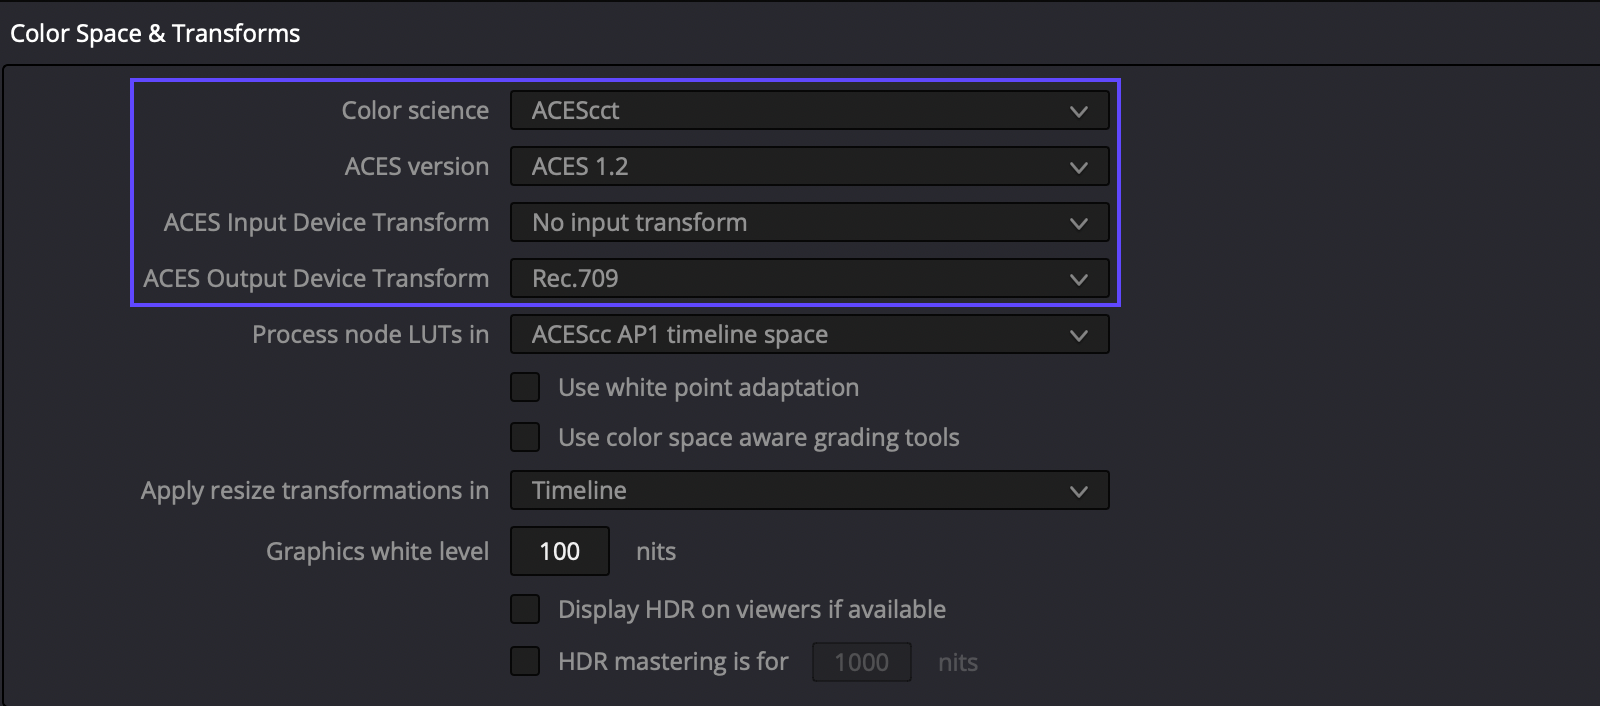
So our first step is to change color management settings for our project in Resolve. Open the Project Settings (Shift+9) and select the Color Management panel. Change the color science to ACEScct, and then choose ACES version 1.2 from the drop-down below. 1.2 is currently the latest version of ACES as of the writing of this article.
For this project, make sure that the ACES input device transform is set to “No input transform.” Using this setting means that Resolve will automatically convert any imported RAW files, but other formats will need to be manually defined. (Right-click on them in the Media Pool and select the correct color profile from the ACES Input Transform list.)
For the ACES output device transform, we’ll change that to Rec.709 so we can properly monitor our images while working.
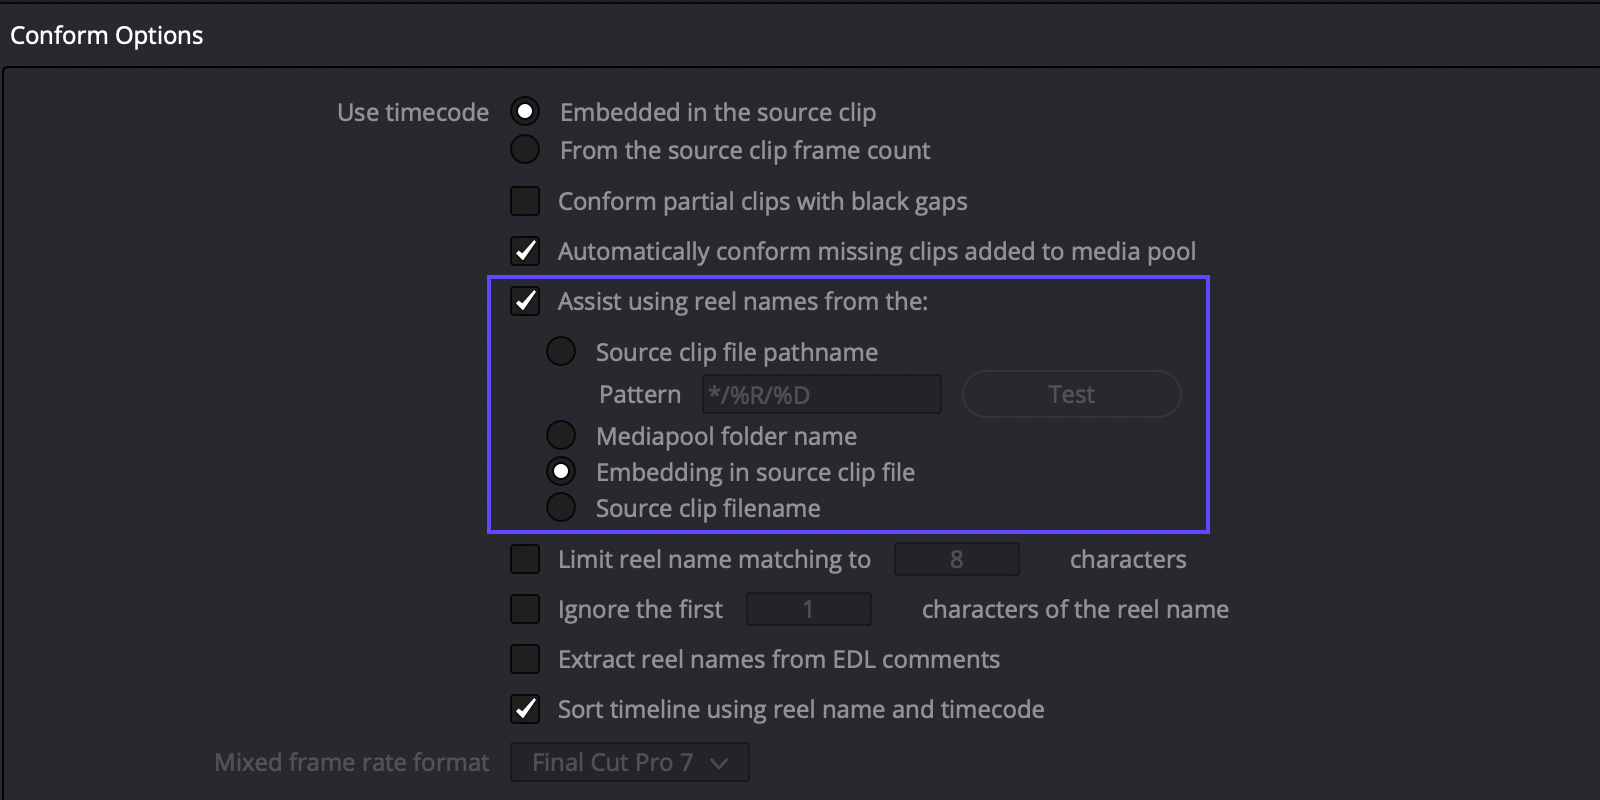
Another setting I like to use when importing media is the “Assist Using Reel Names” setting in General Options under Project Settings. We’ll turn this option on and we’ll also select “Embedding in source clip file.” The latter will pull the metadata embedded in the source clip file as the reel name. This will prove useful later when we render out our ACES files for After Effects.
Importing RAW Media
Now I’m ready to bring in those RED files. It’s as easy as opening the folder in the Media page and importing them into the ACES project.
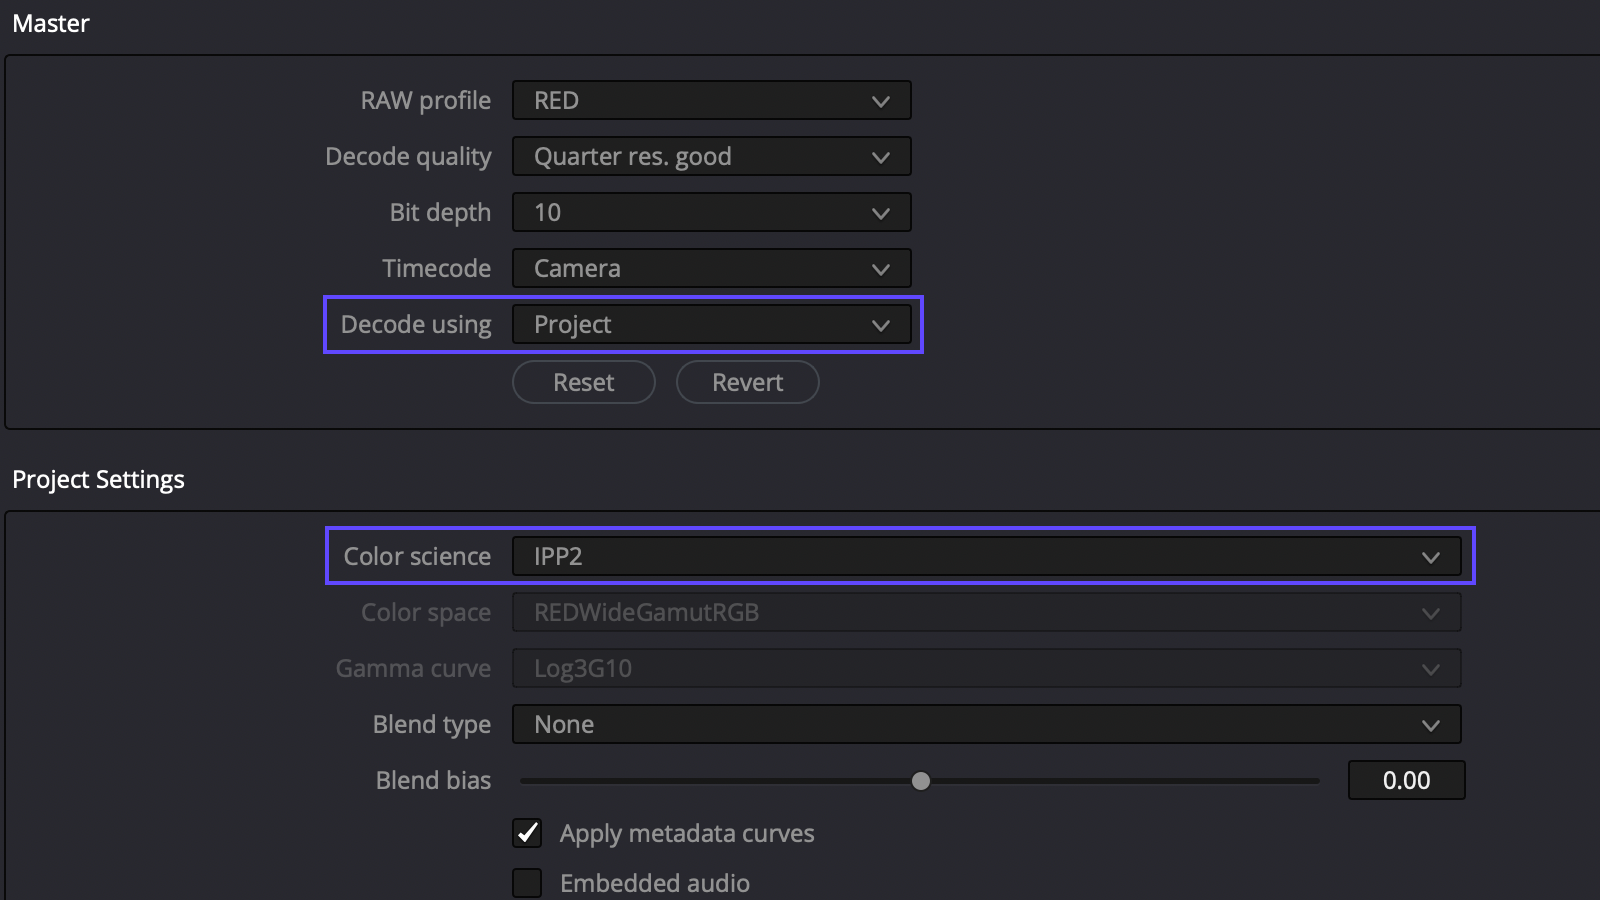
Then check out Camera RAW settings in the Project Settings. We’ll make sure to decode using our project settings and set our color science to IPP2. For this example, I’ll check all the Use Camera Metadata settings so that Resolve is using that information directly from the camera.
Any RAW files will be converted to ACES by default in Resolve without any need to set an input color space. In an ACES color-managed project, RAW data will be converted to ACES under the hood. There are still RAW settings you can adjust like ISO, tint, and temperature but gamma and color space will be unselectable as those are being managed by ACES now.
Rendering ACES plates from Resolve to After Effects
For this demo, we’re going to assume we need to prepare pieces of our imported RAW files for compositing in After Effects. So our next step is to set up our renders in Resolve.
When you’re ready to render—which can be before or after color since we’re in ACES space—you need to change the ACES Output Device Transform (ODT). Changing this setting to “No output transform” means that our renders will be in the linear AP0 ACES space which is what is recommended for exchanging files
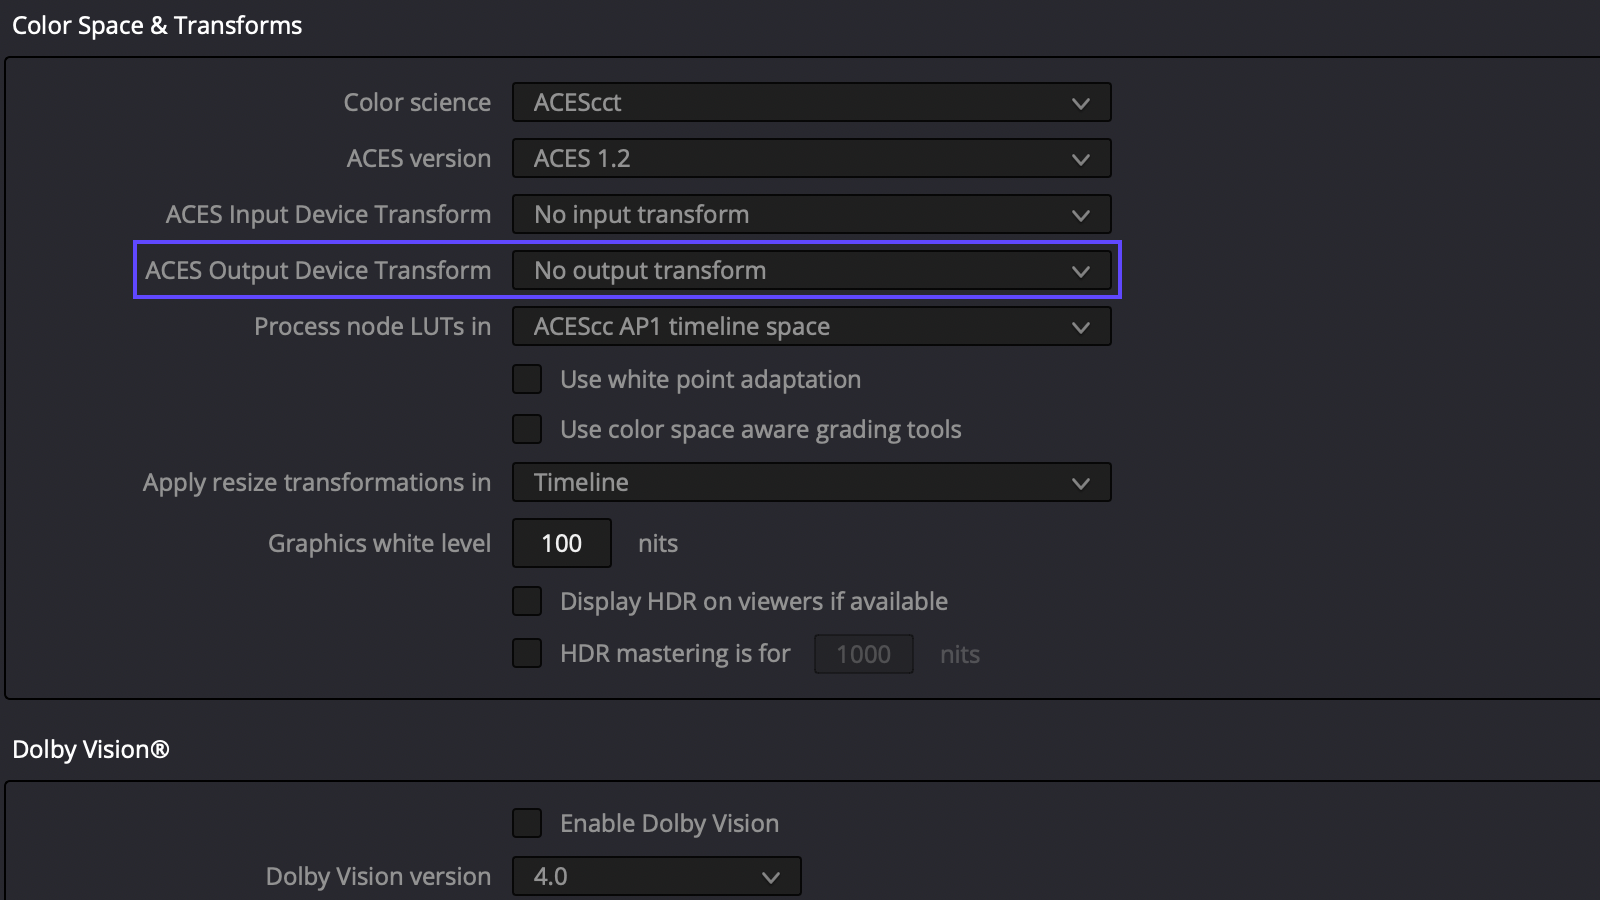
Once you change this setting, the image in the viewer will change and look wrong. This is normal. They’re not supposed to look correct on your monitors without an output transform.
Another setting we’ll change because of our particular video files is the resolution in the project settings.
The RED files that we’ve imported are 8192 x 3456px, which is large and widescreen. So. in the Master Settings of the project, we’ll change this to 4096x1728px, which is the same aspect ratio as the source but a quarter of the resolution, making our files lighter and easier to work with.
One of the great things about Resolve is that timelines are resolution-agnostic, i.e., they become whatever your project settings are. Setting this up in the project leads to our next step.
On the Deliver page, we’ll choose Individual Clips as our render format. Then we’ll choose EXR for our format and RGB half (PIZ Compression) for our codec.
You can read about Piz Compression in greater detail here but in short, it’s good for video with grain, which is most video shot with a camera. It’s lossless as well and will result in smaller file sizes than no compression.
EXR sequences are large on their own, so compression helps a lot. Half is less precise than float which is generally used more for CG-type rendering.
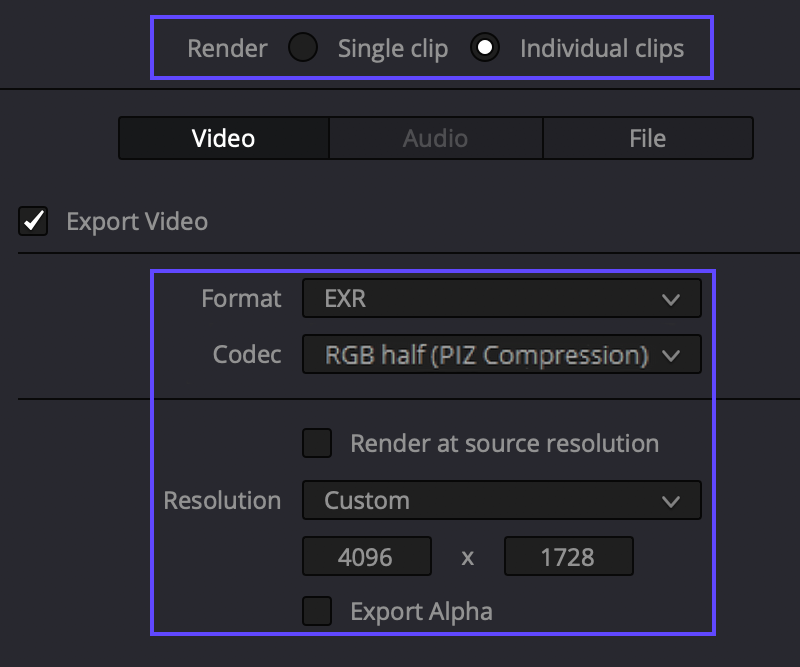
Generally for resolution, I’d stick with the same aspect ratio and the same size as your source media if you can afford it. But if your source files are something larger than 6K, you could downsample to 4K. In this example, since our source files are 8K, we’ll downsample the renders to a quarter of that resolution—4096 x 1728px.
On a quick side note—I’ve noticed some spatial issues with resized source camera footage, especially with specular highlights when going back and forth with ACES, so that’s something to be aware of.
The final setting we’ll look at in Resolve is the “File” tab on the Deliver page. My preference with image sequences like EXRs is to use reel names instead of source names when rendering. This is where the “Assist Using Reel Names” option we changed earlier is helpful.
To add reel name as our file name in the Deliver page, select Custom and enter %reel to then select “Reel Name” from the options.
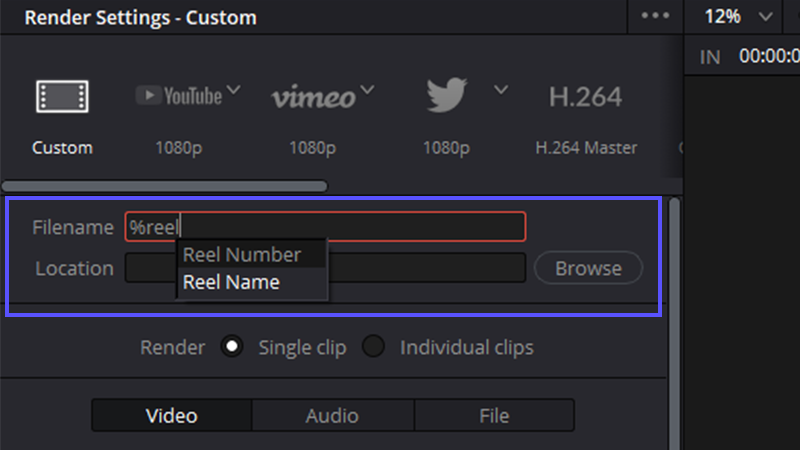
Since this is an image sequence, we’ll need a period as well at the end of our file name so that the file name will be separated from the frame count. I usually turn “Use unique filenames” off and also use “Reel Name” for the file subfolder to contain the image sequence.

Now we’re ready for rendering. I’ve made a short clip of 3 seconds that I’ll pull for our After Effects exchange. We’ll select the clip in the timeline with our ins and outs and add it to our render queue. Hit render and watch it cook!
Setting up After Effects for ACES
Setting up an After Effects project for ACES is a bit trickier.
By default, After Effects’ built-in color management isn’t going to do what we need. So instead we’ll use the OpenColorIO plugin for After Effects, which is a free download. This plugin will manage our ACES transforms in After Effects.
You’ll also want to download the ACES configuration files and place them in the right place for the plugin to access. (The plugin needs these config files to calculate the transforms.)
Here’s where to get the files:
- Download and install the latest OpenColorIO plugin.
- Download the latest ACES 1.2 OpenColorIO configuration files.
The plugin download also contains the OpenColorIO AE manual which is really helpful for installing and using it. Open OpenColorIO AE Manual.pdf and head to the Quick Start section for instructions to install the plug-in and the configuration files.
Depending on if you’re on a Mac or PC, you’ll copy the ACES configurations to their proper folder for the plug-in to read them.
The manual covers a lot of what I’m going to lay out below, but to condense the information into a simple setup here are a few things to do to get your AE project setup:
Turn off color management and set the project to 32bpc
We don’t want any After Effects transforms or interpretations to be happening under the hood in our project because the OpenColorIO plug-in will be doing all the color management for us
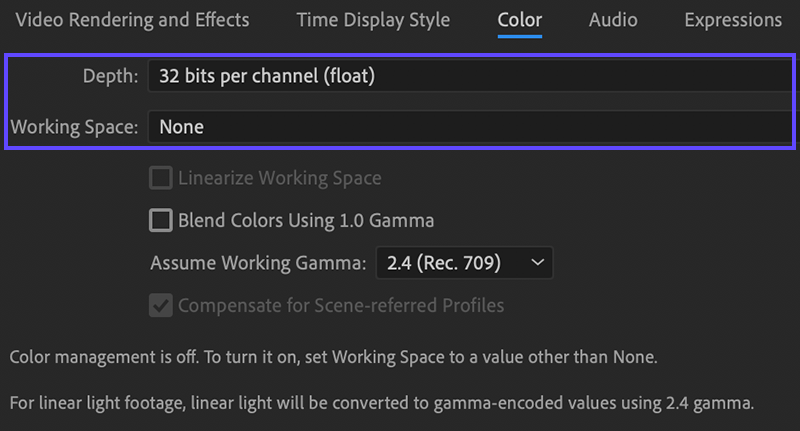
So open After Effects’ Project Settings at the bottom of the File menu and in the Color tab make sure Working Space is set to None. This will ensure that there aren’t any other transforms going on with our footage that would break our ACES transforms.
It’s best practice to make sure that any transforms to and from ACES are calculated in a higher bit depth. So while you’re in the Color tab, can change the Depth to 32 bits per channel.
Interpret the footage
Now we’re ready to import our ACES plates into After Effects. Once we’ve imported the plates, we want to change how After Effects sees them by right-clicking the clip we want to change and selecting Interpret Footage.
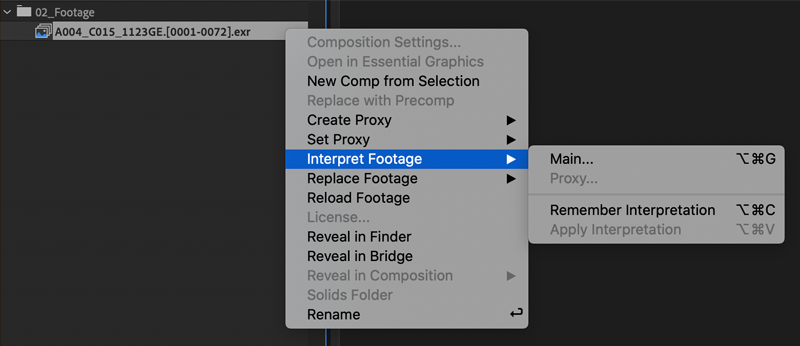
Check the frame rate:
With image sequences, sometimes After Effects interprets the frame rates incorrectly. We’ll make sure for our example that our frame rate is 23.976 to match our source media.
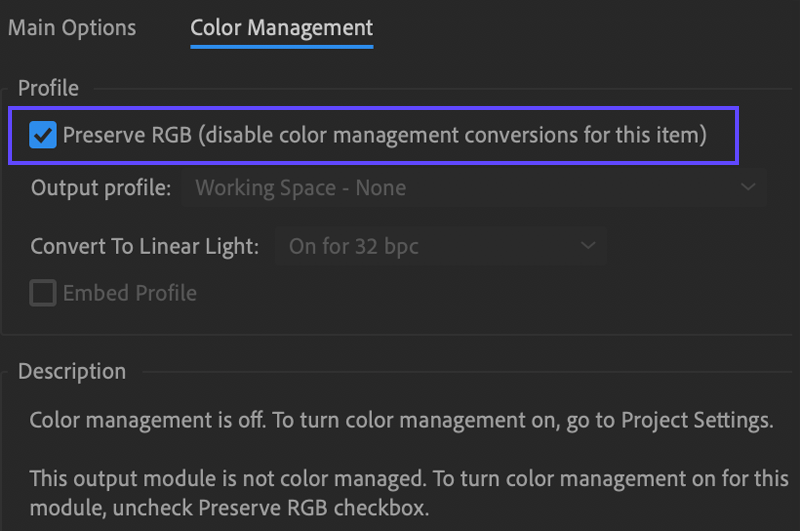
Select Preserve RGB
The second setting to check is in the color management tab of Interpret Footage and it’s a crucial step for properly using ACES transforms in After Effects. After Effects will attempt to convert any linear-encoded files into sRGB gamma by default, so make sure Preserve RGB is selected.
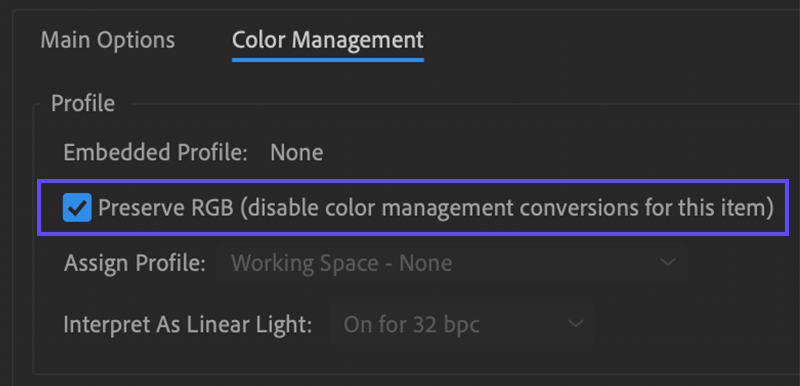
Counterintuitively, the image looks more correct when Preserve RGB is turned off. This is because it’s converting the linear gamma of the file to sRGB.
But this isn’t what we want to stay within the ACES pipeline. We want After Effects to keep these files linear so they should look dark and crunchy like a linear file should look on a gamma encoded monitor. We’re just looking at the linear ACES AP0 file uninterpreted so to speak.

Working with ACES in After Effects
Okay, now we have our project and file properly prepped for ACES. Here’s where things get a little interesting.
In After Effects and in color management in general, there are many methods of working. You can convert sources into ACES, you can work in ACES with all types of footage or do certain things in ACES and output something else, and much more.
For any workflow, the real question comes down to your intent: why are we building this workflow? What is do we want to do with it?
In After Effects, most work falls into one of the three categories below:
- 2D Compositing
- Motion Graphics
- Computer Graphics
Within the context of ACES, each one of these fields has a specific relationship to color management. While all three can overlap and obscure each other, it’s helpful to make the distinction so that we understand the proper context for each. CG in particular can benefit greatly from ACES as assets can be created in a wider gamut and wider dynamic range space as opposed to motion graphic elements which are usually sourced from a narrower display color space. But either one can still benefit from a unified pipeline.
Example Compositing in ACES
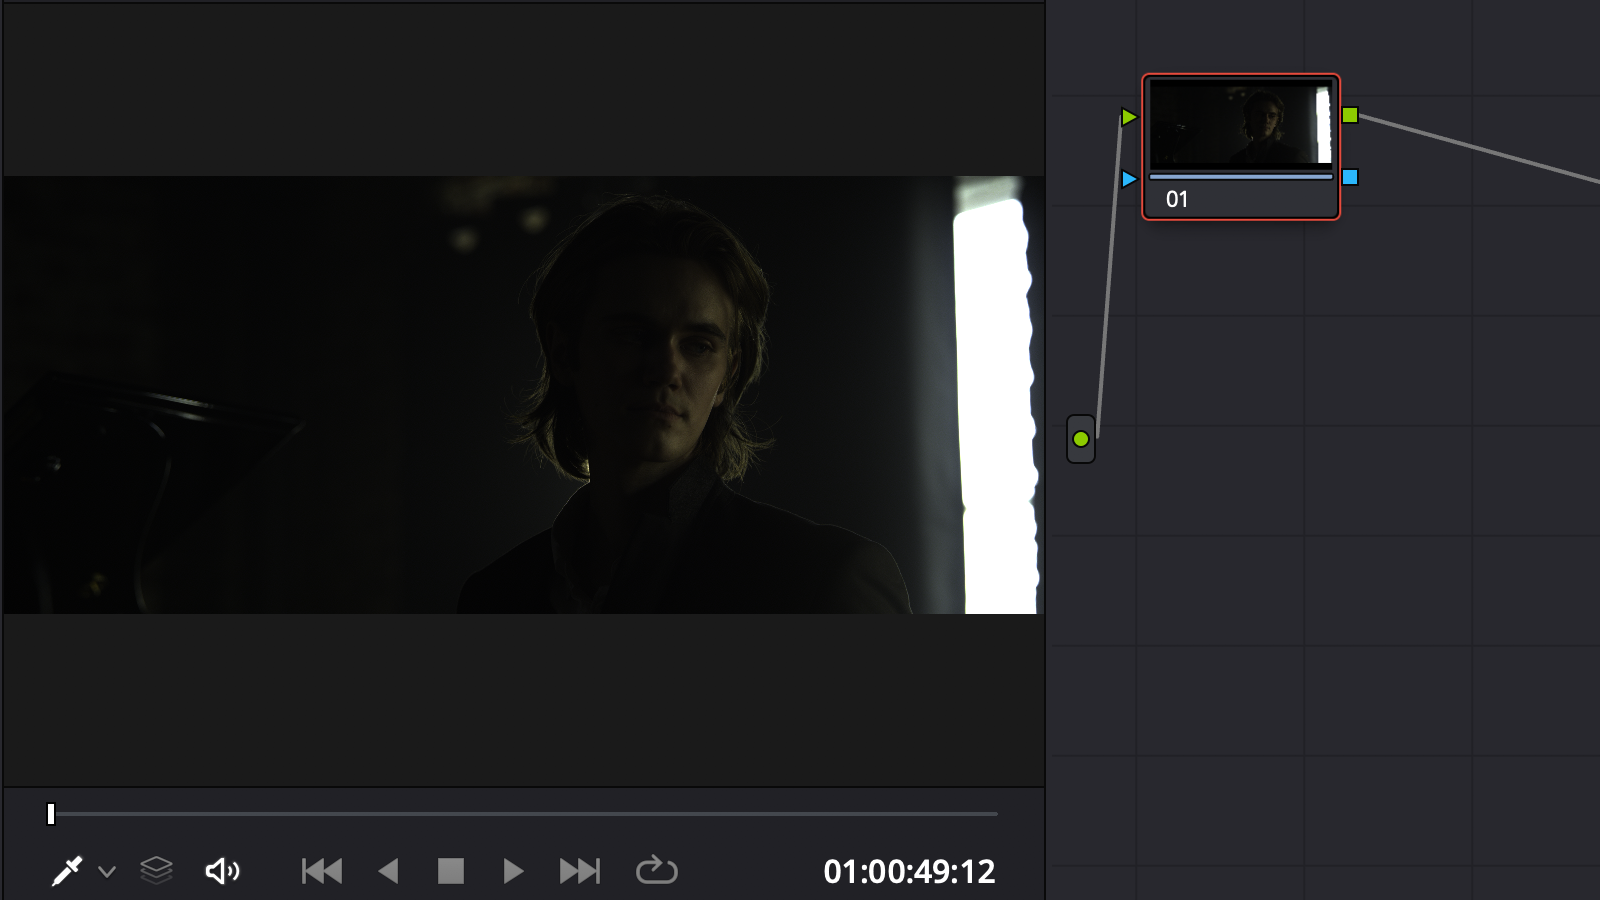
For our example, we’re going to do a simple 2D compositing exercise: tracking the frame.io logo to a piece of footage and rendering ACES plates back to Resolve with an alpha matte.
Now that we have our ACES plate from Resolve, we’ll add it to a comp. Once in the comp, we’ll an adjustment layer, right-click on it, and select Guide Layer. I’m going to call this layer “ACES transform.”
In the Effects panel, search for OpenColorIO and apply the effect to the adjustment layer. We’ll go into the effect, change the configuration to aces_1.2 to match our earlier configuration in Resolve. For the input space, we’ll go to the ACES dropdown and select ACES – ACES2065-1— if you recall, this is the exchange format for ACES between applications also known as AP0. Next, we’ll change our Output Space to Output – Rec. 709.
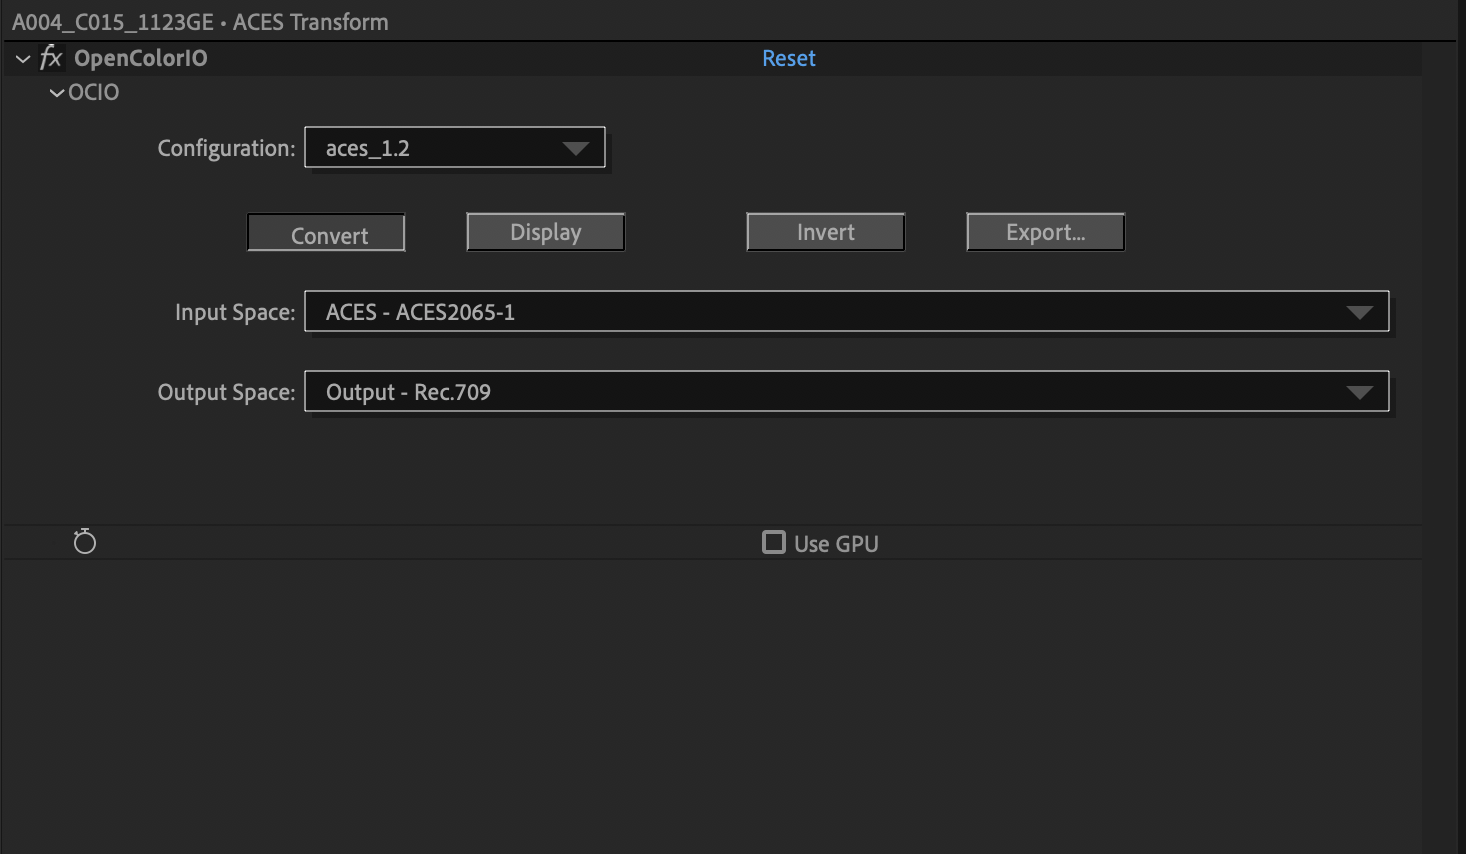
Our export from Resolve should now look correct in the viewer since our monitors see Rec.709 correctly.
So now we’ll add the frame.io logo to our project with transparency. We’ll add this to our comp underneath our adjustment layer but above our footage. We’ll apply an OpenColorIO effect directly to the logo. Select ACES 1.2 again, and select Utility – sRGB – Texture from the dropdown for input space. Set the output space to ACES – ACES2065-1.
Now our logo will be in the same ACES space as our footage underneath.
We’ll track this logo to the background and blend it in a little bit. Now we’re ready to render.
Rendering ACES plates from After Effects
Now that we’re done with our compositing work, it’s time to render our ACES media back to Resolve.
Since we set our adjustment layer up as a guide layer, the ACES transform to Rec. 709 that we added to it won’t be baked into our render. Instead, After Effects will pull the original linear AP0 data for the OpenEXR file.
We’ll add our comp to the render queue in After Effects and then select the output module options. Change the render format to OpenEXR and under Format Options, change the compression to PIZ if it isn’t that already.
Next, click on the color management tab and again turn on Preserve RGB so that After Effects isn’t automatically converting our linear file to a gamma-based file.
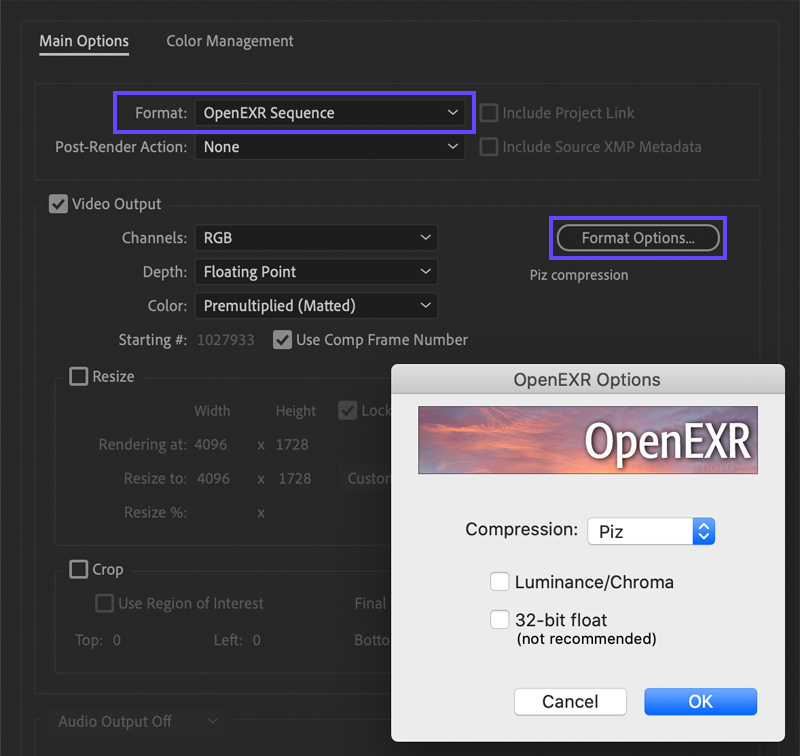
All in all, there are three different locations to select Preserve RGB in After Effects to ensure no color management is happening to our ACES files. For file name, we can leave that as the comp name which should be our reel name from Resolve and make sure “Save in subfolder” is checked in the file name dialog.
We’ll also turn off all the layers but the logo, which we’ll also add to the render queue. Then we’ll configure the render as a ProRes444 with a straight alpha channel. This will produce a file that we can bring into Resolve as our alpha channel so we can adjust the colors of the logo in Resolve in ACES.
Putting it all together in Resolve
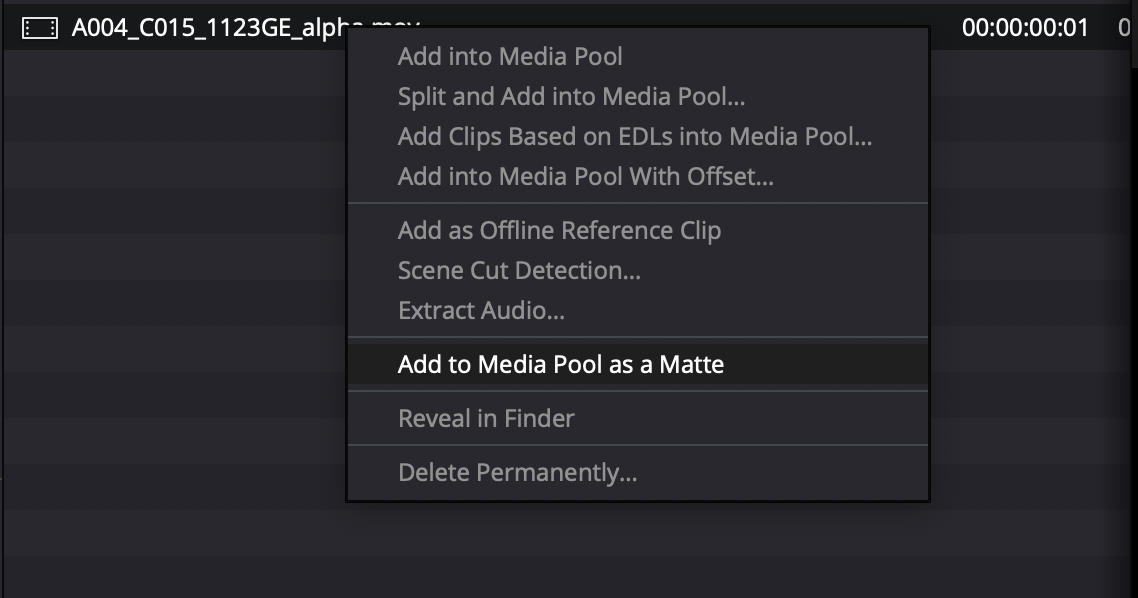
Once both pieces are done rendering, we can re-import them back into Resolve.
Because we’ve rendered to AP0 out of After Effects and in Resolve, we haven’t set an input transform, so Resolve will interpret our file correctly right out of the box. Import your matte as a matte from the Media page.
This is where the magic happens.
Add the clip to a new timeline and set up your nodes. Right-click on one of them to add the timeline matte of our logo that we just imported. Now we have the logo cut out and married to our plate in ACES.
We can change exposure and balance as one unit with those graphics and have full control over how the colors are interpreted on our output to Rec.709. (Or any other deliverables we need to make.)
This is just one example of a potential workflow from Resolve to After Effects and back. There are many ways to do things differently within Resolve and After Effects to suit your own needs for your project and to have flexibility.
Cautionary tales
Now that you have some understanding of the benefits of ACES for your Resolve/After Effects workflow, it’s important to understand something about color-managed workflows.
There are many instances of working with lower-quality source files where ACES transforms will break the image, especially if you’re working with low-quality 8-bit textures or source files like GoPro footage, etc.
ACES really works best when you feed it high-quality camera sources, CG renders, and the like. With the complication of combining different sources in motion graphics or CG work, working in ACES can become more of a headache than a benefit for your particular project. Alpha channels can also be an issue when converting files back and forth to ACES.
So it’s crucial to test your own workflows, make some mistakes, see the limitations of a particular workflow, and ask yourself how it can benefit or hinder your team.
Experience is the best teacher. Once you have a baseline of knowledge of how to get things up and running, you’ll have the tools to discover for yourself what works and what doesn’t for your particular skills or project.