
A while back, I wrote a piece on Camera to Cloud dailies workflows, which demonstrated how Frame.io C2C can significantly speed up your dailies process at any scale.
But what about other dailies workflows in Frame.io? Getting assets onto a cloud platform—whether that’s automatically with tools like C2C or by more traditional means—is only part of the story. What’s the next step?
Productions typically require the work of a lot of people in many different departments—especially episodics or large-scale features where dailies are usually generated by a lab. So the challenge is to make sure that the footage your team worked hard to capture now gets to where it needs to go, and is seen by only those who need to see it.
But running dailies can be complex; more like a series of pipelines rather than a single, unified channel. From data management to color to delivery to archive, there are so many threads to keep together. And the thread that’s most likely to be complicated to execute is the delivery phase.
In other words, who gets to see what and when?
All eyes on me
The larger your production, the more control you need over who gets to see the content. All the clips that were shot and processed (“all takes”) generally don’t get released to everyone on the production team.
The larger your production, the more control you need over who gets to see the content.
In fact, it’s typical that all takes are delivered only to a small subset of the post-production crew first—often just the editorial team. These dailies are then checked, with any that are marked by the script supervisor as “selects” or “circle takes” being released to the wider production team.
Sometimes, it’s the dailies lab that filters these takes, with the editorial team checking to make sure all circle takes are included and that non-circles aren’t. This way, creatives and executives are only shown takes that will most likely be used in the edit.
Ending in tiers
It’s also commonplace for there to be additional tiers of recipients inside of larger groups.
For example, a producer or associate producer may want to double-check the dailies for errors or missing takes before releasing them to executives.
Another example occurs when you’re working with restricted content—usually sensitive material of some kind, like intellectual property or nudity. Even if these takes are circled, they may only be released to select viewers within a group.
So it’s easy to see how controlling who gets to see what (and when) can be problematic. Fortunately, Frame.io gives you all the sharing and organizational tools you need to stay on top of workflows like these.
So let’s look at three methods for releasing and sharing your dailies using Frame.io. Each has access control, permission schemes, and functionality that can serve your needs across different productions.
Note: Some features described in this article are only available to some Frame.io plans.
Using Frame.io Folders and Projects
The first and simplest method of releasing dailies using Frame.io is to upload the footage directly into a Frame.io Folder using a browser, Transfer App, or C2C.
In the case of C2C, this can either be the default C2C Folder, or you can move your C2C assets into a designated dailies Folder – we’ll cover both below.
Once uploaded, there are several tools you can use to leverage your dailies release workflow.
For this method, all recipients of dailies will need to be Team Members or Collaborators on the Project—roles are assigned by a Frame.io Admin or Team Manager—and will need to login in order to access the dailies. Team Member and Collaborator roles are available in all Frame.io plans.
While similar, Team Members and Collaborators have different access rights in Frame.io. Both roles can see and comment on assets, but Collaborators have much less access. They can only see the Projects they’re invited to, can’t share assets, and can’t see private Folders or files.
A Frame.io admin can also control a Collaborator’s download and invite permissions.
Private Folders
Private Folders are Folders in a Frame.io Project that are only visible to Team Members and above.
In this method, our wider recipient group has been added to our Project as Collaborators. You’ll be uploading your dailies into a Private Folder, then copying them into a standard Folder when they’re ready for release.
If you’re using C2C, you can make your Cloud Devices Folder itself private, and those assets will be uploaded there automatically from the set.
This method allows you to work within a single Frame.io Project, and it works like this:
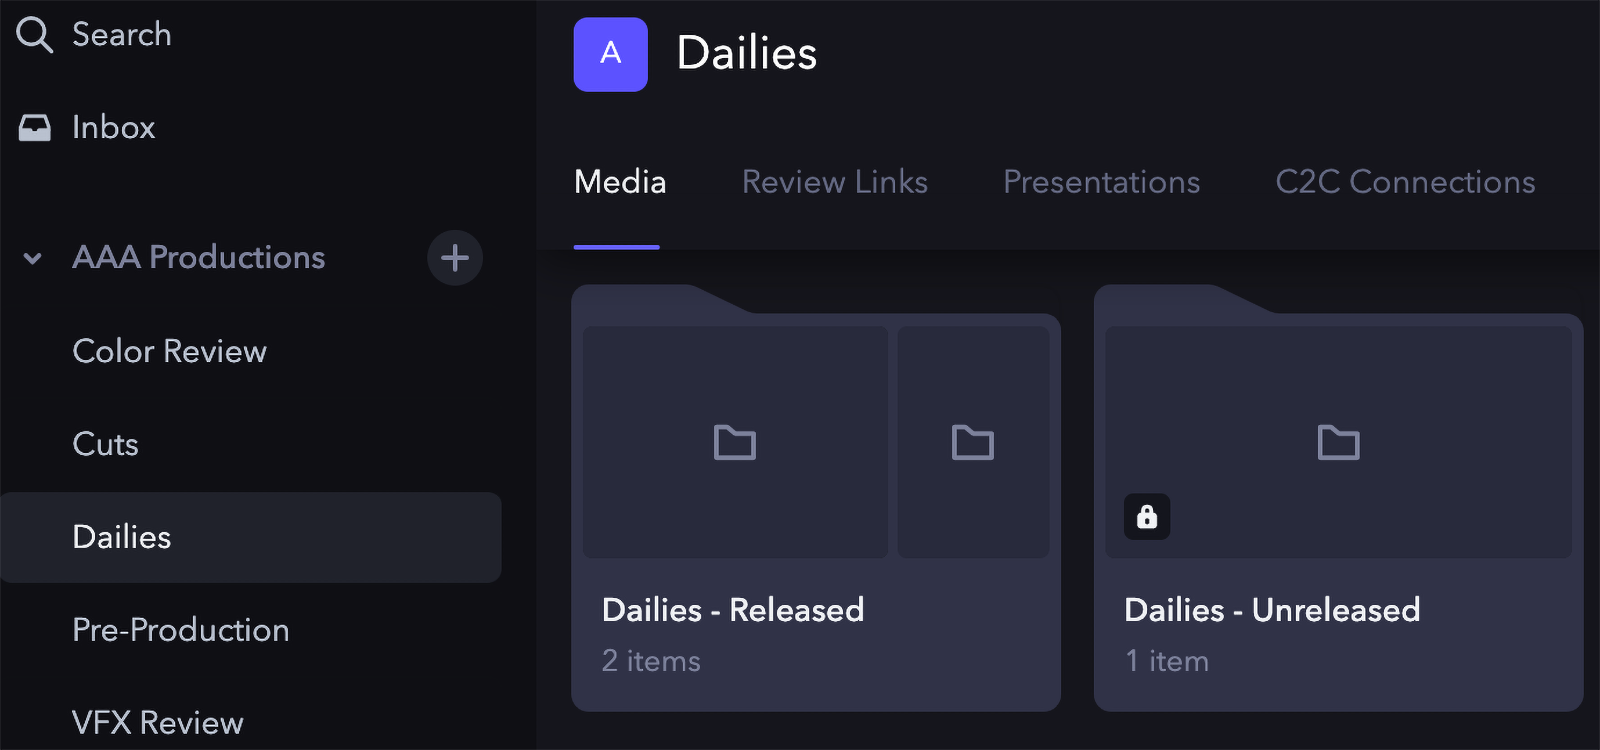
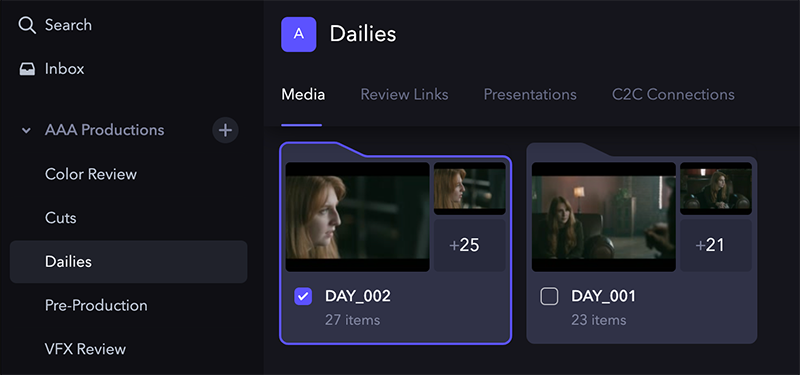
- In your dailies Project, create a new Folder by using the dropdown under the New button in the upper right hand corner and choosing New Folder. It’s good practice to name this after your shoot day along with a specific designation that makes it clear that this is the upload destination. Something like “Dailies – Unreleased.”
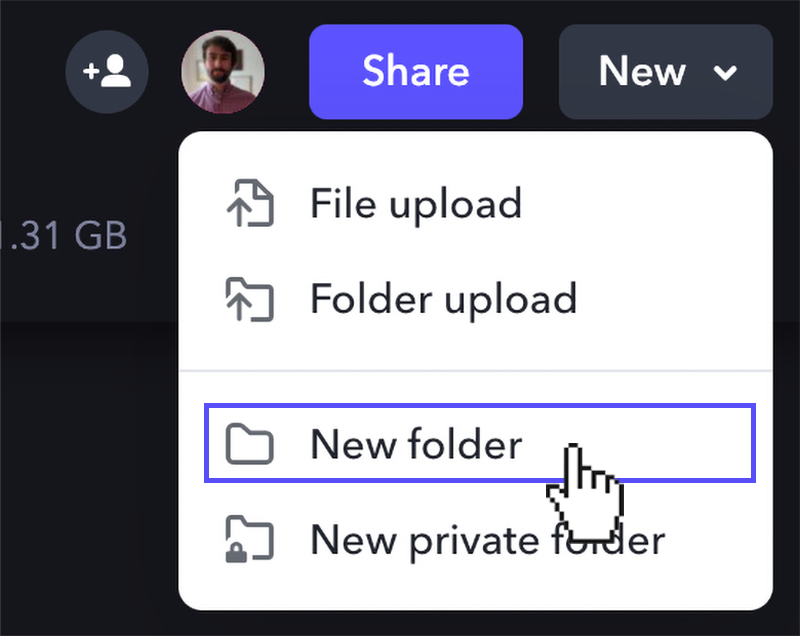
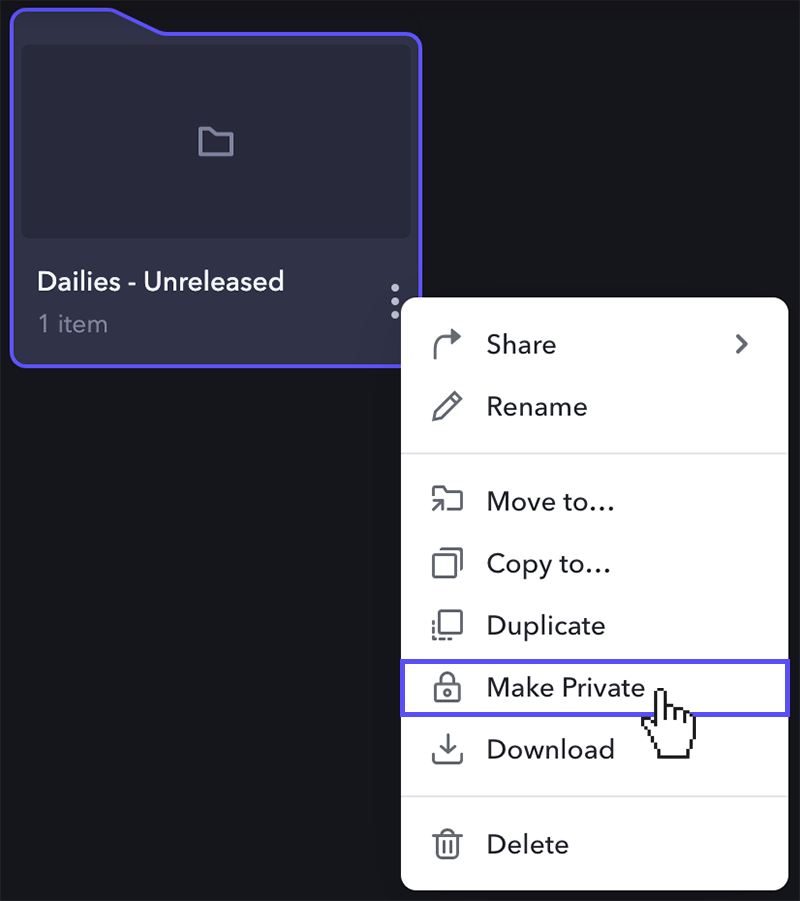
- Next, make this Folder private by clicking on the context menu (the three dots) on the Folder and selecting Make Private. This will then hide the Folder from Collaborators. If you’re using C2C, do this action on the folder labeled “Cloud_Devices.”
- Then make another regular (not Private) Folder. This is the Folder that the Collaborators will be able to see, so it’s good practice to name it something like “Dailies – Released.” Just as long as it’s clear that this Folder is related to the Private Folder you created earlier.
- You’re now ready to upload your dailies (all takes) into your Private Folder, then review them and make sure you’re ready to release them. Again, if you’re using C2C, these files will upload automatically into “Cloud_Devices.”
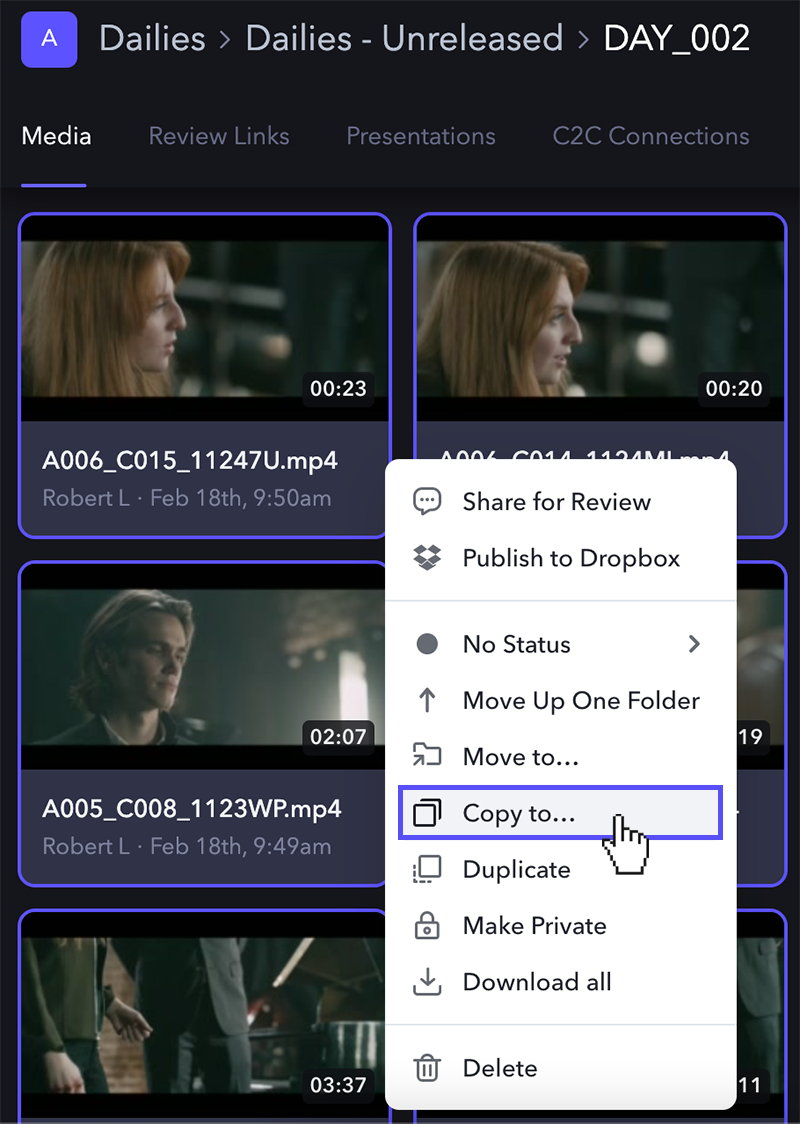
- When you’re ready to release, select all the dailies in the Private Folder that you want to release to your Collaborators. This can be all takes or just your circle takes.
- With the clips selected (you can select individual takes or a Folder), click on the context menu (three dots) on one of the selected takes or Folders and choose Copy to. Then find the regular Folder you made earlier and hit the Copy button. (Note that copying assets on Frame.io does not duplicate the storage used.)
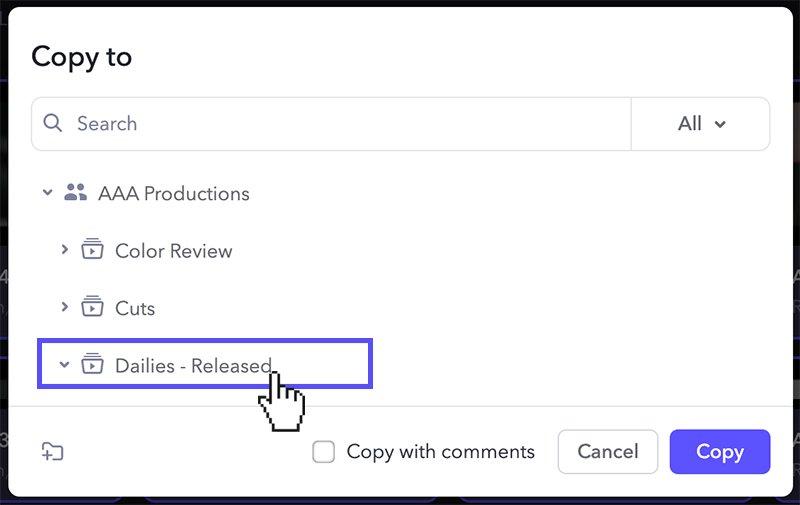
- Once the dailies are copied into the “Dailies – Released” Folder, Collaborators can now view the approved clips.
Pro-tip: you can mark circle takes using Frame.io’s Status tools. If you mark circles as “Approved”, for example, you can switch your view to list view then sort by Status to group your circles together.
Using Projects
Instead of using Folders, you can also use Frame.io Projects to control users’ access to dailies.
In this method, we’ll create two Projects: one for “unreleased” clips that a select group of people have access to, and one for “released” clips that the wider recipient group will be added to.
If you’re using C2C, you can use the “unreleased” Project as your C2C enabled Project. C2C dailies will upload here automatically.
Using Projects instead of Folders gives you a little more control as well as deeper organization.
Again, it relies on the Team Member and Collaborator roles set by your Frame.io admin or Team Manager. In this case, Team Members can view all Projects within a Team, but Collaborators can only view the Projects they are explicitly invited to.
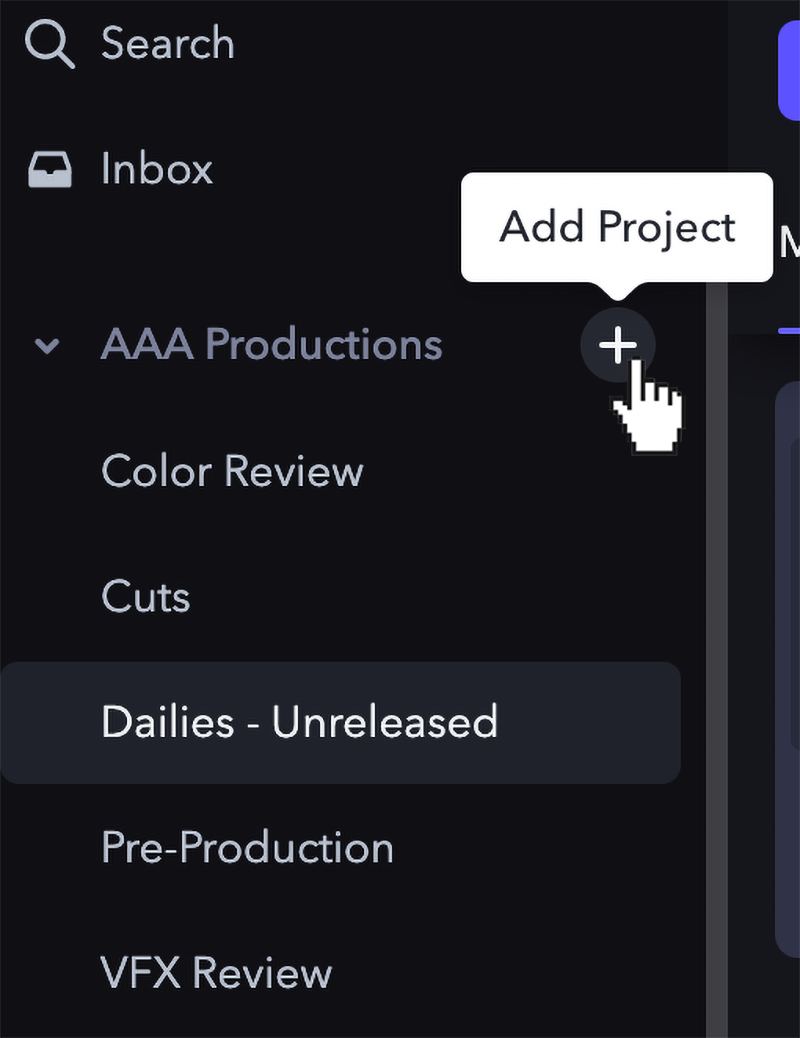
- Your first step is to create two Projects in our Team. For this example we’ll be using “Dailies – Unreleased” and “Dailies – Released.” To create a Project, click the + icon next to the Team name in the Frame.io sidebar. If you’re using C2C, make sure to enable C2C Connections under Project Settings—then make sure to add your devices to this Project.
Note: If needed, you can make a third Project called “Dailies – Released (Restricted)” for released dailies that need to go to a smaller group.
- Next, add your dailies recipients to the “Dailies – Released” Project as Collaborators. Then add your dailies approvers to “Dailies – Unreleased” as whatever user role makes sense, just remember that Collaborators can only see the Projects they are invited to.
- Now that your Projects are set up, you can upload your dailies to the “Dailies – Unreleased” Project. It’s a good idea to group them into a discrete Folder per shoot day. C2C Projects will automatically sort uploaded dailies into date folders.
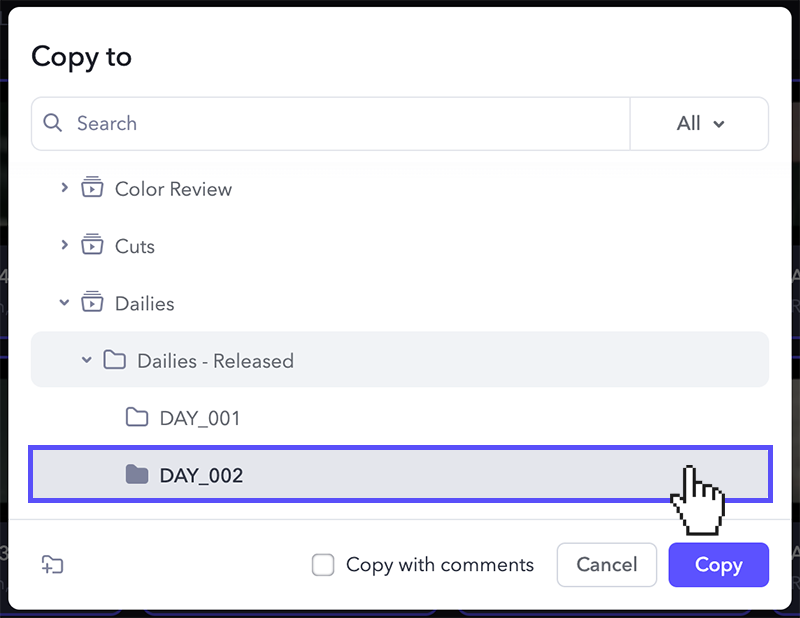
- Next, review them for approval and select the dailies you want to release (you can select individual takes or a Folder). Copy them by clicking on the context menu (three dots) on one of your selected takes or Folders and select Copy to. In the dialogue box that opens, locate your “Dailies – Released” Project, and click on Copy. (If you’re copying individual takes, it’s a good idea to create a shoot day Folder in “Dailies – Released” and copy them there.)
- Once the approved dailies are copied into “Dailies – Released”, members of the Project will be able to view them. If any Project members have Frame.io notifications enabled, they will receive a notification that takes have been released automatically.
Pro Tip: You can drag and drop takes or Folders from one Project to another on the Frame.io web app. Doing this places the copied takes or Folders at the root level of the destination Project.
Frame.io Review Links and Presentations
Some of your dailies recipients might not need full collaborative access to a Frame.io project—which is where Review Links and Presentations come into play. These allow you to share an asset—or a collection of assets—to their email or Frame.io inbox without having to add them to a Project.
Note: In the following section we discuss password-protected shares, Frame.io inboxes, and WatermarkID. Password-protected shares are available in Frame.io Pro plans and higher. Inbox and WatermarkID are included with Frame.io Enterprise plans.
Review Links vs Presentations
Before we look at the actual process, let’s look at the differences between Review Links and Presentations, as you might find that one works better for your production than the other.
| Feature | Review Links | Presentation Links |
| Commenting* | ||
| Downloading* | ||
| Pass Phrase | ||
| Expiration Date | ||
| Custom Layout | ||
| Editable Assets |
*Commenting and downloading can be disabled in the settings
In short, the main differences are that Review Links can allow commenting and Presentations can be customized both in layout and in design. Both have the same strong security and access settings.
Using Review Links
Review Links allow you to share files or Folders with recipients outside your Project, allowing them to comment and collaborate. (You can choose to disable commenting on Review Links, if preferred.)
Additionally Review Links allow the recipients who are part of your Project to focus on just the assets you want them to review. Review Links can be shared with a URL or with a direct invitation—which places the Review Link in the recipient’s Inbox.
With this method, you don’t need separate “Dailies – Unreleased” and “Dailies – Released” Projects or Folders. Instead, only members of your first tier select group should be added to your Project. Then, once the dailies have been approved, they can be shared directly from the Project as a link. This applies to both C2C workflows and conventional workflows.
Let’s see what this looks like.
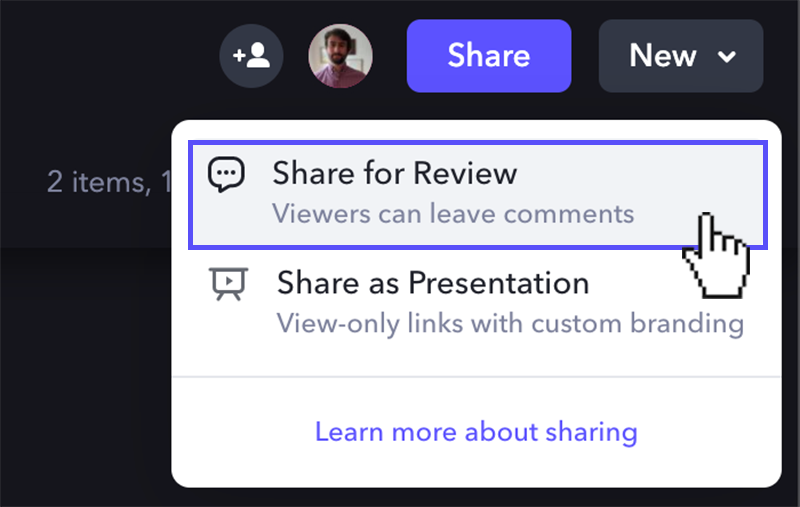
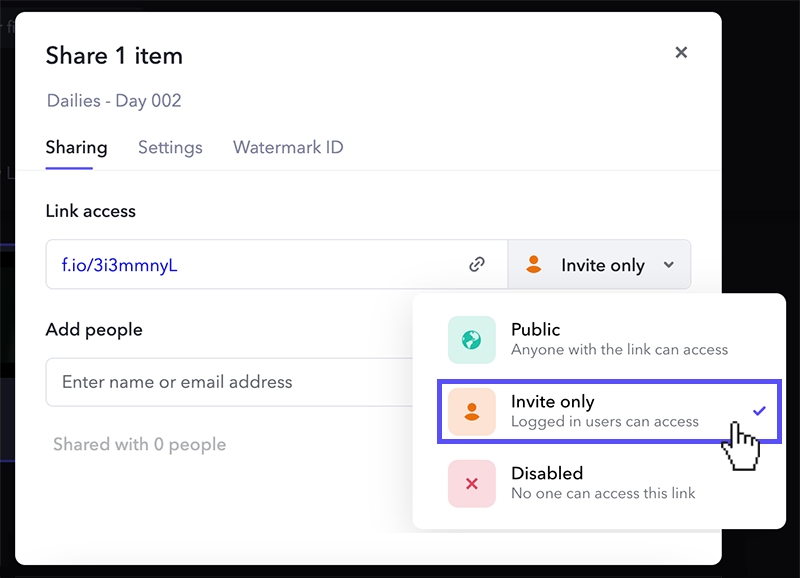
- To begin, click the Share button in the upper left of the Frame.io web app, then select Share for Review.
- The assets in your current view will now be available to select. You can select an asset or Folder by clicking on it. A selected asset or Folder will show a checkmark at the bottom. Selecting a Folder will include all assets in that Folder.
Pro tip: If you want to select assets inside of a Folder that’s in your current view, you can hover over the Folder and you’ll see a Go to Folder button. This will maintain any existing selections from outside the Folder as well.
- Once all the assets you wish to share have been selected, click Create Link in the bottom right corner of the web app.

- Clicking on this button will bring up a configuration window. At the top, you can click on the default name to rename the Review Link. From this tab, you can set recipients, security, and other options.
- The first tab will show you the URL of the Review Link, which you can copy and paste to share to your recipients. The Add People section is where you will add explicit recipients—but let’s wait to add anyone here until we set up the link.
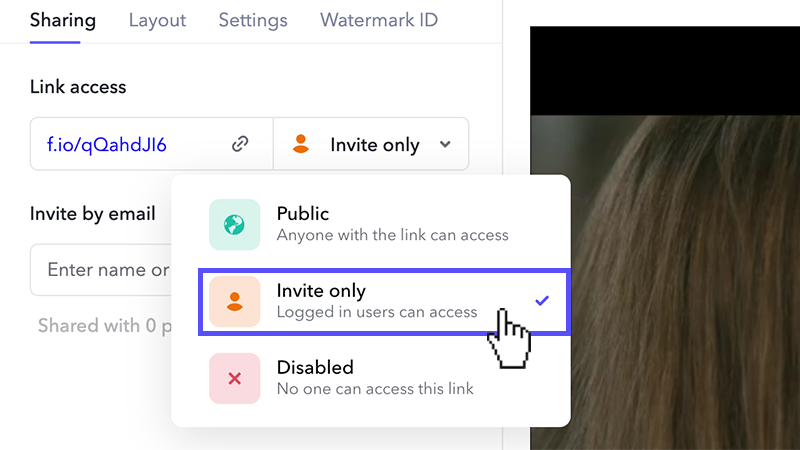
You can also set the visibility and access of the Review Link. Setting the Review Link to Public will allow anyone with the URL to access the link. Meanwhile, setting the Review Link to Invite Only will only grant access to the email addresses you add under Add People.
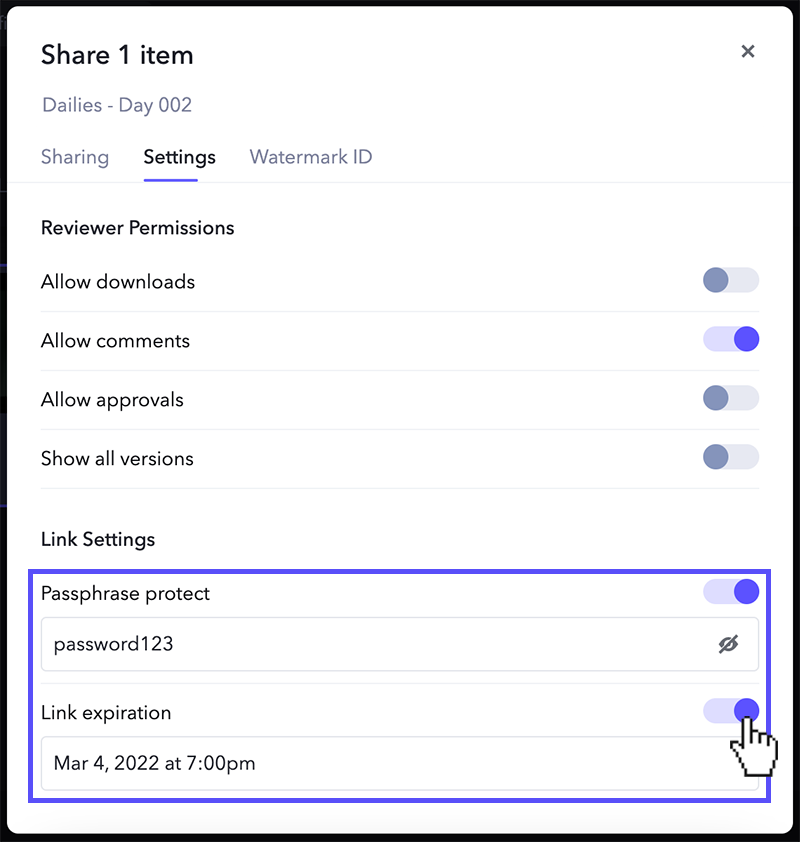
- The second tab of this window lets you set your interaction settings, including additional security settings. Here you can allow or disallow downloading, commenting, status changes, or access to version stacks. You can also apply a passphrase and an expiration date to further secure a Review Link.
- The final tab enables or disables WatermarkID, which is session-based watermarking for video playback available to Enterprise users. You can either create a new watermark or use saved templates that already exist in your account.
- Once all your settings are configured, you can go back to the first tab to add your recipients under Add People. You can enter individual emails of recipients (you can also add groups of users here—like a “Dailies Distro”—which we’ll cover later).
- Once you have included all of your recipients, you can click Add. This will send the Review Link.
Review Links are completely editable after they’ve been created and sent. You can change the security settings, watermark settings, add or remove recipients, or rename them.
In fact, you can also add (or remove) assets to a Review Link you’ve already created. This is helpful for days with media breaks—you can create a Review Link for the first dailies break, for example, then add the dailies from the wrap break to the same Review Link without changing the URL.
If you’re shooting C2C, you can create a Review Link on any of the folders in Fixed Folder Structure and the Review Link will automatically update with new assets as they’re uploaded.
You can also create a Review Link before adding any recipients, then add recipients once it’s ready.
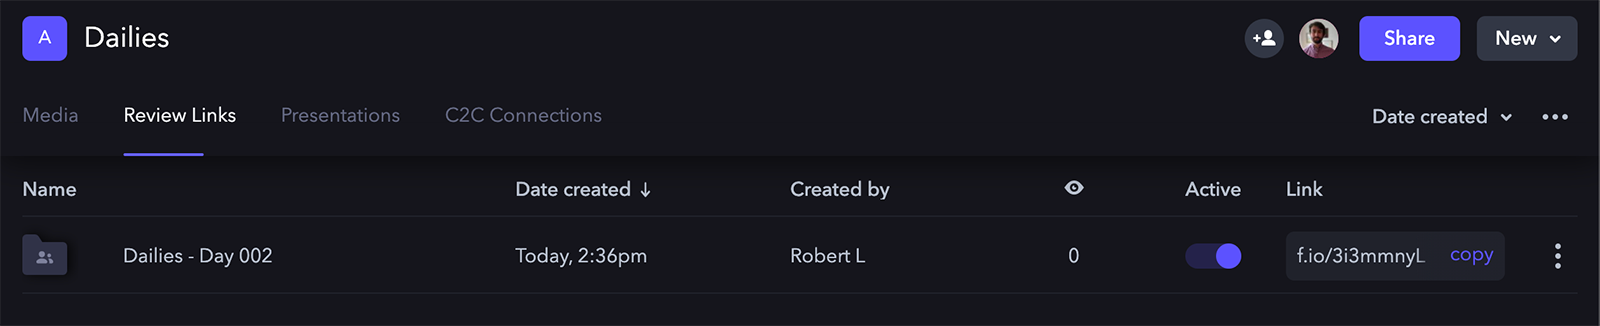
All of this can be done from the Review Links tab in the web app, which is also where you’ll find a list of all the Review Links you’ve created in the Project alongside their URLs.
Using Presentations
Presentations are similar to Review Links in both creation and function, but differ in appearance and level of interaction.
Unlike Review Links, recipients can’t interact (ie, make comments or annotations) with assets in a Presentation. However, you can still configure Presentations to the same level of security and access.
Presentations are a good option for recipients who need a focused dailies review experience. In this example, we’ll configure a Presentation in a traditional dailies “reel” format.
This format is ideal for recipients on the go, as the assets are very easy to navigate between and the page provides a clean, focused experience.
- Unlike Review Links, the content and arrangement of Presentations is based on your current view in the web app. You can use Frame.io’s Sort tools to put the assets into your desired order.
This can be alphabetical (Name), by upload date and time (Date uploaded), or even a custom order. All modes can be set to list in ascending or descending order (Oldest first/Newest first).

Pro tip: You can also share directly from a Folder without entering it; the content and arrangement of a Presentation created from a Folder will still follow the Sort settings.
- Once your view and sort order is set, you can create your Presentation. Click the Share button, then select Share as Presentation.
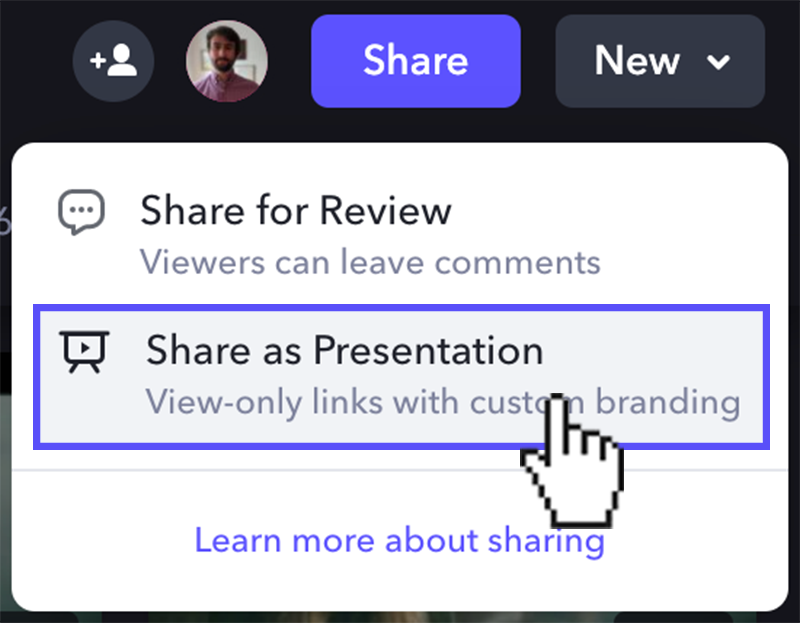
- Just like with Review Links, you’ll get a window that will allow you to configure your Presentation. At the top, you can click on the default name to rename the Presentation. We’ll come back to the first tab once we’re ready to send our Presentation out.
- In the second tab we can set up our layout—how the Presentation is going to look to our recipients. There are two layouts available: Blog and Reel. Since we’re making a dailies link, we’ll use Reel.
The Reel layout puts the takes in the Presentation in a carousel along the bottom of the page, which enables a recipient to quickly navigate from take to take. (You can also set a custom color scheme for the Presentation to keep your branding consistent.)
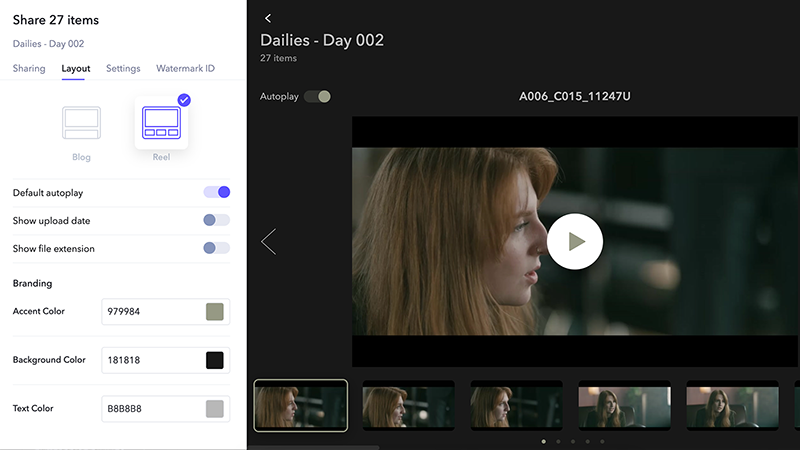
Note: a default custom color scheme can be set under Account Settings.
- In the settings tab, you can configure options for allowing downloads as well as applying a passphrase or expiration date, just like Review Links.
- The final tab again sets up WatermarkID for the Presentation.
- Once all your settings are configured, you can return to the first tab and add your recipients. Again, this works the same way as Review Links: you can add individual emails, groups, or share the URL.
Presentations are somewhat editable after they’ve been created and sent. You can change the security settings, watermark settings, add or remove recipients, or rename them. Unlike Review Links, however, you can’t add or remove assets once a Presentation has been created.
However, if a Presentation is shared from a folder, assets you add to that folder after the Presentation is created will be added to the Presentation automatically, including dailies uploaded with C2C.
All of this can be done from the Presentations tab in the web app. Here, you’ll see a list of all Presentations you’ve created in the Project and their URLs.

Creating Groups for Review Links and Presentations
As mentioned earlier, Frame.io can create distribution lists. We call these “Groups”. With a Group, you can easily add a large number of recipients to a Review Link or Presentation by simply adding the Group instead. Groups are created at the Account level and can be used by any Project in the Account.
Here’s how that works:
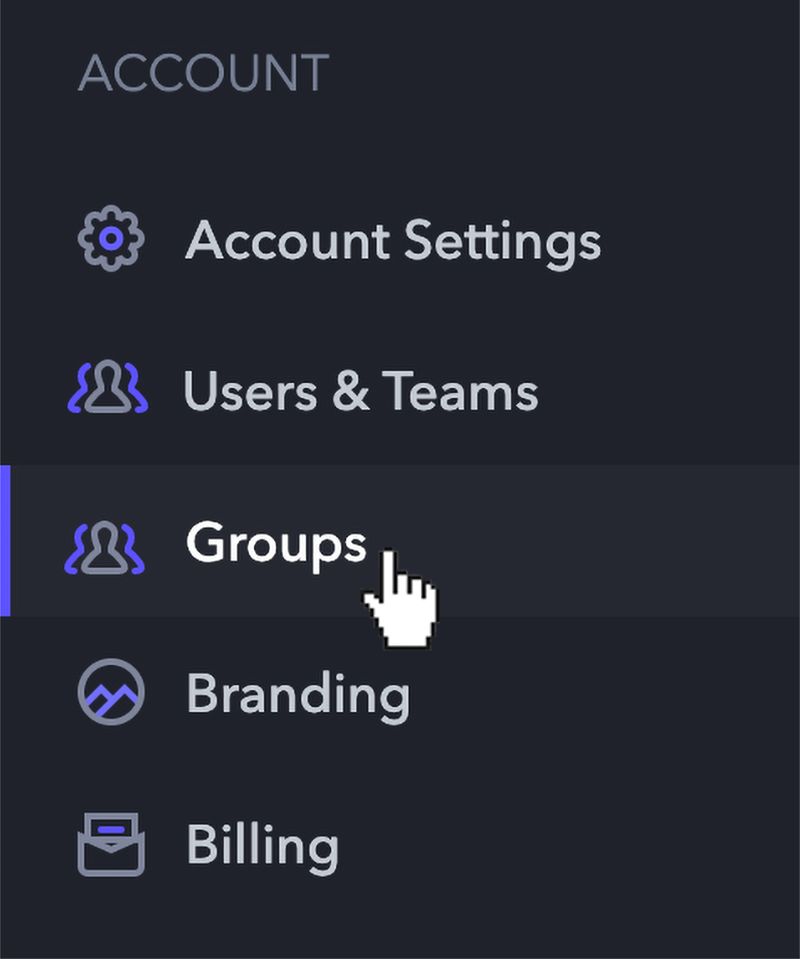
- Go to your Account Settings by using the dropdown menu under the Account name in the upper left hand corner of the web app.

- In Account Settings, there’s a section for Groups. Click on that to begin adding or editing Groups.
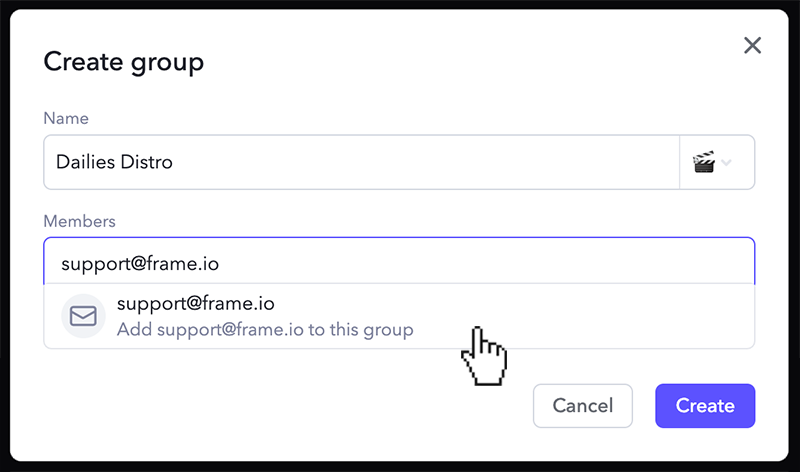
- You can start a new Group by clicking Create Group. This will bring up a window where you can begin configuring your Group. You can give it a custom name (like “Dailies Distro”, for example) and add email addresses of recipients.
Note: you can paste in a copied list of emails here as well.
- Once you have added all of your recipients, click on the Create button to save the Group.
Now that the Group has been created, you can add it to a Review Link or Presentation by simply typing its name into the Add people box when creating the Review Link or Presentation. You can even add multiple Groups to a Review Link or Presentation—this is helpful if you have a separate list for limited or restricted dailies releases.
Finally, you can also add Groups to Projects. If you are using the private Folder or Project methods, you can use Groups to quickly add people to your Projects.
If you would like to rename the Group or add or remove members, you can go back to the Groups section of Account Settings and click the pencil button next to the Group.
Note: Groups are only available in Frame.io Enterprise plans.
Conclusion
Between Folders, Projects, and Presentation/Review Links, there are several ways to control access and effect a dailies release workflow on Frame.io. And, while we explored these workflows in the context of production dailies, they can be employed in other parts of the production as well.
Cuts, color reviews, and VFX reviews can all benefit from these tools and workflows to make sure you remain in control of your content and assets. And, of course, these workflows work just as well with your Camera to Cloud workflows.
It’s cliché, but each production is unique. Differences in the crew assigned to work on any given production can create complexity across the board. Despite that, Frame.io is flexible enough to work with your production and helps you build the workflows that work for you.
If you’re keen to learn more, maybe you’d like to check out The Essential Guide to Connecting Your Set to the Internet, or Preparing for the Future of Production: Who Should Own the Network?