In post production, artists exchange digital files between applications and departments all the time.
Renders, transcodes, conforms, deliverables…there’s a constant flow of data processing and reprocessing. The larger the team, the more complex the data flow, with different versions of the same software, different operating systems, different file storage, and different workflows. So it’s really important to have a clear understanding of the choices being made during these crucial file exchanges.
My goal with this article is to provide an understanding of the common pitfalls that you’re likely to experience, and to provide a checklist you can use to troubleshoot common issues. That way, you can focus on being creative and spend less time fixing or researching things that went wrong.
Contents
Graphics and VFX: Alpha Channels
Alpha channels can be particularly tricky depending on which application they’re coming from. So let’s consider what an alpha channel is before digging into the potential issues they can cause.
Any time an image or video asset file—rather than a project file—has an embedded alpha channel, it typically contains three RGB channels, often called a Fill and a black and white alpha channel often called a Matte.
How this matte interacts with the fill is where some of the confusion starts, and it’s usually due to the two key methods of rendering embedded alpha channels; straight and premultiplied.
| Image formats with Alpha | Video formats with Alpha |
| DPX | Apple Animation |
| GIF | Apple ProRes 4444 |
| JPG2000 | AVID Meridien |
| Maya IFF | AVID DNxHD |
| OpenEXR | AVID DNxHR |
| PNG | AVIF |
| RLA | Cineform |
| RPF | Cineon |
| SGI | HEVC / H.265 |
| TGA | |
| TIFF | |
| WebP |
Straight alpha channel
A straight alpha channel means that only the alpha channel (matte) contains transparency data and any RGB (fill) elements are opaque. With a straight alpha channel, the fill can look strange on its own, since it’s not being limited by the alpha channel (as you can see in the second example below).
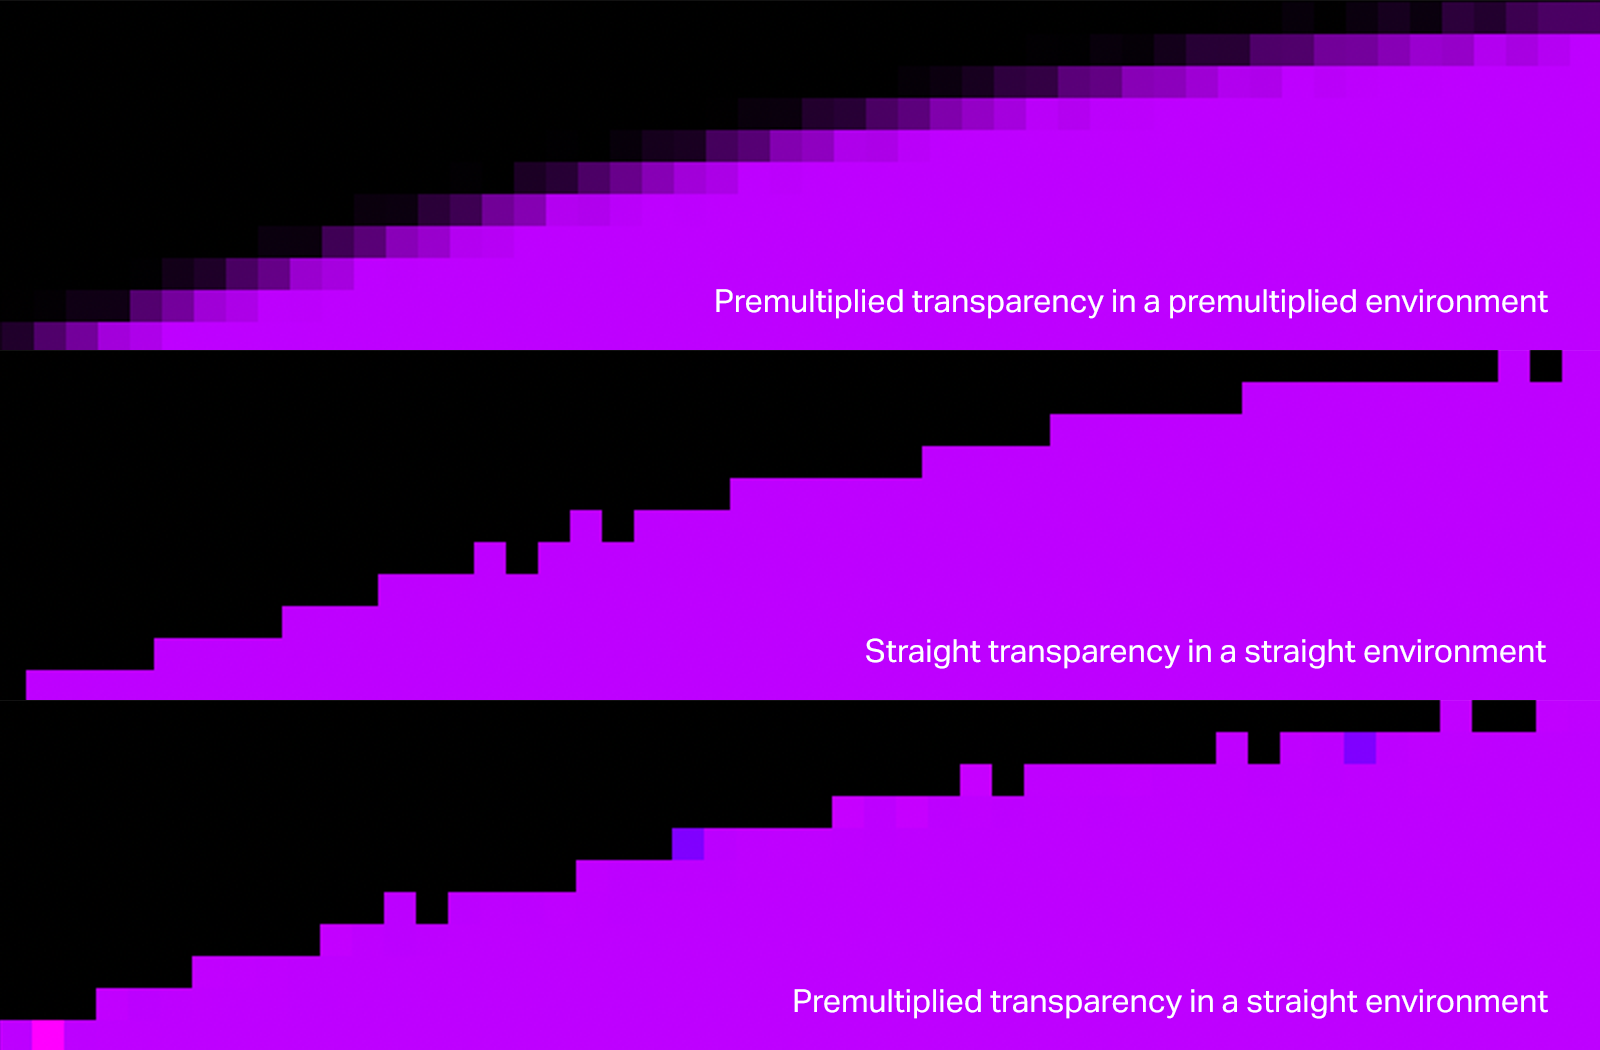
One of the ways to tell what type of alpha channel is embedded in a file is to turn off the alpha channel. If the file looks pixelated or has odd colors at the edges, then it probably has an alpha channel that obscures these strange edges or filters them through transparency.
Premultiplied alpha channel
A premultiplied alpha channel means that the RGB channels contain transparency information as well as alpha channel. The RGB values are combined with a specified matte color (usually black) that defines the amount of transparency. This matte color is subsequently removed from the RGB values by the software that you open the file with.
In simpler terms, the transparency value for a pixel is stored as a value between 0 and 1 (with 0 being completely transparent and 1 being completely opaque). For premultiplied transparency, the software simply multiplies the RGB values by the alpha value to calculate the result—hence the term premultiply. So an alpha value of 1 results in a fully opaque pixel, a value of 0 results in a completely transparent pixel, and a value of 0.5 would provide a 50 percent transparent pixel.
With a premultiplied alpha channel, since the RGB channels contain transparency information, you might not see much of a change if you turn the alpha channel off and on.
Files with a premultiplied alpha channel will probably look close to how they should, compared to a straight alpha channel which may look wrong outside of a proper compositing environment.
Layer-based compositing vs. node-based
In layer-based compositing programs like After Effects and Photoshop, files with alpha channels are treated as one single unit in one layer. The embedded alpha channel can interact with layers above or below it.
In programs like this, alpha channels are handled in the background without much user control. This can work well for artists who are more comfortable with text or graphic animations as there isn’t as much need for alpha management or interpretation for these elements. So it’s as simple as selecting an alpha channel interpretation when you render.
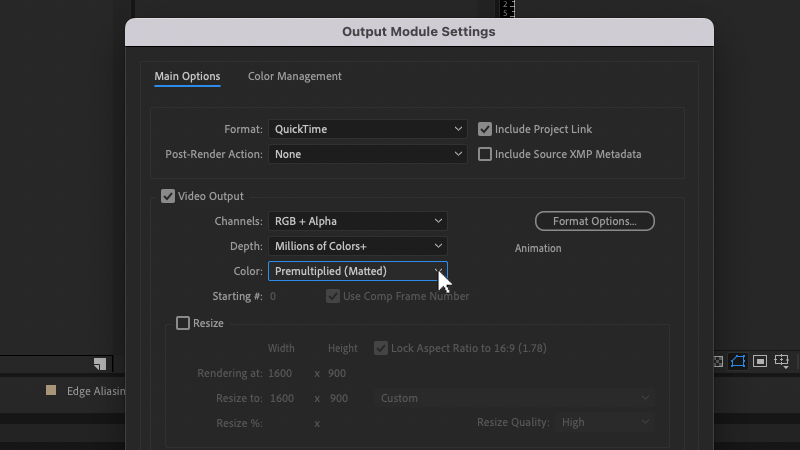
However, working with alpha channels and live action footage or CGI is a different story. Applications like Flame, Fusion and Nuke are all node-based compositing systems. Alpha channels are handled much differently in these types of programs than layer-based compositing systems.
The biggest difference between node-based and layer-based compositing systems is that fills and mattes are treated like separate components, not one self-contained file or layer.
For example, in After Effects a mask that cuts out a part of a shot will automatically have transparency behind it in the compositing environment. That happens in one layer. In contrast, in Flame a mask is created in a node. This mask node needs to be piped into a merge or comp node with a foreground and background element to composite something.
It’s a two-stage process. When rendering or exporting, the user needs to explicitly pipe the correct mask into an alpha channel output to correctly interpret it.
To confuse things further, alpha channels can be rendered in many different ways in node-based compositing systems. Since the fill and matte are treated separately, it’s possible to render out a fill that contains the whole shot and an alpha channel that only cuts out a piece of it. In this case, the render would be used as a separate matte within an application on an underlying piece of footage.
Another option is that each individual RGB channel could be rendered as its own black and white matte layer. For certain shots involving rotoscoping, each of those RGB channels could be used as separate mattes that could be combined, subtracted or manipulated in more sophisticated ways than a simple single channel alpha channel.
Even more complicated are embedded channels within an OpenEXR file which can contain many layers. Usually OpenEXR files are used with CG work so that the compositor has more control over the CG elements within the scene. Channels within an OpenEXR can be piped to inputs on merge nodes for manipulating elements separately.
So with node-based compositors, the user has more control over the matte layers. But the matte layers and embedding process need to be managed more explicitly than a layer-based compositor. And like any manual process, it opens the door to user error, causing mattes to render incorrectly.
Comparatively, layer-based compositors have less explicit control, but this comes with an ease of use and automation that can make them more straightforward. Neither way is wrong. It’s just important to understand the distinctions.
So when rendering or interpreting alpha channels, it’s critical that whomever renders or interprets the alpha channel can answer these questions…
- Is the alpha straight or premultiplied?
- If a node-based system was used to render the alpha channel, what does it contain?
If the answers aren’t clear, or the information isn’t passed along to others, you’ll end up with misinterpreted alpha channels. For example, if a file is rendered premultiplied and interpreted in another program as straight, there’s likely to be a dark halo around the edges of the alpha channel. Or if a file from a node-based compositor containing RGB channels as mattes is interpreted as a traditional RGB fill and matte in a layer-based program, it’ll be unusable.
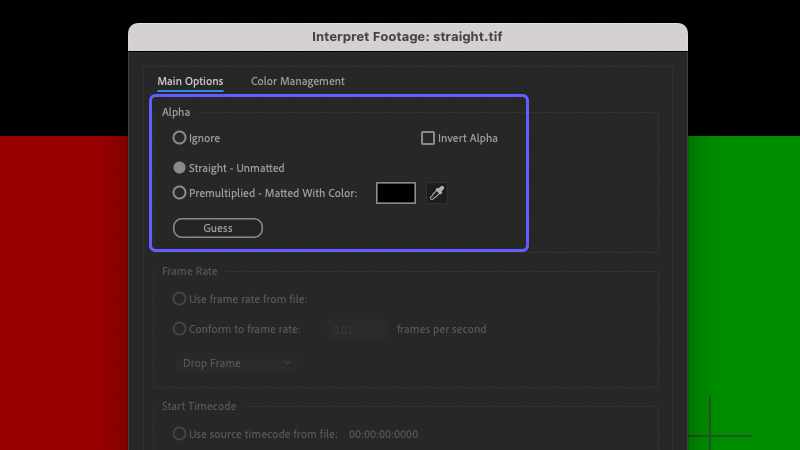
After Effects has options to automatically detect which type of alpha channel is embedded in a file, but the communication is key. If both the person rendering and the person importing are on the same page, that is the easiest way to avoid this pitfall.
It can be difficult to catch incorrect alpha interpretation in Premiere or DaVinci Resolve or Avid by eye. So when importing a file with an alpha channel, it’s important that the application explicitly knows what type of alpha channel is embedded in the file. Without that piece of information, it’s anyone’s guess.
Timeline Exchange: XMLs, EDLs and OMFs
Exchanging timelines between applications requires the use of text-based lists that refer to file metadata, like XMLs, EDLs, AAFs or OMFs.
One of the largest pitfalls when using these lists is to assume that the effects, media, file interpretation and layer structure will automatically translate properly between programs. This is rarely the case even with simple projects.
Before discussing how to avoid this assumption, it’s important to understand what information is contained within these lists and how that information is formatted and read by applications. In addition, file metadata itself is very important when it comes to exchanging lists—files need to have proper metadata so that programs can make sense of how to use them.
One of the largest pitfalls when using these lists is to assume that the effects, media, file interpretation and layer structure will automatically translate properly between programs.
These lists work in conjunction with various file types. Every file contains some type of metadata about itself embedded from the hardware that captured it, or the software that created it.
File exchange lists like EDLs, XMLs, and AAFs, refer to this metadata, which can be details about timecode, file names, reel names, and much more. Without proper metadata, files can be difficult to translate to different programs. For example, if the source application doesn’t contain necessary information like embedded timecode or unique file names, exporting an XML or EDL to rebuild in another application can be a very time consuming manual process, if it can even be done at all.
Depending on the source program that exports the list and the program that imports it, there are bound to be some pitfalls in rebuilding the timeline. It’s important to understand the limitations and strengths of these exchange formats and also understand the quirks of particular programs. Not only that, but the media being referred to by these lists will play a part in rebuilding the timeline in the destination application.
EDLs
The EDL (Edit Decision List) is among the oldest and most common file exchange formats, and it’s a simple standard that most programs understand. EDLs only contain one layer and don’t contain any resizing information. While these are significant limitations, it’s also easier to troubleshoot an EDL, since the formatting is very basic and transparent.
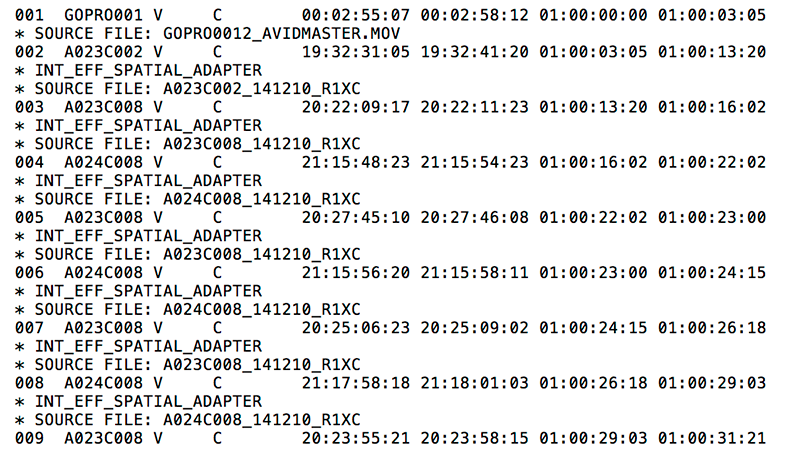
EDLs are still used in many parts of the industry partly because they’re the least error prone, but also because they’re easily editable. An EDL can be opened and modified in a simple text editor, so custom scripts can be created to modify parameters.
A lot of the functionality (and limitations) of EDLs come from their origin in old tape-based systems, where files contained reel or tape names that corresponded to a physical piece of media alongside timecode. With tape, each reel name contained a sequential timecode so the reel name was used to refer to the proper tape, while the timecode was used to find which part of the tape contained the right video. With digital files, it’s different. Reel names are typically unique to each source file so each camera take is essentially the digital tape.
EDLs use embedded reel names to correctly identify which camera file to use when rebuilding in another application. So it’s important for files to contain embedded reel names when using EDLs to exchange between applications.
XMLs and AAFs
XML (eXtensible Markup Language) and AAF (Advanced Authoring Format) files are also text-based lists, but they contain more information than EDLs. To begin with, XMLs and AAFs, multiple layers can be exported instead of just one. XMLs and AAFs also contain information about resizing which EDLs do not. They’re also more flexible in terms of reel names and file names for rebuilding timelines.
While XMLs and AAFs have more functionality, there is a common misconception that it’s easier to prep timelines with XMLs or AAFs than EDLs. While this can be somewhat true due to the fact that XMLs and AAFs contain resizing information and multiple layers, it’s just as important to properly prep sequences when exporting XMLs and AAFs.
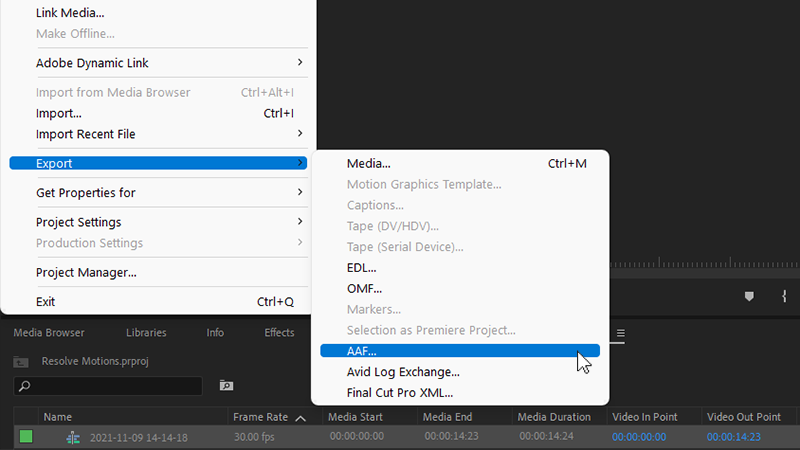
Files without timecode, graphics, or audio layers won’t conform properly with just an XML or AAF. While the destination application might have better tools like Flame to conform, it’s still important to communicate with whoever is rebuilding the timeline to make sure everything rebuilds properly on the other end.
Prepping timelines and files
Before exporting an EDL, XML or AAF, it’s important to make sure that the files in the timeline have the proper metadata for rebuilding in another application. The most important metadata embedded in source files are:
- Timecode
- Reel names / Tape ID
- File Names
If file names have been changing during editorial, reel names or tape IDs become even more important for conforming and rebuilding. Timecode is also essential for properly rebuilding timelines in other apps. An easy way to check that files match is to import proxies and the camera original files and compare the metadata. If all matches, then the XML/AAF/EDL shouldn’t have an issue finding the right pieces of the right files.
Beyond the basic metadata, it’s also important to understand:
- How nests or compound clips will translate between programs.
- If clips are multicam and need to be flattened back to source files before exporting a list.
- If files contain CDL (color decision list) information for VFX or color plate pulls.
- If there are markers or other information that is critical to embed.
Usually a good rule of thumb is to ensure that the prepped timeline contains files from the original media files with basic effects like timewarps and resizes but not nests, multicam clips or comps before exporting.
This will ensure that the exported list contains metadata that actually matches the files, not elements created within the source application that won’t translate to another application. Checking exported lists after exporting also helps ensure that nothing is missed or lost in translation when sent off to another artist.
File Quality: Bit-depth, data rates, and codecs
Compressed file quality is another important pitfall to understand when working in post production.
Certain codecs and file containers can compress media to a much higher degree like h.264 or h.265 compared to more constrained formats like ProRes or DNxHD. When selecting render settings, it’s very important to understand the intent of the render—whether that’s delivery, hand off to another artist, client approval, VFX plates, etc. Especially when you’re handling codecs like h.264 or h.264, where chroma subsampling, bit rates, and encoding profiles define the quality and size of the files.
In general, compressed codecs like these are best used to efficiently record media to inexpensive hardware or efficiently deliver data for distribution. Compressed codecs aren’t as useful for manipulating images in post or exchanging files between artists. They’re called “lossy” for a reason.
When exchanging files between artists, it’s important to maintain source bit-depth quality especially when exporting log-encoded images back to log. Log files specifically are designed to work at higher bit depth levels so that they can be transformed with enough information from a log-type gamma space to a display-type gamma space.
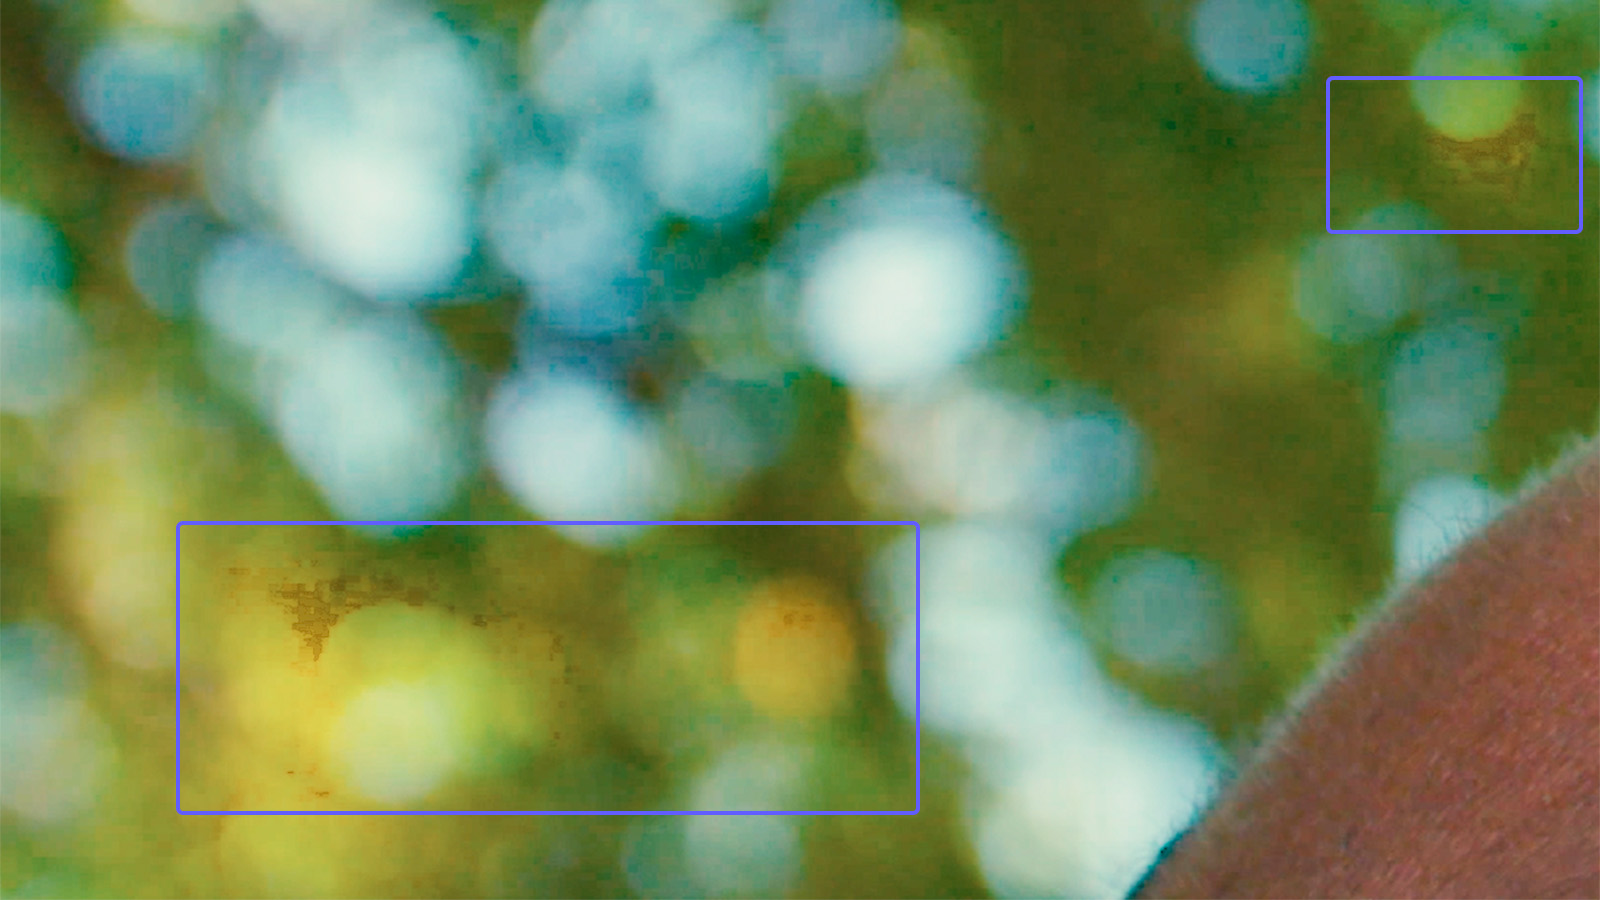
Without that information, banding and low color fidelity can have a very detrimental effect on imagery when color grading. Digital files can depreciate very quickly with re-rendering, transcoding or exporting. So make sure that your intent is clear before you decide how to export or transcode a file. For example, an edit is locked with 10-bit source media files in a log-type gamma and exported for color grading. If the render settings are modified to a lower bit depth like 8-bit, that exported timeline will be much more difficult to grade and lead to banding and color information falling apart in areas of gradation.
Bit depth specifically comes into play with log-encoded images because higher bit-depth sources make it possible to manipulate the range of subtle colors and variation s within the image. So make sure that when exporting log files for grading from Premiere Pro that the “render at maximum depth” box is checked and 16-bpc is selected when rendering to a format like ProRes444 or DNxHD. This ensures that all the bit-depth of the source imagery will be preserved for the colorist or further manipulation of the log imagery down the line. (For more detail, check out Jarle Leirpoll’s post on Premiere Pro’s Render Quality settings.)
Data rates come up mostly when exporting or encoding compressed media for delivery like h.264 or h.265 files. But they can also come into play when dealing with compressed camera sources. Certain cameras like GoPros, for example, use a version of h.264 for recording video. So make sure you understand how these file were encoded and at what data rate. The lower the data rate, the more compressed the file.
Data ranges
Data ranges come in two main flavors: video and full. In my experience, unless there is a specific workflow and pipeline built around full range data, video range files are much more common especially with offline editorial type workflows in Premiere, After Effects, and Avid.
There isn’t really a great way to embed information about the data range of a given file unless it’s properly exported with bars. Certain programs export certain file types as full range automatically like ProRes444. Traditionally 444 formats are full range with RGB data, but newer codecs don’t always encode information that way. And depending on the application, the file might be interpreted as full or video range.

Most of the time, a file’s data range is interpreted based on the codec and file container. So if a file is encoded with information that doesn’t match the usual data range for that file type, the interpretation of that file could be wrong.
For file formats like DPX image sequences, most programs assume a full data range. For file formats like Quicktime, most programs assume video range data. It can be tough to tell when looking at files which range that file is. If there’s a question about the data range of a file, encoding bars at the start of a program is a great way to have an idea about the data range of the file.
Certain programs can switch the interpretation of files from full to video range. If the bars look correct, then the application is seeing the correct data range of the file. If the bars look lifted or too dark on the scopes, then the files aren’t being interpreted correctly.
File handles
When rendering media for conforming or from color, it’s important to understand file handles. Edits can oftentimes contain time warps. File handles ensure that there’s enough media to rebuild timelines. When pulling media or VFX, it’s important to deliver the proper amount of handles to ensure a good rebuild when files are back in the edit or conform. With fast time warps and over-cranked footage, extra handles are needed to properly conform. It’s also important to use source timecode when rendering out files that will be used for conforms.
Color space and gamma
For VFX prep and renders, color space and gamma can easily be interpreted incorrectly between apps. Files can be exported with linear gamma and source camera color space and interpreted back with the same gamma but a different color space. It’s always great if files can be rendered the same as the source for gamma and color space, but sometimes wires can get crossed.
Just remember that EXRs are used to exchange linear gamma, while DPX files are usually full-range and contain log gamma. ProRes or DNX files should be rendered with a high bit-depth for VFX exchanges. In After Effects particularly, these log files can easily end up being rendered in 8-bit, which makes them useless for color grading.
Frame rates
Frame rates can be tricky in how they’re interpreted between apps. File sequences in particular don’t always contain metadata that tells apps how to interpret them. It’s also possible to re-interpret frame rates within the apps which can make exchange file lists (XML, EDL, AAF) tricky if the other app doesn’t have that same interpretation.
Color tags and displays
Color tags can make it difficult to properly see how something is supposed to be seen between apps. Apps all have different color management and users can be on computers with a variety of displays or operating systems.
As long as color shifts aren’t baked into renders, it’s okay if things look different between apps. Check the file renders from different programs against each other in a known color space and gamma in a single app.
And we’re done
Some of these problems are specific to certain types of software, some are a part of how files are encoded today, some have been an issue in post for many years. Experience is the best teacher to recognize these common problems.
Often there isn’t time during post production to research or dig deeply into finding a solution. But hopefully you’re now in a better position to spot these common pitfalls before they become a problem that can’t be fixed.

