Film visuals are like restaurant food: the chef gets all the praise while the rest of the back-of-house toils away unseen.
But just as the best meal will go uneaten if it’s served on a dirty plate, your project will go to waste if you serve it on a grubby audio bed (Tenet anyone?)
A proper audio mix is essential to delivering high-quality video. It’s one of the many reasons why audio pros are so heavily involved in the post-production finishing process. But if you’re an editor without the resources for a professional mix, getting the final audio the way you like can be daunting. In DAWs or NLEs, the audio mixing process can get very complex, very quickly.
But understanding some of the basic techniques and principles can help you add clarity to dialogue, and a bit of extra punch to music and sound effects. And that can go a long way toward impressing a client and earning their trust.
So today we’re taking look at some basic audio mixing skills that every Premiere Pro editor should know.
Get organized
Before any real progress can be made in the mix, you’re going to need to get organized.
Depending on your style of editing this may be an easy task or it could take some time. Don’t get me wrong, when grinding out an edit on a deadline a messy timeline isn’t uncommon. When it comes time for a good audio mix though, that cluttered sequence of clips needs some structure.
Start by splitting your timeline’s audio clips into groups, like dialogue, music, and effects. Personally, I keep my dialogue at the top of the tracks, effects below that, and music as the bed underneath. You may even find it helpful to add locked tracks between each group to easily distinguish the groups visually.
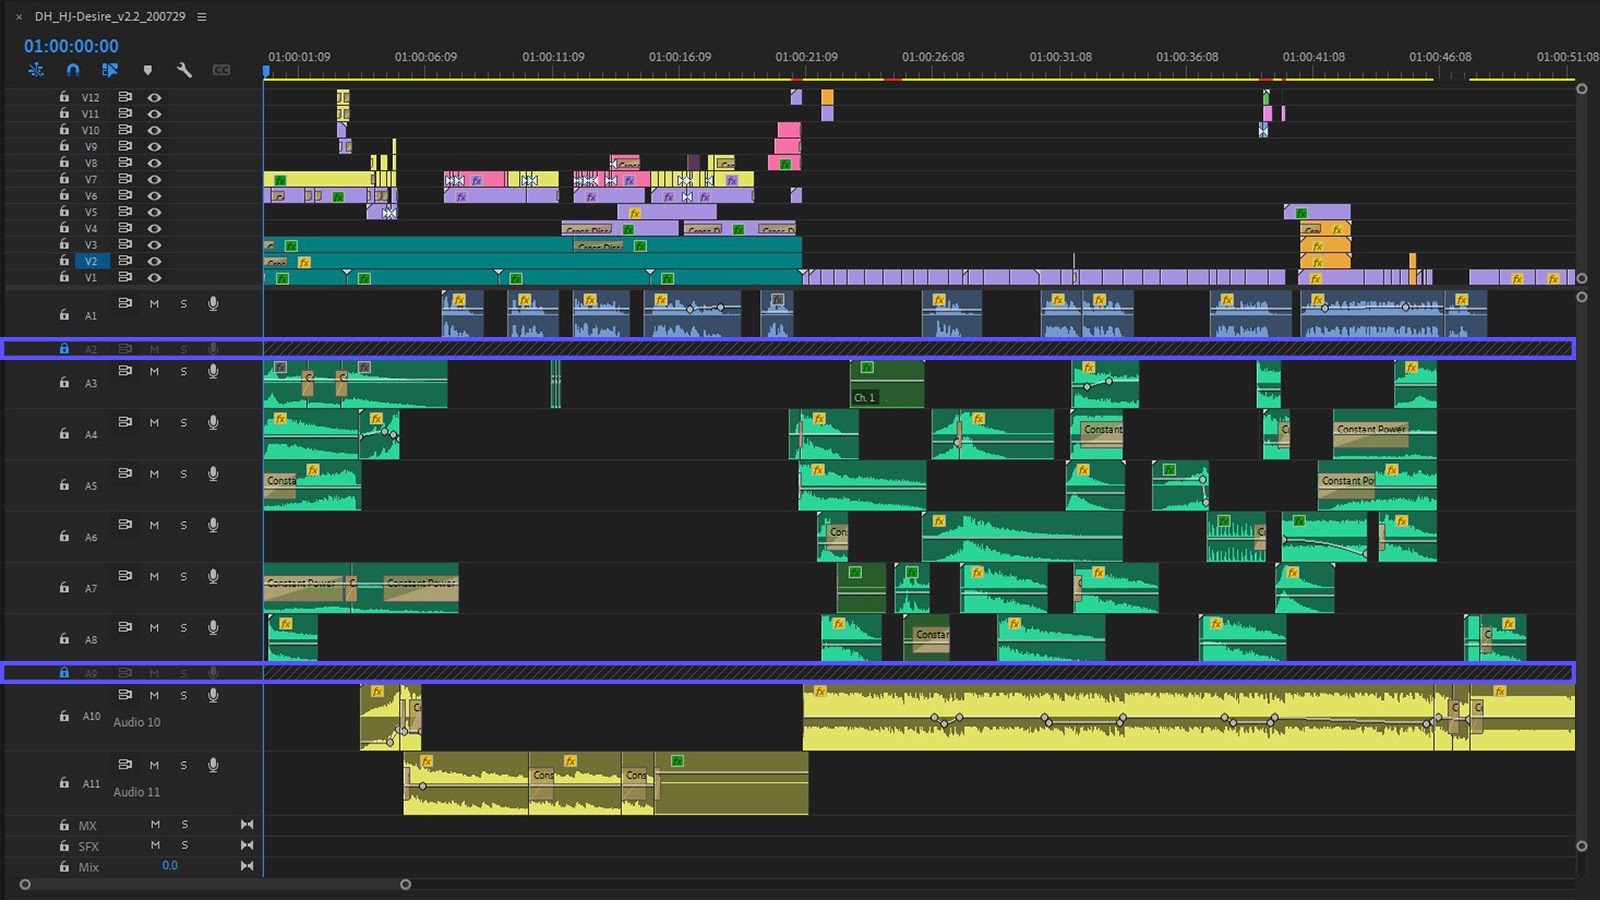
Digging deeper, it’s helpful to add some more organization within each of these groups.
When grouping the dialogue, create a separate audio track for each speaker. If a speaker changes location—from indoors to outdoors, for example—group the inside and outside audio clips onto different tracks. This is helpful because the sound of their voice and ambiance around it, like room tone, can vary by where they’re recorded.
With the dialogue looking pretty, follow a similar process with sound effects, keeping them on dedicated sound effect tracks. Keep production elements, like whooshes, hits, and risers on their own tracks. Then have separate tracks for foley work, ambiances, and any nat (short for natural) sound that may have come from production.
Moving to music, there’s not much to do after the music cues are separated from the dialogue and sound effects, but you might also consider checkerboarding the music cues across your timeline. Using this pattern can make the tiresome task of creating music cue sheets a little less painful.
I realize this clean-up process may seem tedious, but I promise the grouping and subgrouping will pay dividends down the road, especially on long-form content.
Let’s keep going to see why.
Pick up, clean up
There’s one more step before we can move on to creative mixing.
With all of the audio organized and grouped, make a close inspection of all of your dialogue. It helps to solo the dialogue tracks or mute the sound effect and music tracks, whichever is easier, and listen through the piece’s dialogue for cut off words.
In the midst of cutting, the heads and tails of dialogue clips can errantly get cut short and might be missed thanks to music underscores or simple familiarity with the piece. This is your chance to correct that by taking a quick listen and then trimming and adding short fades as necessary.
At the same time there’s a creative decision to make, especially if you’re using voiceover. This may surprise you, but voiceover artists still need to breathe and often those breaths are audible. Do you remove all of the breaths for a voice-of-God approach or leave them in for a personal touch?
In this interview with Dallas Taylor, of Defacto Sound and Twenty Thousand Hertz, while discussing the aspects of a good audio mix, Dallas recalls mixing for the Discovery Channel, noting their blanket policy was to pretty much remove breaths from all narrators.
The breathing decision is ultimately a creative one for you…or whomever is paying you.
Mixing with submixes
The secret sauce to audio mixing in Premiere Pro or any other NLE is utilizing submixes.
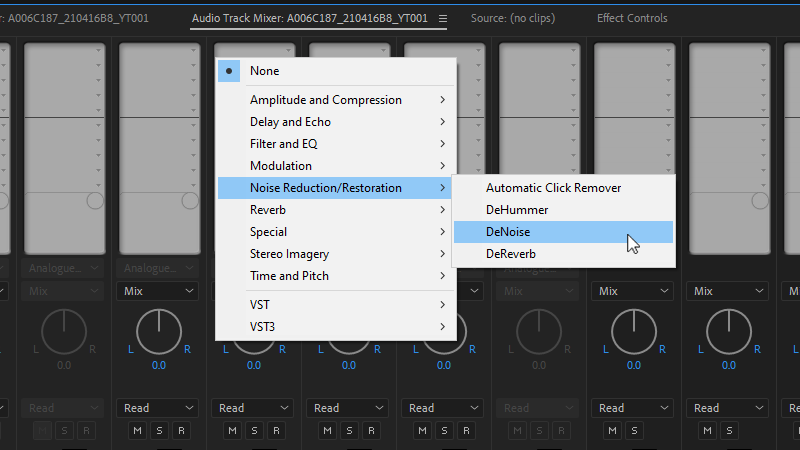
A submix is similar to a bus in a DAW in that it combines signals from specific audio tracks into a single mixed track. This is helpful because you can then use track based effects on your audio routed to a particular submix. A typical example of this is noise reduction.
It’s not uncommon for there to be unwanted room noise when recording an interview on location and, by the miracles of post-production, we can remove most of that noise by simply dropping a noise reduction effect, like DeNoise in Premiere, onto a clip.
By using a dialogue submix, we can apply that same DeNoise effect to an entire track or tracks of clips while only calling the effect once. With only one instance of the effect, it’s an easier way to manage tweaks to the effect across a piece and is much less processor intensive.
How to use submixes in Premiere Pro
In Premiere Pro we can work with submixes through the Audio Track Mixer panel (Windows > Audio Track Mixer).
First though, we must actually add submixes to our sequence. To do that, right-click in the timeline panel next to the track targets and select “Add Tracks”.
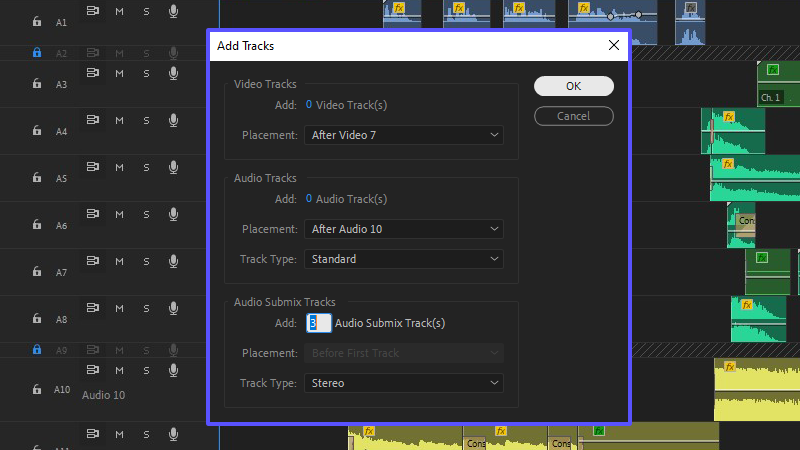
How many tracks you need is entirely dependent on the sequence and what you’re trying to achieve. Assuming you have multiple tracks of dialogue, music, and sound effects, then you’ll need at least three submix tracks.
Now we need to name each submix and assign tracks to it. Renaming is as easy as selecting the track name in the Audio Track Mixer panel and typing a new one—or you can right-click the track in the Timeline panel next to the track targets and click Rename.
In this example, “Submix 1”, “Submix 2”, and “Submix 3” are renamed respectively to “DIALOGUE”, “SFX”, and “MUSIC”.
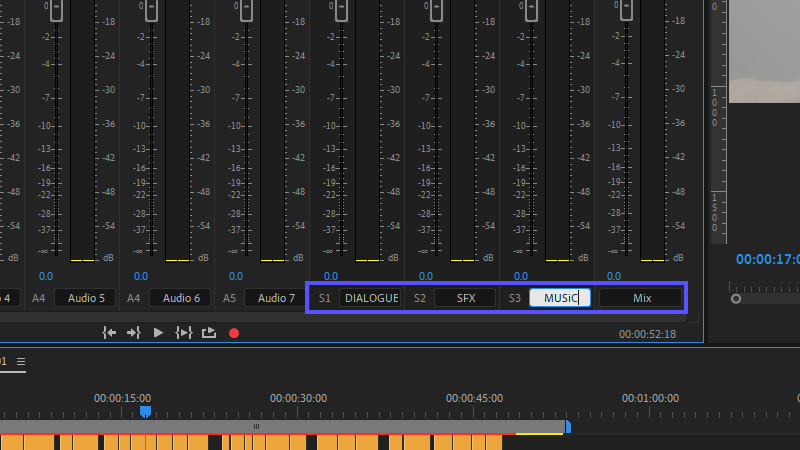

Tracks can then be assigned with the Audio Track Mixer by clicking the dropdown just above the pan knob. Then depending on the track type, select “DIALOGUE”, “SFX”, or “MUSIC” to send it to the appropriate submix track.

Great, we’ve got submixes! Now what?
Using effects on submix Tracks
The Audio Track Mixer allows you to affect all clips on a given track and that includes all clips routed into a submix track.
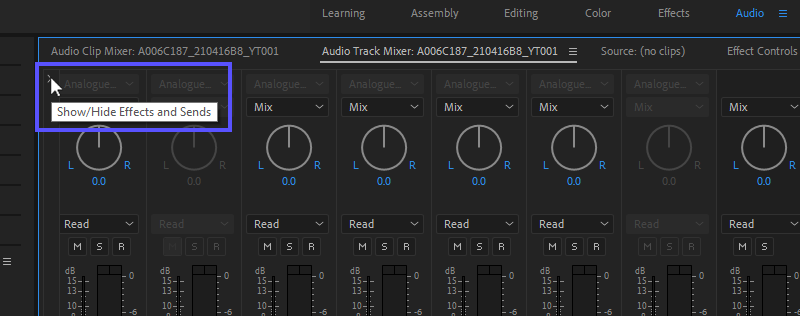
You can adjust audio levels across the board, control the panning on tracks, and even add effects. Unfortunately Premiere Pro won’t let us drag effects from the Effects panel onto the Audio Track Mixer, so we use the effect dropdowns instead.
If you can’t see the Effects panel at the top of the mixer view, look for the carat that toggles the visibility in the top-left corner of the panel.
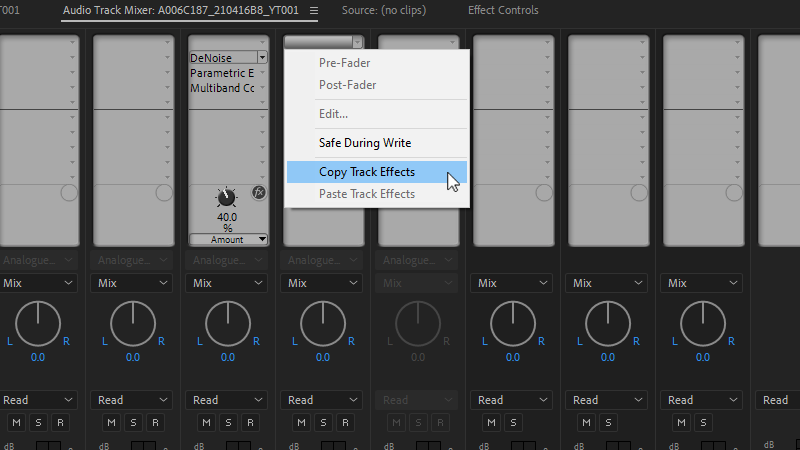
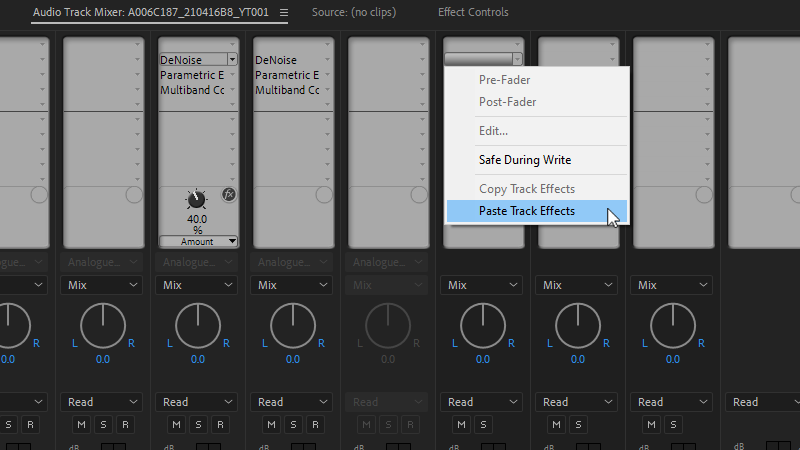
Effects on each track can be stacked, just like video effects, and can be rearranged using drag and drop. Dragging an effect to another track in the Audio Mixer Panel will create a copy, but you can also copy and paste by right-clicking on the effects stack, selecting Copy Track Effects, and then right-clicking the destination track and selecting Paste Track Effects.
Until recently, there was also no way to copy multiple track effects from one track to another, but Premiere Pro now lets us copy an entire track’s effects and paste them to a different track, even if that track is in a different sequence.
Simply right click the track you want to copy, select Copy Track Effects, and then paste them to a new track similarly, clicking Paste Track Effects.
Visual tools for mixing audio
An audio mix is a creative process, but there’s some science behind those waveforms and like any good scientist, you need some specialized tools to see what your ears can’t tell you.
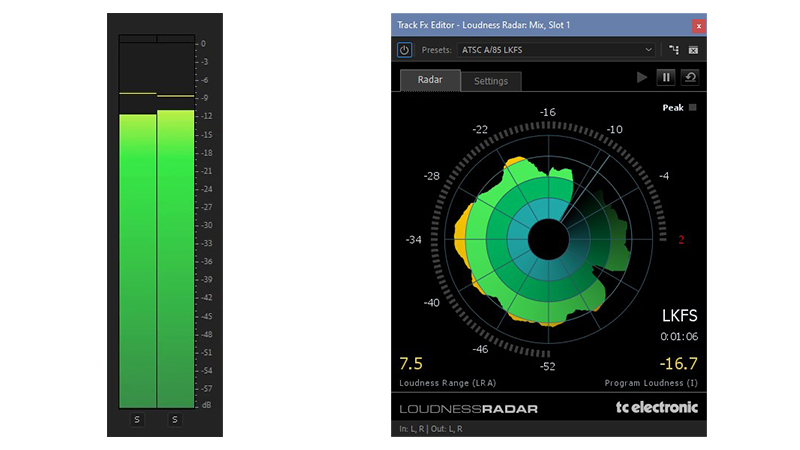
Enter Premiere Pro’s Audio Meters and Loudness Radar.
Audio Meters are what most people think of when we think of measuring audio. Those little bars bouncing along the side of the screen as a video plays are more than just eye candy, though. They can be used as a great guideline while editing and, to an extent, while mixing to keep your video’s audio levels in check.
What audio meters do best is help us to avoid peaking. Audio peaks when it is too loud and the meters turn red at the top, or peak. When audio peaks, it can sound distorted and messy. The best way to avoid peaking is to aim to have your mix never go above -6dB. Some industry veterans might even say never go above -10dB and that brings up an interesting point.
There is a lot of debate on where audio levels in a mix should live. Ultimately, it again comes down to creative taste.
As you’re editing through a mix, use the numbers below as guidelines, not rules, and let your ears be the deciding factor.
The Loudness Radar
With so much uncertainty surrounding audio levels, it makes you wonder how anything gets standardized, especially for broadcast.
After the Calm Act of 2012 was passed, limiting commercial loudness on broadcast TV, things became a little more standardized. The law focuses on the loudness of a video, measured in LKFS or LUFS. Loudness is measured differently than volume in that it measures across an entire video, not just individual peak moments.
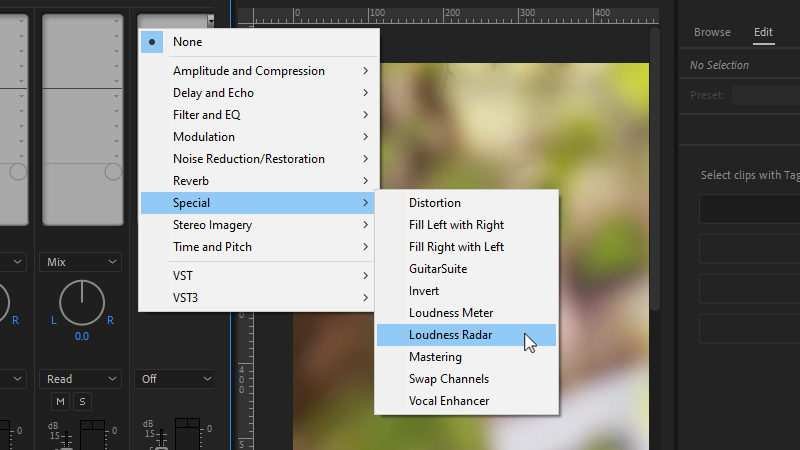
To measure the loudness of a sequence in Premiere Pro, we can use the Loudness Radar in conjunction with the Audio Track Mixer. In the effects dropdown of the Master track within the Audio Track Mixer, select Special > Loudness Radar. Then, double click the effect and a box should pop up with a circle that looks like a target.
Click over to the settings tab and adjust the target loudness, -24 LKFS for broadcast or drag to -16 LKFS for online.
Then set the radar speed to be roughly the length of your sequence. Switching back over to the radar tab, we read the radar like a clock. If our radar speed is set to one minute, then when playing our sequence, it will take a full minute for the radar to move around from 12 o’clock all the way back to 12 o’clock.
Park your playhead at the start of the sequence, click the play button on the radar, and then play the sequence. The radar will start to build a colorful pattern that shows the loudness throughout the piece.
The target loudness we set earlier is represented by the second circle from the outside of the radar. Any parts of the sequence that show yellow are louder than the target loudness and should be corrected in the mix. Use the rest of the radar to visually see how loud one portion of the sequence is in relation to another.
But you might be wondering “Should the video play at the same loudness throughout? Are there moments of quiet, followed by stretches of loud?”
Well, that all depends on the video, but the loudness radar allows you to visually make sure the levels play as they should.
Start mixing
It’s taken a minute, but with a clean sequence and an understanding of the measuring tools, we’re ready to start mixing!
When mixing audio in Premiere, I like to start with the music. You’ll want to solo the tracks you’re focusing on so you can hear them clearly.
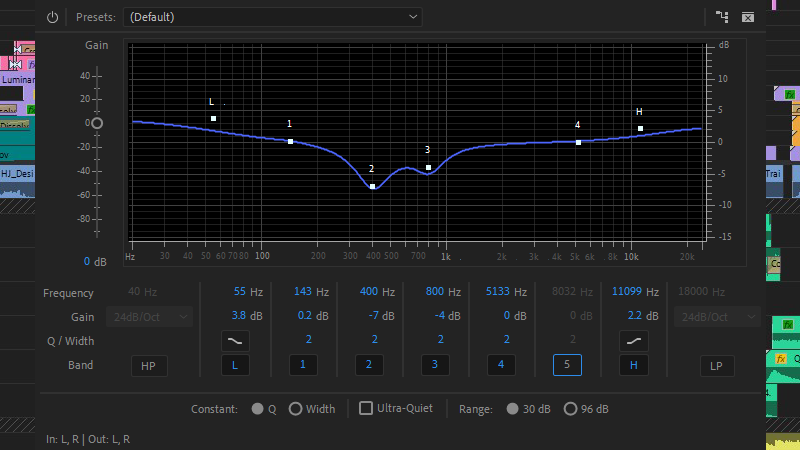
First, let’s start by taking your music mixing skills to the next level by scooping the music. Scooping refers to the process of using an equalizer to carve out the mid-range frequencies of the cues in order to better hear dialogue tracks.
To scoop, add a Parametric EQ effect to the music submix in the Audio Track Mixer and then boost the high/low ends while lowering specific frequencies in the mids, like in the example below.
Then, using the audio meters, start by getting all of the music used as underscore set to -22dB to -18dB. It’s helpful at this time to duck your audio as well.
Move on to the dialogue next, and turn your eyes back to the Audio Track Mixer. On the dialogue submix track, add a DeNoise effect (Noise Reduction/Restoration > DeNoise). In most cases the default settings are fine.
Then add a Parametric EQ effect and use the “Vocal Enhancer” preset. This preset brings clarity to dialogue by rolling off frequencies below 100Hz, adding a gentle trough around 300Hz to reduce muddiness, and then gently boosts frequencies starting at 4kHz.
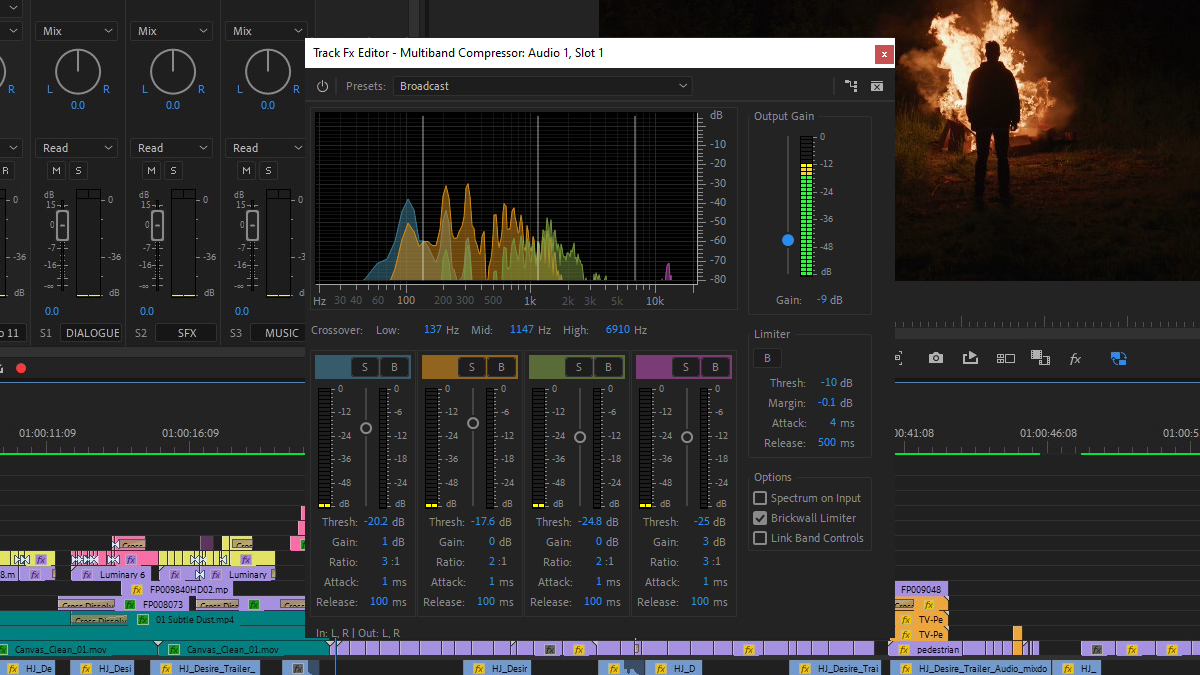
The last effect we need to add to our dialogue is a Multiband Compressor (Amplitude and Compression > Multiband Compressor).
Compression in its simplest form helps to normalize audio by reducing the difference between the loudest and quietest portions of an audio track. It brings the quiet parts up and tames the louder parts. There’s a lot to be learned about compression, but Premiere Pro gives us some handy presets to fastrack using the Multiband Compressor.
I like to start with the “Broadcast” preset, then tweak the overall gain down to taste.
With our effects added, move through all of the dialogue tracks and adjust the levels using the audio meters to around -15db to -12db.
With the dialogue and music in a good place, turn your attention to sound effects. I don’t typically solo the sound effect tracks when mixing because I like to hear how they interact with the full mix. Once complete, use the Loudness Radar to measure the entire sequence and adjust levels across all tracks as necessary to get the entire piece at or under the target loudness.
When to call in a pro
By now I’m sure you’ve gathered that a lot goes into a good audio mix and admittedly, this crash course is only scratching the surface.
If you want to dig deeper, check out this in-depth guide to Premiere Pro’s audio tools. It goes into much greater detail about some of the tools we explored above.
Similar to video editing in an NLE, a truly professional mix needs to be performed in a dedicated DAW by an audio professional. Audio pros bring a level of expertise that can take a mundane video and make it feel alive.
So when the budget allows, consider hiring an audio pro.
That said, it never hurts to give them a head start by doing a solid pre-mix.