If you’ve been following this four-part series, then you’ll know that we’ve already covered choosing your microphone, preparing your environment, and recording your voiceover. Now it’s time to finish things off. And for this, we’ll be staying in Adobe Audition. It’s not your only option, and a lot of the features noted here can also be found in other applications, so you should be able to follow this guide even if you’re using a different editing tool.
Adobe Audition is a powerful audio editor, and like most of its type, the extent of its feature set can make it intimidating to the newcomer (or even a video veteran who’s never seen a spectral frequency display before).
So before we get down to the specifics of editing and cleanup, let’s take a look at the displays you’ll be using in post—waveform and spectral frequency.
Waveform
This is the simplest and most familiar of the two and is time (x) plotted against amplitude (y), with peaks indicating loudness. Just as with the Levels meter, this is measured in dBFS (decibels relative to full scale) with a maximum peak of 0dBFS.

Once you get to know the spectral frequency display a bit better, you’ll probably rely on the waveform view a lot less. But it’s still useful to check for instances of audio clipping, or creating fade envelopes, or seeing how much headroom might be available for gain or compression. But the chances are that you’ll spend most of your time with the waveform view minimized to give the spectral frequency more room, which you can do by dragging the horizontal divider up and down to suit.
Spectral frequency
At first glance, the spectral frequency display (Shift+D) can be intimidating, but it’s actually pretty simple. It plots time (x) against audio frequency (y), and the colors are just a heatmap that shows how loud the sound is at a given frequency. The brighter the color, the louder the sound, so cross-referencing bright and dark areas against the frequency axis will give you a surprisingly good idea of the sound being made.

Now, I’m not saying that you’ll be able to read words, but you’ll start to pick out some of the more obvious sounds, transients, and phonemes with a bit of practice.
To provide a more visual example, here are the waveform and spectral frequency views of me saying “mmmmmmm” and then “tsssssssssssss”.
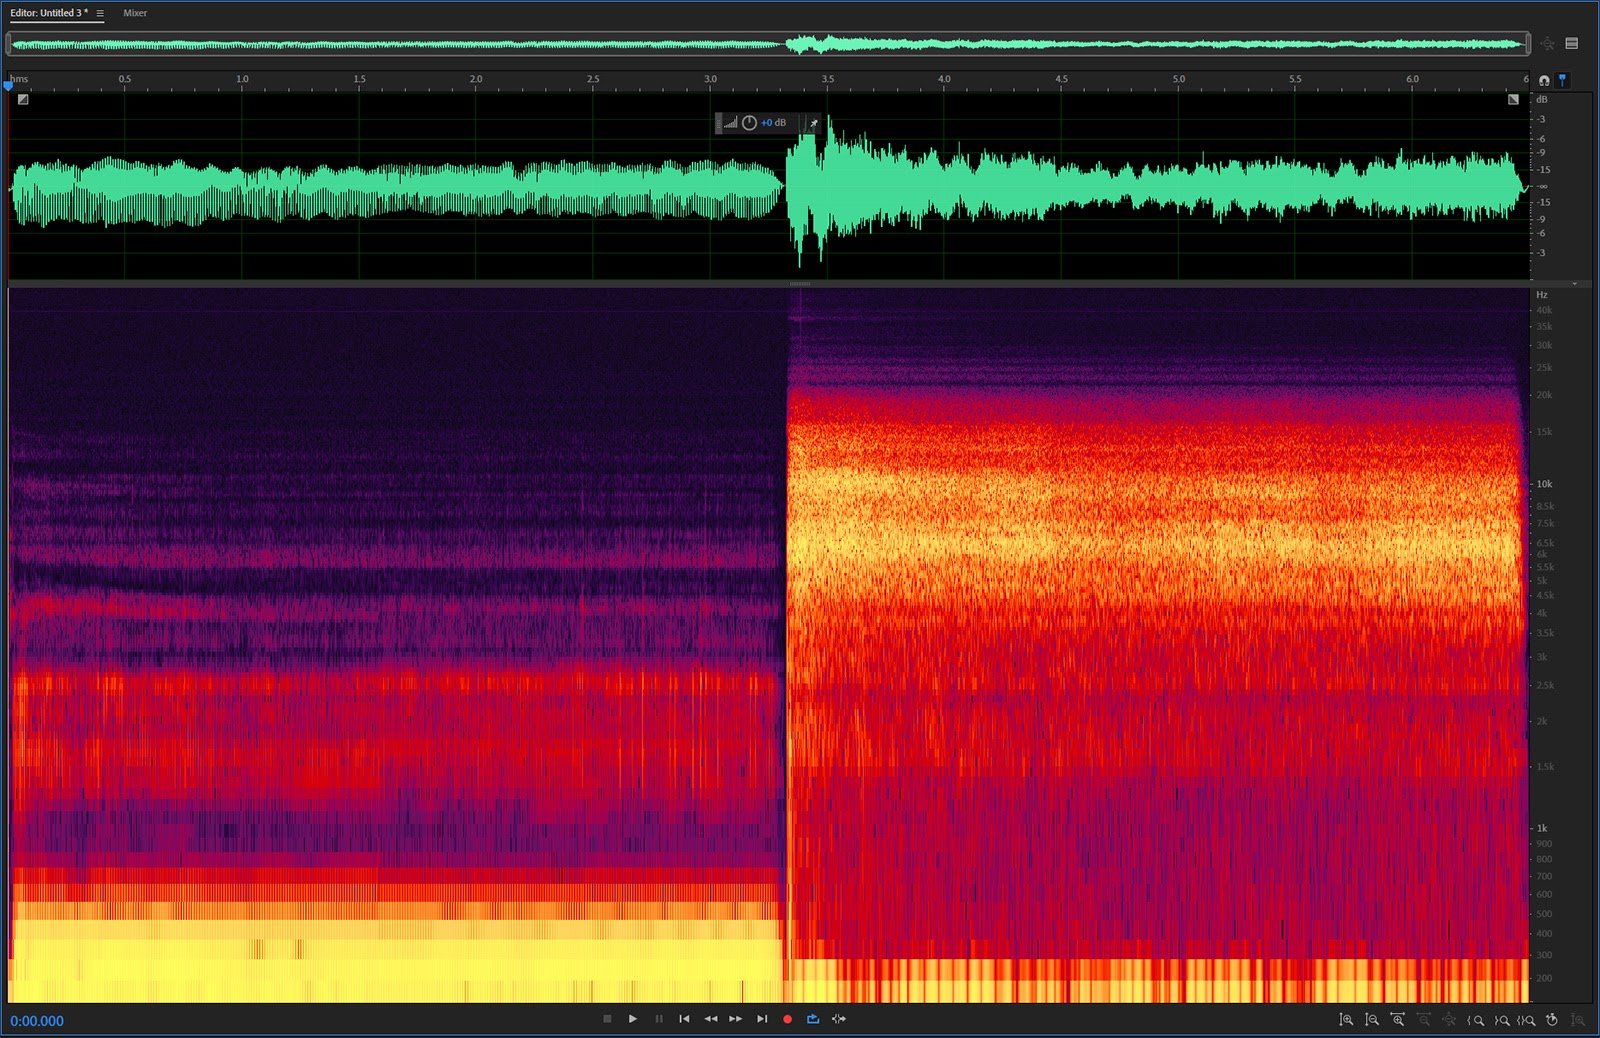
Humming lives in the lower frequencies, so you can see my “mmmmm” is hottest between 200 and 500Hz, while the high-frequency sibilance of my “tsssss” looks brighter between the 4kHz to 10kHz mark. In comparison, the waveform offers less granular information, but you can still tell where each sound starts and stops, as well as their differences in amplitude.
Now we know what we’re looking at. Let’s get to work.
Create your rough cut
The first thing to do with your recording is to edit out the garbage, leaving you with a single audio file that matches your script. Just use the time selector (T) to highlight the bits you don’t want to keep and delete them.
If you took my earlier advice and have ten seconds of silence/ambiance at the beginning of your recording, leave this in place. And don’t worry too much about timing at this stage, we can refine things later.
Snapping
Audition enables “snapping” on the timeline by default, but you can toggle it with the S key or by clicking on the magnet icon at the top right of the Editor panel. For the most part, you should leave snapping turned off as this will make it easier to make accurate manual selections. The exception to this is when you’re using markers.
Marker selection
To avoid losing your place while editing, use the M or * key to create a cue marker under your CTI (current time indicator, or playhead) to locate the In point of your edit. Then find your Out point and mark it in the same fashion.
With snapping turned on, you’ll find it much easier to select the range between the two markers, and it’s a useful technique for making large selections.
Alternatively, you can select both of your markers in the Markers panel, by selecting them, right-clicking, and choosing Merge (or clicking on the Merge button). When you double-click on this new merged marker, the range between your In and Out points will be automatically selected, and you can hit the Delete key twice to delete the marker then your selection.
When you’ve finished your rough cut, save it as a new file to keep it separate from your original recording.
Normalize your audio
The next step is to normalize your recording. Hit F2, or click on Effects-Amplitude & Compression-Normalize (process), and this will adjust the gain to lift (or drop) the audio’s loudest peak to the value you set in the pop-up window.
Typically you can leave this at 0dB or -0.1dB, unless you want to leave some headroom for EQ (equalization) or a music bed later on, in which case, feel free to drop the ceiling a little.
If your recording levels were good, then normalization won’t make a big difference and you’ll only see a slight lift across the waveform when you apply it. If your levels were too low, then the difference can be pronounced. And if they were too high (clipped) at any point, then normalization will have no effect at all, because the clipped audio is already as high as it can go.
Normalize is one of Audition’s many process effects, which are indicated by (process) in drop-down menus. These are typically CPU-hungry effects that require waveform analysis, so they can’t be played back in real time and are permanently applied.
Hard limit
If you find that your vocal levels are being held back by a couple of pesky amplitude peaks, you have a couple of options. One of these is to highlight the troublesome peaks and selectively reduce their gain using the HUD (toggled with Shift+U). Dialing down the peaks will provide more headroom so that Normalize has a greater effect.
Alternatively, you can use the Hard Limiter to boost your quieter sections, which is essentially a compression effect. The Hard Limiter isn’t a process effect, so you can (and should) apply this using the Effects Rack panel, as this is non-destructive and allows you to adjust settings later, or even toggle the effect on and off in the stack.
So instead of selecting it from the Effects drop-down, click on the Add Effect button in the Effects Rack (the triangle at the end of the row) and select Amplitude & Compression-Hard Limiter. Keep the Maximum Amplitude the same as the value you used to Normalize, and set the Input Boost to the value you think your quiet vocals need. The other values can stay at their defaults.
Play the audio while you make your adjustment, and watch the Input and Output levels on the Effects Rack to see the difference it’s making. As a rough guide, you should aim to have most of your vocals hanging around the yellow zone.
Bear in mind that the hard limit effect is a compressor, so it will reduce your audio’s dynamic range. You can definitely overdo it, and it may not be appropriate if you need a deeper range of sounds from loud to quiet. (Compression is partially why adverts sound so loud.) To learn more about compression and its effects, you should definitely read this article.
Silence, please
The tolerance for background noise in voiceover recordings is usually very low. Your editor will often have to split the track into phrases to match the timing of what’s being said to what’s being shown, and the resulting silence between these clips will draw attention to any background noise when the voiceover kicks in again.
So we want the space between our recorded vocals to be as close to silent as possible. This can be achieved in a number of ways in Audition—like Adaptive Noise Reduction and DeNoise—but I’ve always found the best results come from the Noise Reduction process. But your mileage may vary, so feel free to check these alternatives out.
Noise reduction
To use the Noise Reduction process, you need to give it a sample of noise to work with, and this is why you recorded those seconds of silence at the beginning of your track. And you might be thinking, “does he mean room tone?” Which would be a reasonable question, as it’s basically the same thing.
But while the recording is technically the same, the objective is the exact opposite. Tone is something you record so you can add it to the edit to make ADR sound like it happened in-situ. Noise is something you record so that you can identify and remove as much of it as possible.
It might sound counter-intuitive, but use the spectral frequency display to clean up your noise sample first. Look for transient noises like mouse clicks, keypresses, or breath, and take these out until you’re left with a section of clean, constant background noise.
Highlight this with the time selector and open the Noise Reduction effect using Cmd/Ctrl+Shift+P. In the window that opens, hit the Capture Noise Print button to let Audition know that this is the noise you want to remove, then Select Entire File, and Apply.
The process will take a moment to work, and it won’t remove everything in one go, because Adobe has wisely chosen to set a less aggressive profile as the default. Instead, you should check the audio preview to make sure that your first pass hasn’t caused unwanted ringing or distortion effects in your vocals (known in the business as space monkeys).
If your voice sounds fine but you can still hear some background noise, then give it a second pass using the same noise print. You don’t have to get the gaps between your words looking absolutely black, so don’t worry if you can still see dark purple noise on your spectral frequency display.
Why DeNoise might be a better choice
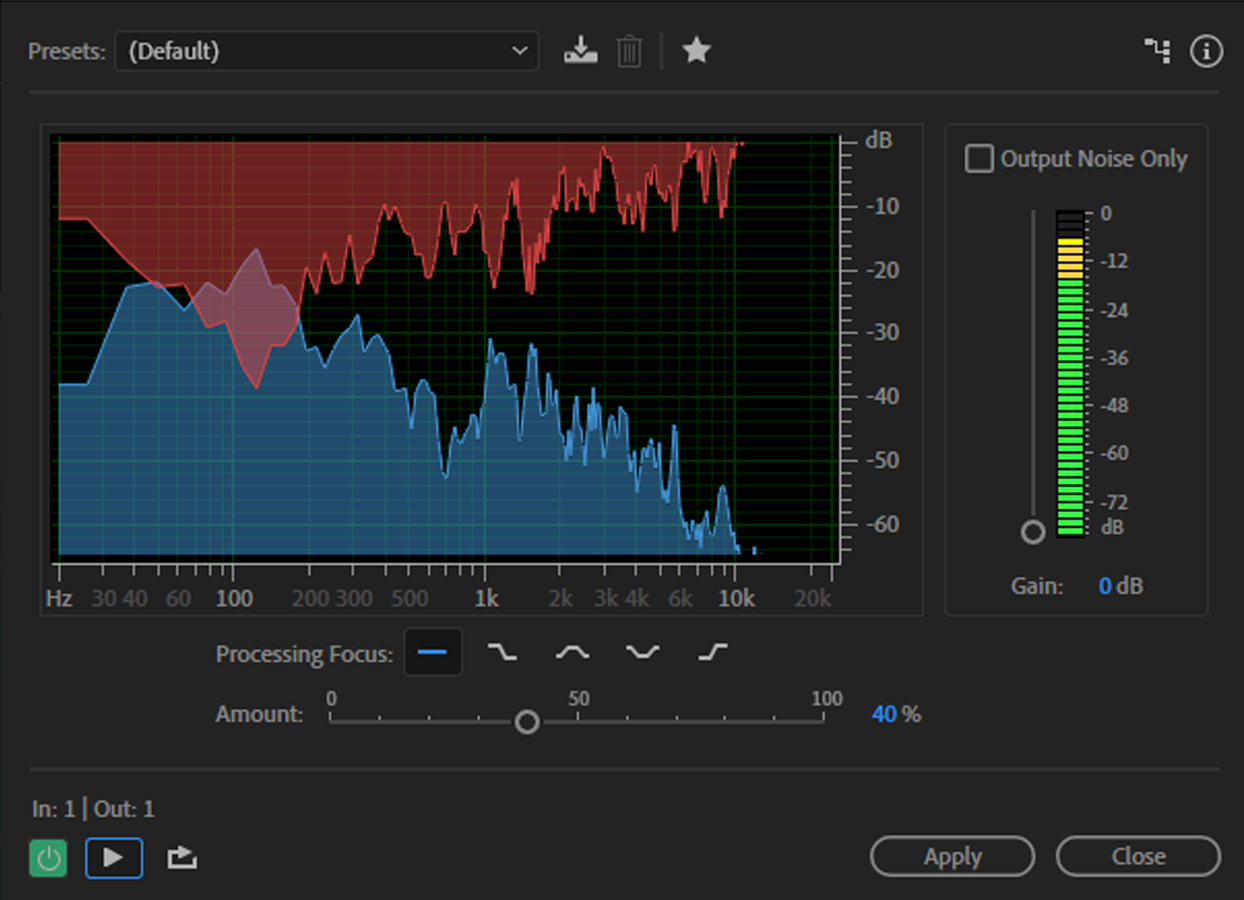
The DeNoise effect is dynamic, so it’s better at responding to changing background noise, like a plane travelling overhead, or your aircon turning on and off. Its settings are simple and you set it to focus on specific areas using the Process Focus pattern buttons. So you might want to give this one a shot if you find that Noise Reduction falls short.
However, if your background noise is so bad that the noise reduction process can’t fix it without distortion, just get as close as you can while keeping your vocals clean and we’ll address this manually.
A note on reverb
Reverb is a tricky thing. Because it’s a delayed reflection of your own voice, it hides itself in the original audio and is practically impossible to remove without damage. And where voice is concerned, we’re extremely sensitive to artificial changes.
There are several reverb removal solutions (some of which are not cheap) including one that’s built into Audition (and Premiere Pro). But my (admittedly not extensive) experience with them suggests that the benefits are outweighed by the distortion they introduce.
As far as I can tell, de-reverb tools work better with more echoey reverb (longer “tails”) because the reflected sound is more discrete. But this is not a scenario you’re likely to experience with VO recording (and is one of the reasons why we put so much time and effort into preparing the recording environment).
If you find yourself with audible reverb in your recording, your option might be to leave it sounding natural and send a sample to your editor to see if they think it’s usable. If it’s going on top of a music bed, you’ll be surprised at how much you can get away with.
Breath noise and gaps
You can use brute force to remove background noise and breath sounds from your vocals simply by highlighting them and using either the HUD (Shift+U) to dial them down, or selecting Silence from the Effects menu. But this can create a distractingly abrupt shift, especially if the track contains audible background noise.
Creating a fade envelope preset is a more subtle approach. To do this, highlight an area that you want to silence and select Effects-Amplitude & Compression-Fade Envelope (process).
Expand the waveform view to give yourself some room, and zoom in on your selection. Check the Spline Curves option in the Effect-Fade Envelope pop-up, then click on the yellow line in the waveform view to create keyframes at the beginning and end of your selection. Then create two additional keyframes adjacent to these and drag them down to the base of the waveform display so that it looks like the image below.
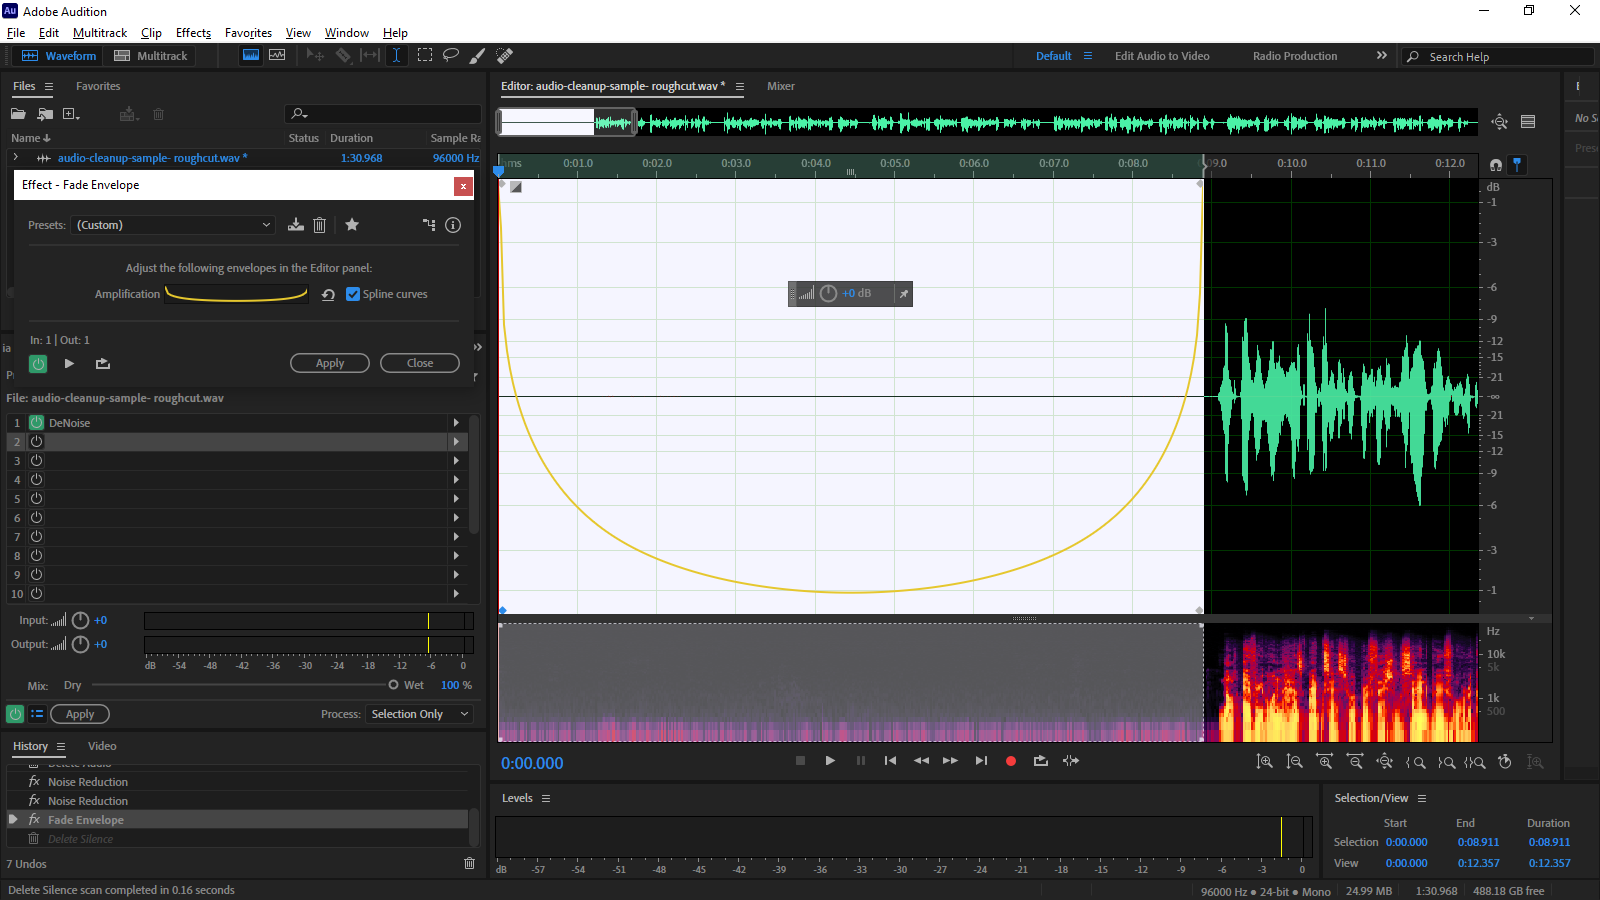
Before you hit the Apply button, take a moment and save this as a preset so you can quickly apply it to future recordings.
Once you’ve applied the effect once, you can streamline the process by running through your recording, highlighting the areas you want to silence, and hitting Cmd/Ctrl+R to instantly apply the last effect to your selection. So do this now.
De-Essing
Depending on your voice or microphone, you may not like the sibilance in your recording. It’s possible to train yourself to reduce this while speaking, but a more immediate solution is to get Audition to fix it for you.
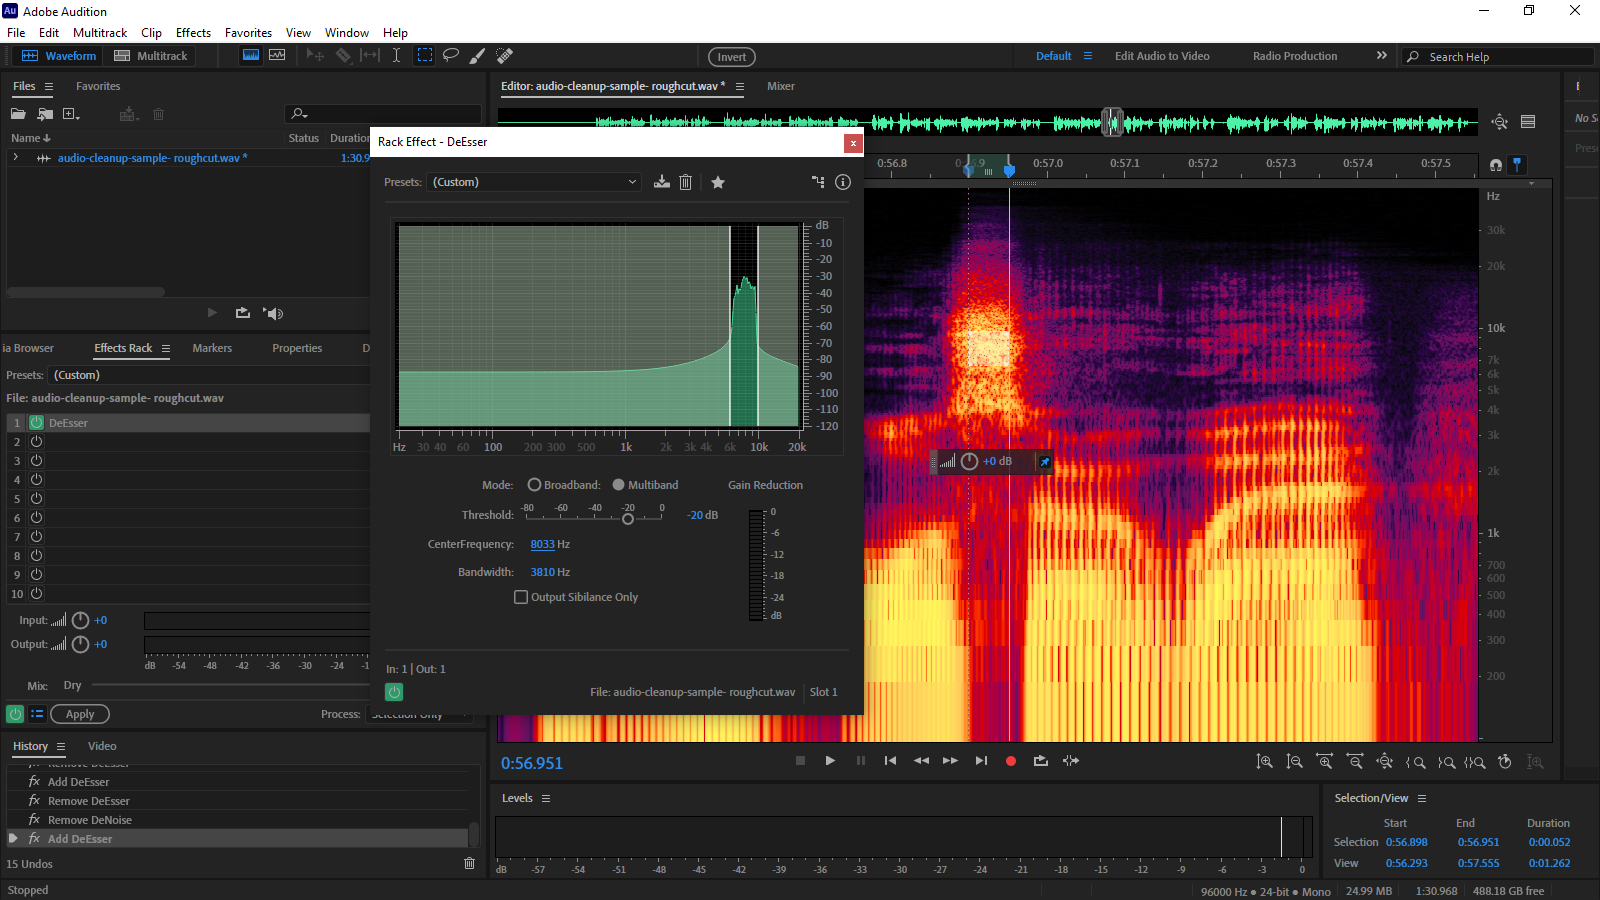
Start by finding one of your loudest instances of sibilance and use the marquee selection tool (E) to highlight its hottest part in the spectral frequency display. Turn preview looping on using Cmd/Ctrl+L, and use the next available slot in your Effects Rack to add Amplitude & Compression-DeEsser.
When the Rack Effect-DeEsser window opens, tap the Spacebar to play your selection and you’ll see it clearly in the effect display (see below). Stop the preview and drag the CentreFrequency value to move the default selection into this region, then adjust the Bandwidth values to refine the range. Lowering the Threshold value will increase the amount of DeEssing applied, but use it sparingly and check how it sounds in other areas of your recording.
Removing pops/plosives
Even with a pop filter on your mic, it’s likely that you’ll hear an occasional thump on your vocals caused by air hitting the pickup when you use plosives (P and B sounds).
The good news is that these are really easy to remove because they sit in the sub-200Hz region. So when you hear one, use the spectral frequency display to look for a hotspot in this area. It might not be that obvious, so use your ears to isolate it.
When you find it, simply use the marquee selection tool (E) to highlight the region between 0 and 200Hz and hit Delete. Even with male vocals, you should find that this takes it out without leaving an audible trace.
Mouth noise (clicks)
And while we’re on the topic of removing unwanted transients, you should keep an ear open for the worst of them all—sticky mouth sounds. (Even if you were well-hydrated during the recording, I can guarantee these clicks will show up somewhere.)
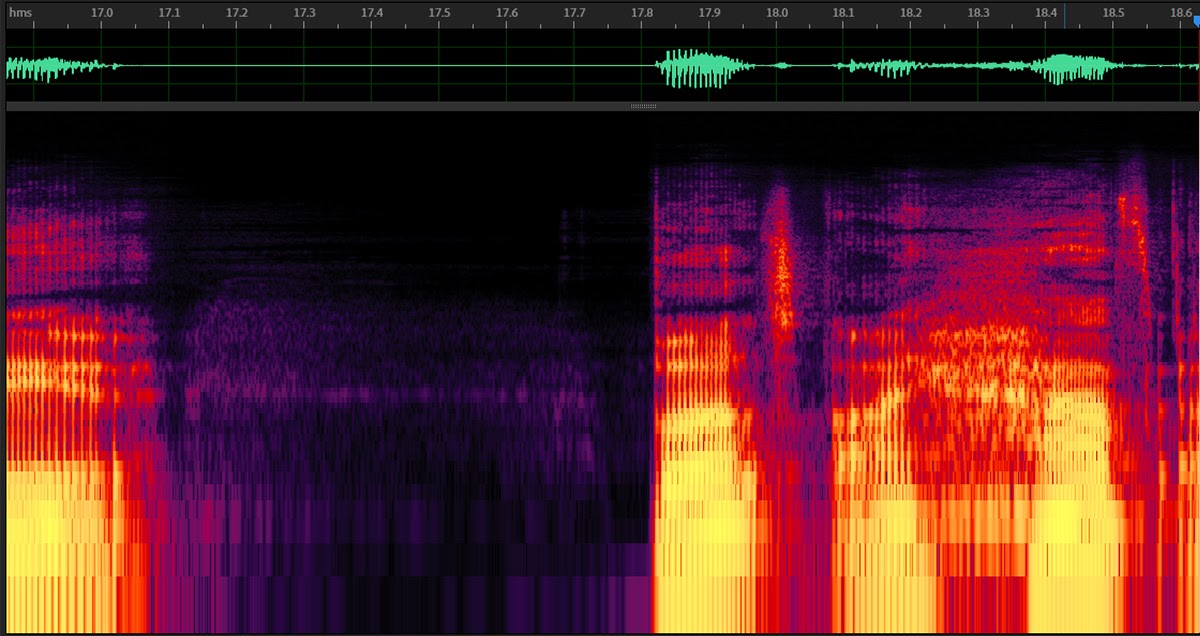
With a little practice, you’ll start spotting these in the spectral frequency display before you even hear them. They manifest as sharp needle-like shapes in the mid to high frequencies, and you’ll find about twenty of them in the example below—though not all of them will be audible.
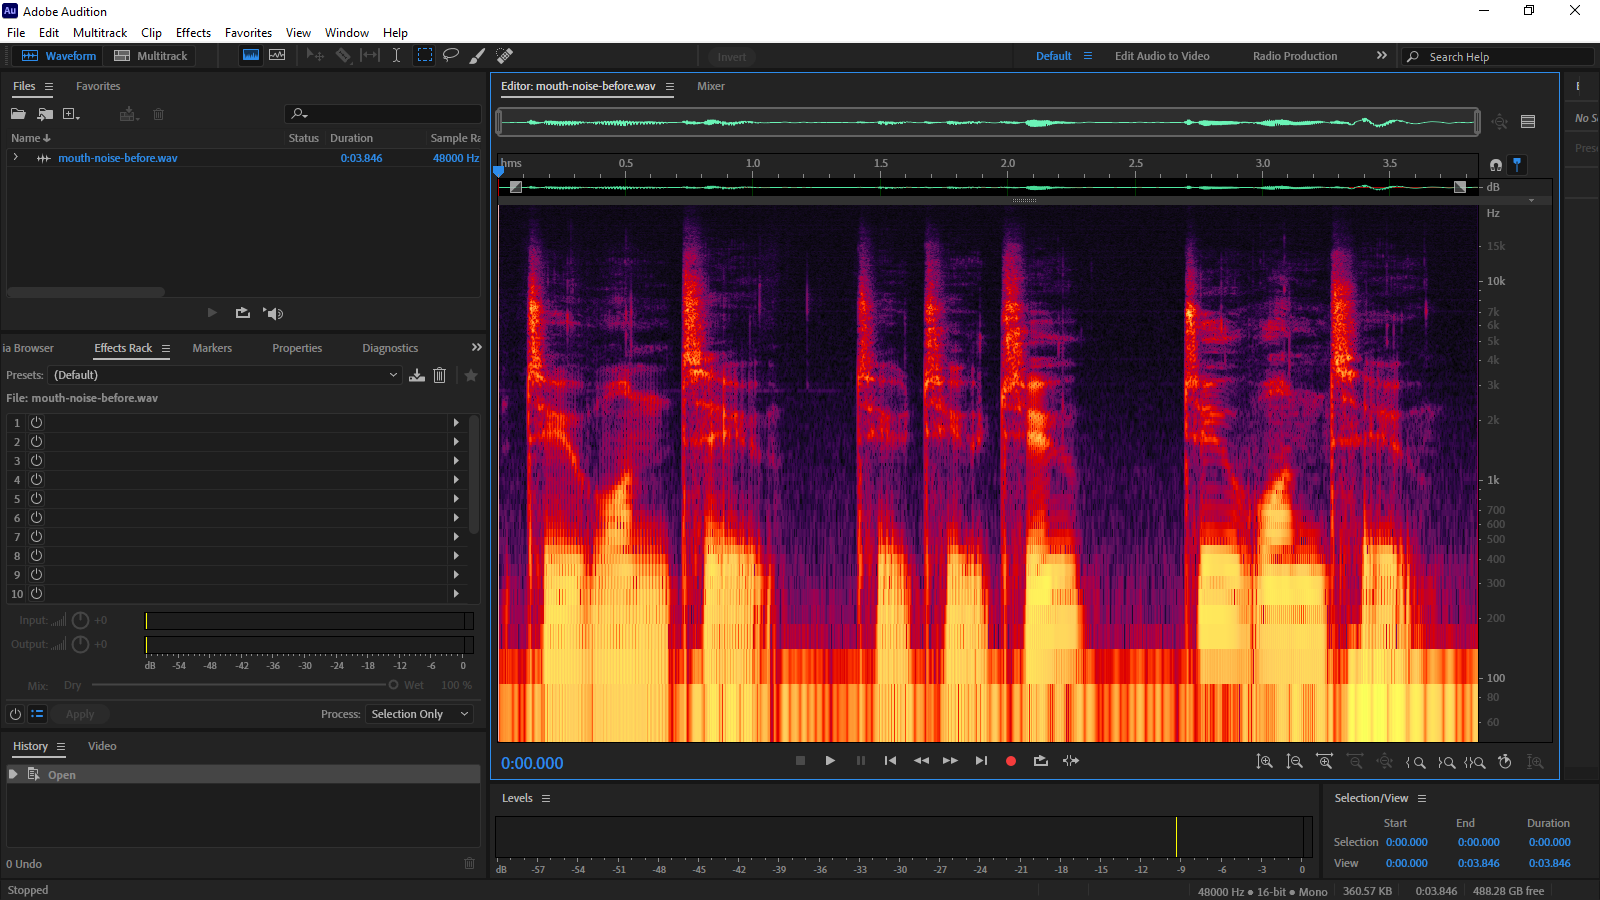
If there’s a way to remove these automatically without affecting the rest of your vocals, I’m afraid I haven’t found it. Fortunately, the Spot Healing Brush (B) does a fantastic job of stripping these off-putting noises out of your recording.
Zoom in on the spectral frequency display until you can clearly see these transients, then resize the brush tool so that it comfortably exceeds their width using the [ and ] keys. Hold down Shift to lock the brush to the vertical, then simply draw a single stroke over the offending noise.
When you let go, the Spot Healing Brush will strip the transient out by painting adjacent noise over the top—exactly like the equivalent tool in Photoshop. It’s time-consuming but really satisfying. Here’s a quick before/after so you can see what I mean. (If you can’t hear the difference, then you should probably get some different headphones.)
And now that you’ve used it for this, you can now apply the same technique to all kinds of sound removal, like birdsong or smartphone notifications. Just paint over them in the spectral frequency display, and you’ll be surprised at how often it works.
The Equalizer
In the hands of a skilled sound engineer, equalization—or EQ—to use its cooler nickname—is an incredibly useful tool. Using bold adjustments, it can function as a high- or low-pass filter to block out hum or hiss, while subtle tweaks can improve the clarity and character of your recording.
Because we’ve already addressed the noise and levels of our track, EQ at this stage is an aesthetic rather than corrective measure. And it’s probably worth having a chat with your editor before you go adding EQ—they might have something specific in mind, and may prefer to work with your file as it now stands (in which case, you can skip to the mastering stage).
You might recall that I mentioned my mic—the sE Z3300a—has a bright top end, but is pretty flat across the rest of the spectrum. So I’ve created a preset that helps to fill out the low end while de-emphasizing the sibilance in my voice. Remember those microphone frequency response charts from part one? They can be useful here.
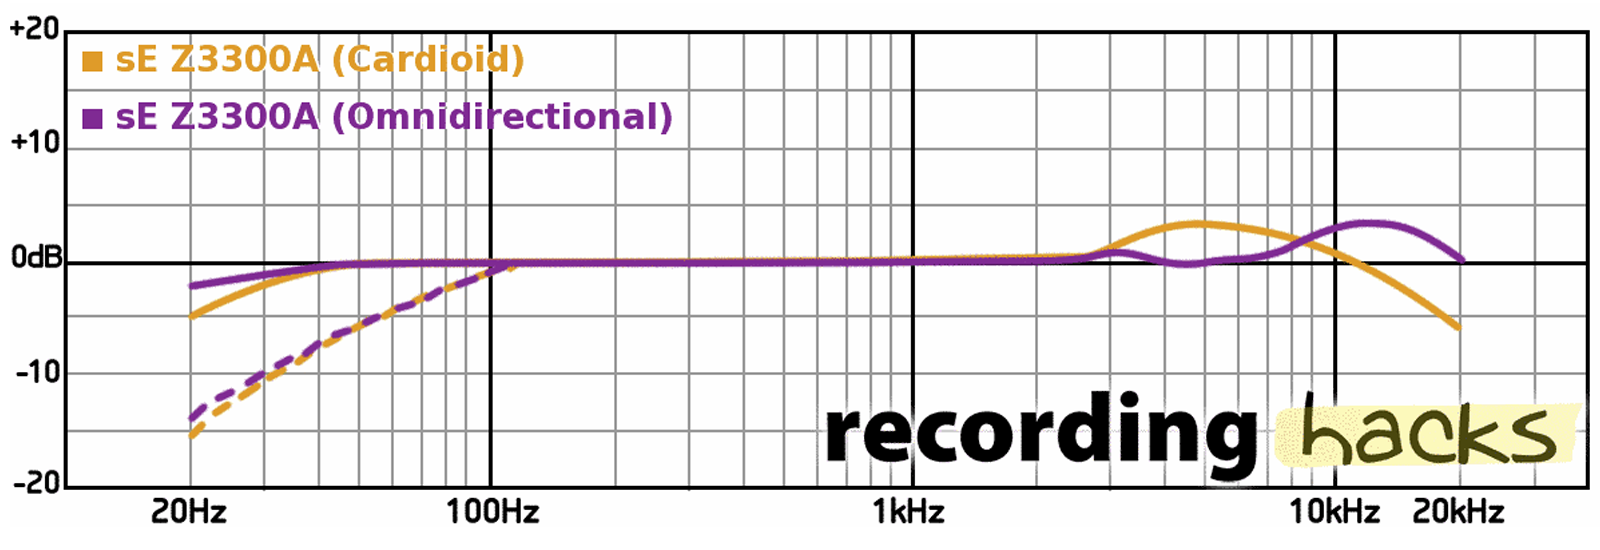
You can, of course, do this entirely by ear, but referring to the frequency response graph can give you a baseline to start from. And there’s nothing stopping you from creating multiple presets.
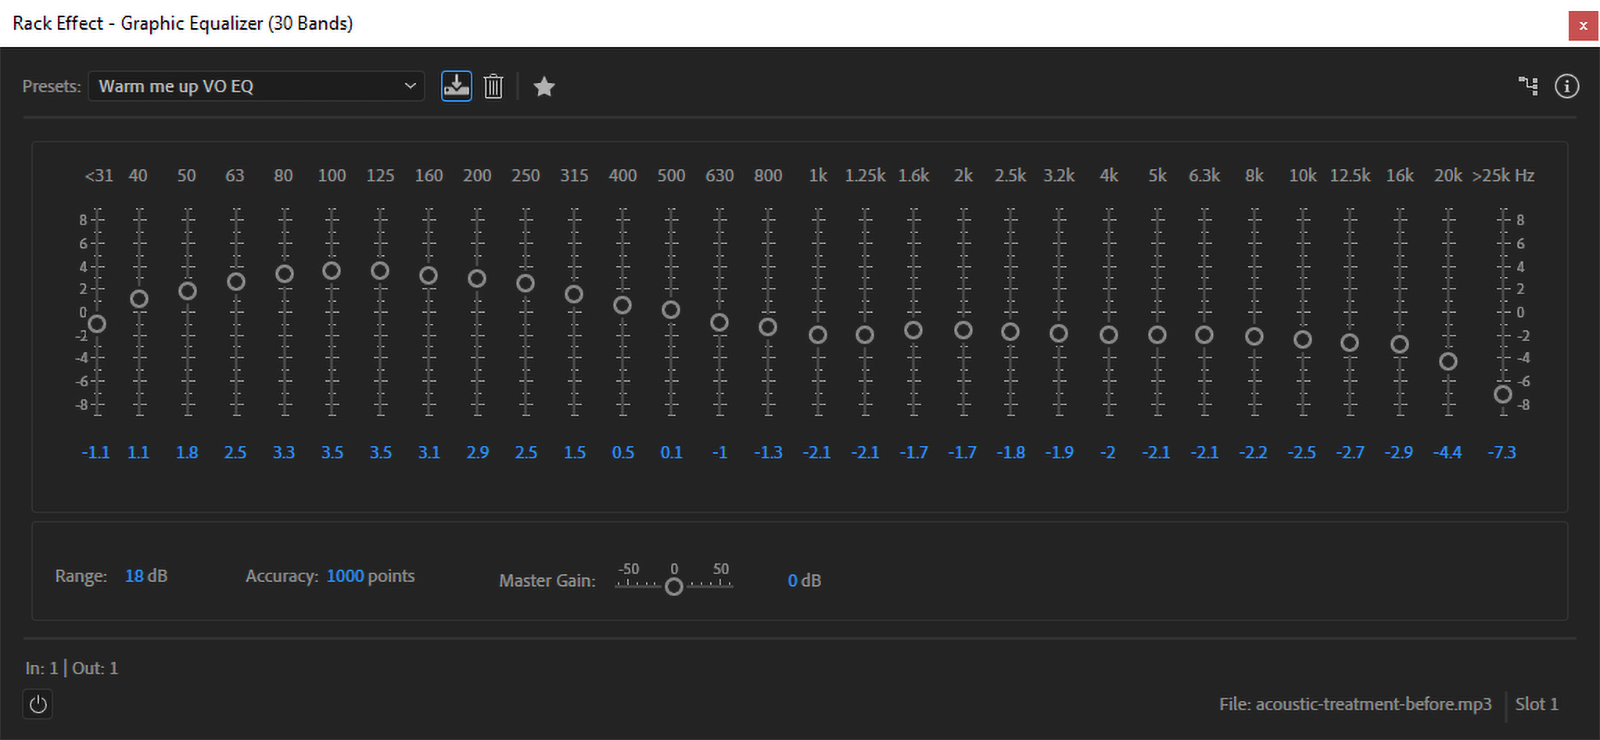
To apply an EQ, select the Filter & EQ-Graphic Equalizer (30 bands) in the next available slot on your Effects Rack. Then dial in the settings that reverse any unwanted characteristics of your microphone—like an overly-bright top-end—before adding adjustments to give your vocals the tone and color that you want.
EQs will stack in your Effects Rack, so you can create a baseline EQ to flatten your microphone’s frequency response—think of it as a technical LUT, but for your microphone—and then drop another EQ on top for character. And if you find yourself doing this a lot, then make sure you save them as presets for easy selection.
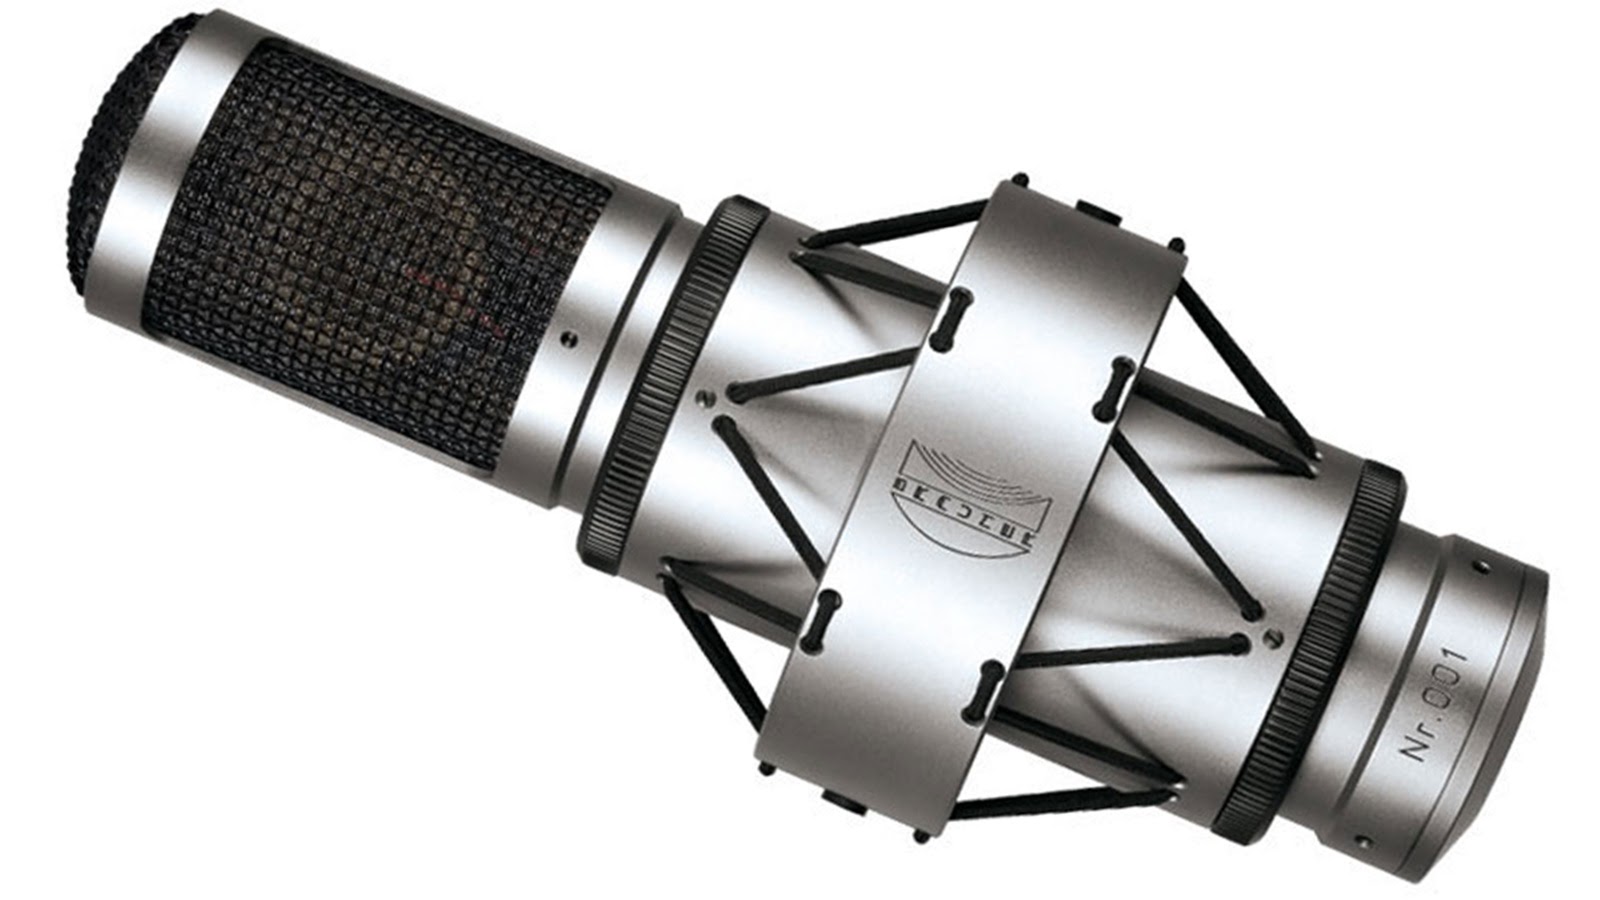
This isn’t going to turn your $60 Behringer C1 into a $8.5K Brauner VMA, but with a little work, an EQ can add character to your vocals that your microphone may have missed. Here’s a sample of how my EQ preset sounds:
Before adding EQ
After adding EQ
As always, your ears should be your guide when experimenting with EQ, but sometimes it helps to have a map. Like this one from ProducerHive, which illustrates key frequency ranges and the effects they can have on the end result.
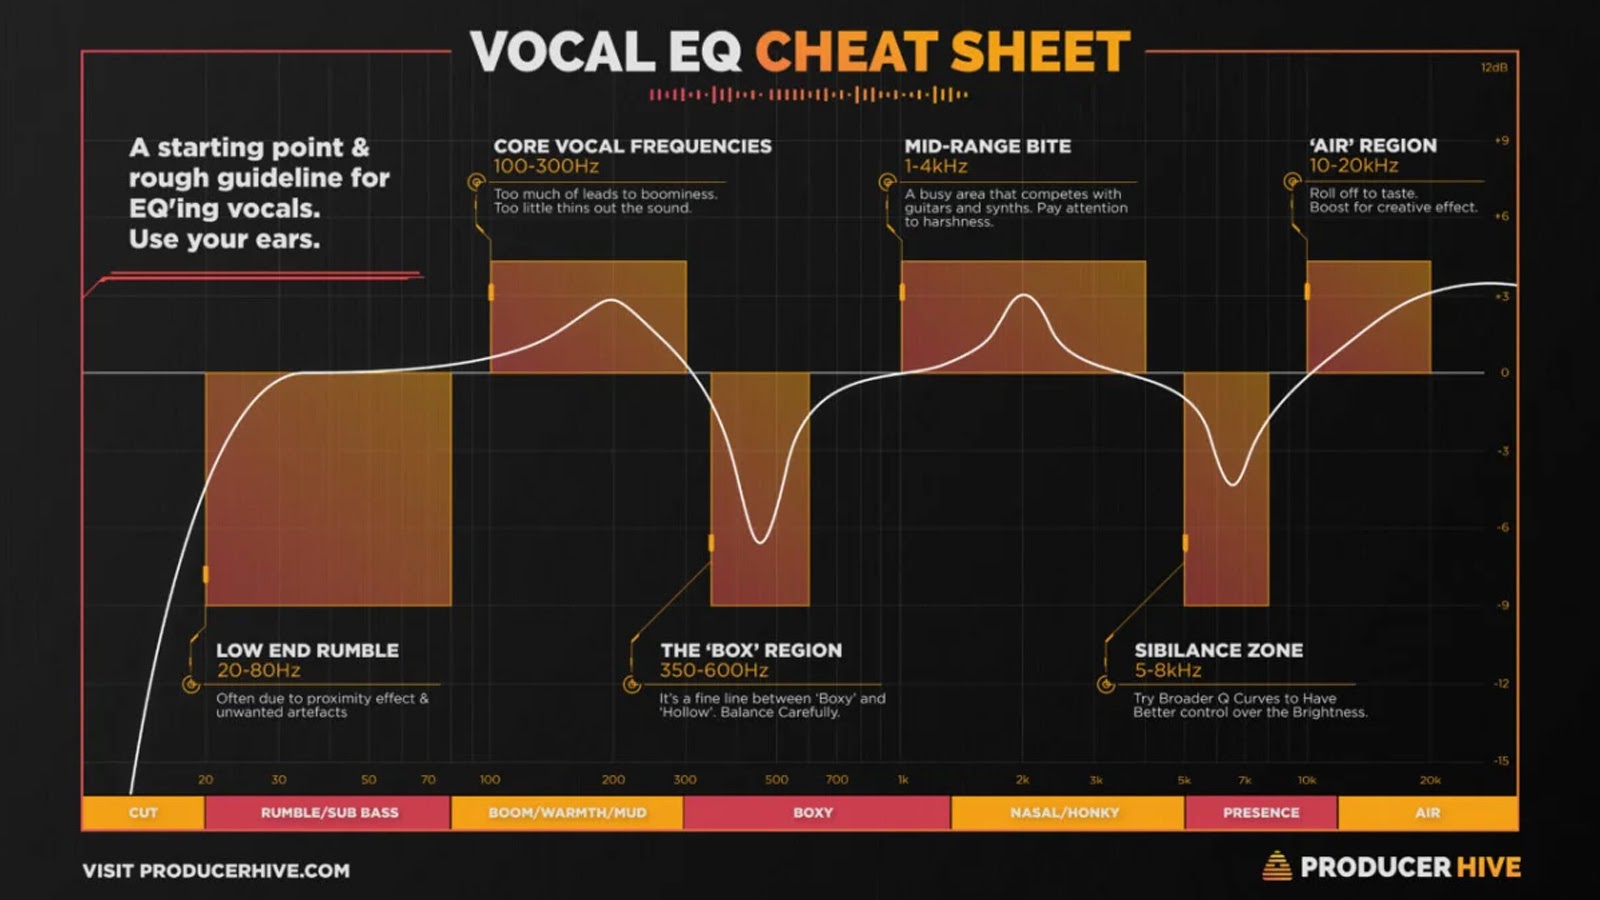
When you’ve got your audio sounding just how you want it to. It’s time to finish it off.
Render your rack
Any effects you have in your Effects Rack need to be rendered, otherwise they won’t make it into the exported file (Audition will warn you about this). So hit the Apply button to process the stack.
This will apply all the active effects to your track, and will clear all the effects from the stack—even those that were disabled. You can undo this process, but the changes will be permanent once the file is saved. (Which is why we made that backup at the beginning.)
Mastering your audio
A quick word about broadcast loudness standards. Right now, your voiceover is probably not broadcast-compliant, meaning that it doesn’t meet with local loudness standards like EBU R128, or ATSC A/85.
But that’s okay. You can go ahead and export it as-is, because your voiceover is just one component of the final production, so mastering for broadcast can wait until all the other components are in the mix.
But if you’re curious, you can check your recording by adding the TC Electronic Loudness Radar to your Effects Rack. (This is also available within Premiere Pro.)
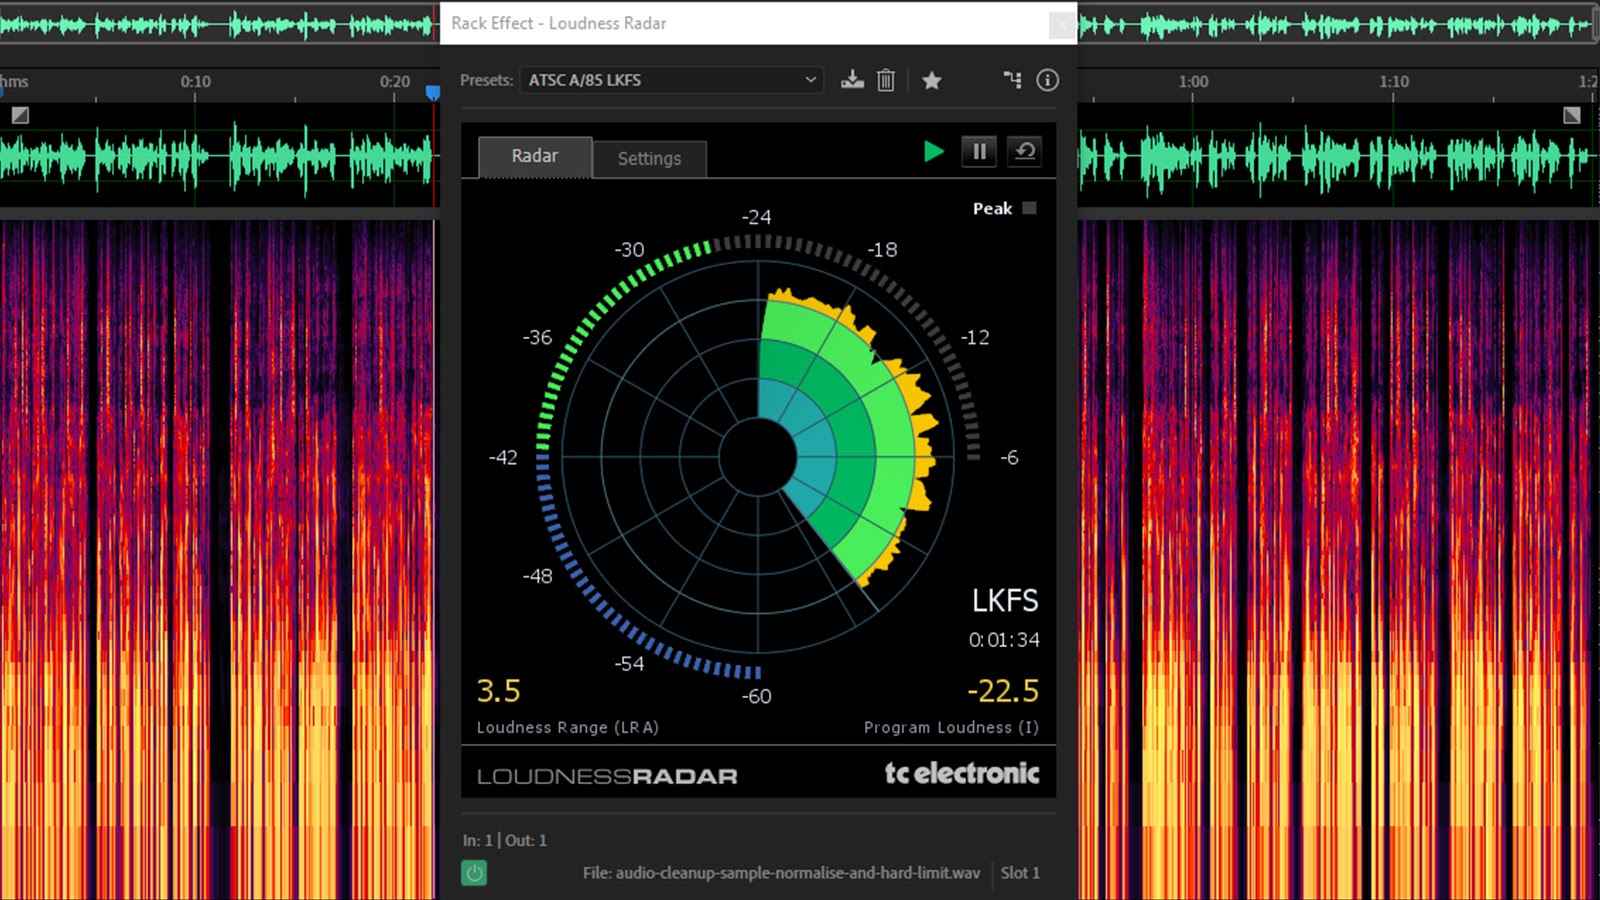
With this loaded, you can choose from a number of broadcast standards from the presets drop-down, and then preview your audio to see how it matches up.
LUFS/LKFS
Broadcast standards use a slightly different measurement scale known as Loudness (K-weighted) relative to Full Scale (LKFS) or Loudness Units relative to Full Scale (LUFS). For practical purposes, these are the same thing.
Unlike dBFS, LKFS and LUFS are a better measurement of how we perceive sound loudness because they represent values over time and they factor in dynamic range.
Match Loudness
If, however, you’ve been asked by your editor to meet a particular standard with your voiceover, you can do this using Audition’s Match Loudness panel (Alt+5). Just drag your file(s) into the panel, pick the broadcast standard you need from the Match To dropdown, and hit the Run button.
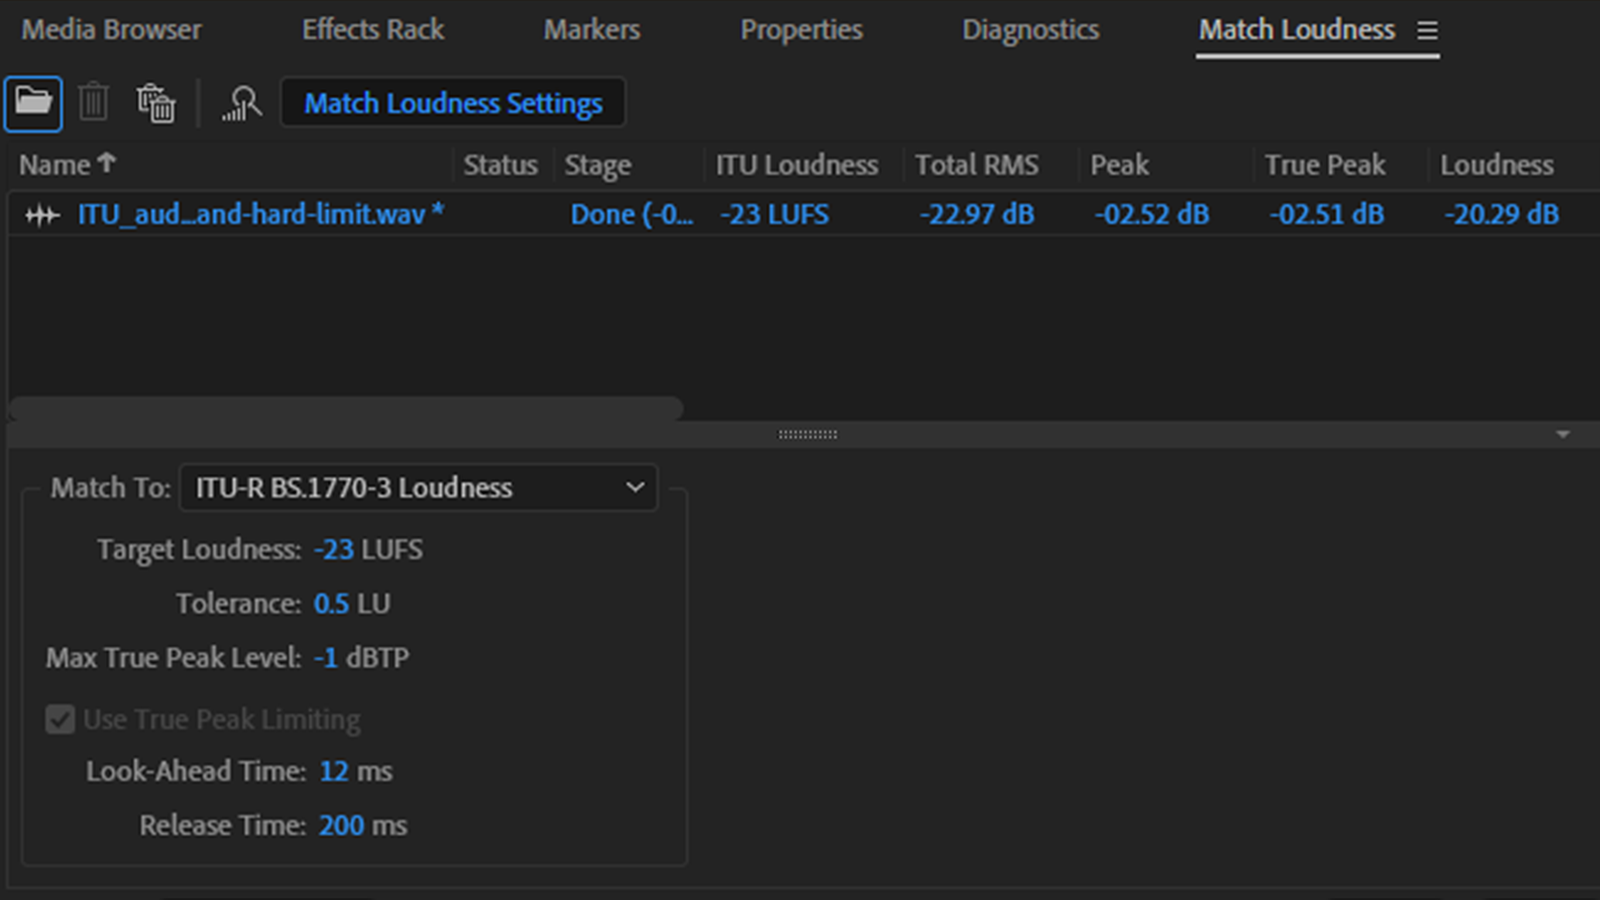
If you just want to run the audio analysis, you can toggle the Export function off before hitting Run, and this will give you a breakdown of the audio file and the changes that will be made once you commit. For more information on broadcast audio specs, check out Jeff Hinton’s article.
Pick your export format
There’s a bunch of export formats available but, for your mastered audio, the common standard is uncompressed WAV, whether you’re on PC or Mac. Just pick the sample rate and bit depth settings that correspond to your recording settings, hit the OK button, and your newly-minted voiceover is ready to ship to your editor.
In conclusion
Like I said at the beginning of this series (if you can remember back that far), this is by no means the only way to get to where you’re going when it comes to voiceovers. So if you think I’ve missed anything, or would like to add some tricks of your own, throw a comment in the section below. Thanks for sticking with me all the way to the end, and good luck with your vocal career!

